We know that to create a Livebase plugin we need to have a minimum of knowledge of OSGi environment and perform a series of steps to configure the bundle, many of which can be automated with Gradle scripts. This requires a lot of expertise, so we have prepared a set of basic projects already configured to allow you to start developing a plugin immediately.
Three basic projects are currently available from this BitBucket repository:
- Single plugin (mono-bundle): the simplest and lightest configuration. Ideal if you only need one plugin for your Cloudlet, or if you are new to Livebase plugin development.

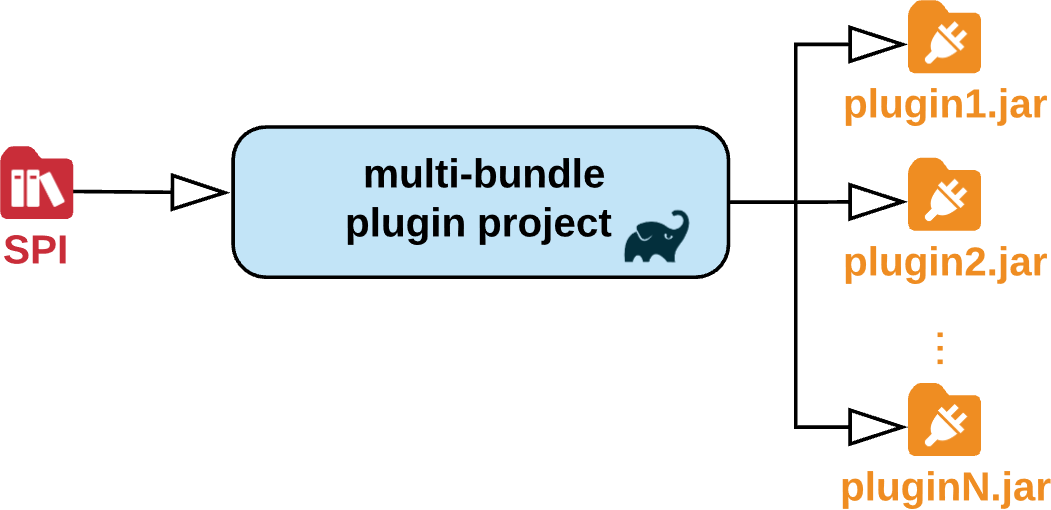
- Multi plugin (multi-bundle): a more flexible template that allows you to make several plugins for a single Cloudlet. It is a Gradle multi-project consisting of a root project, which contains the common configuration, and as many leaf projects as plugins you want to produce.
- Multi plugin preconfigurato per jOOQ (multi-bundle-jooq): It is also a multi-project, preconfigured to use the jOOQ framework that facilitates access to the Cloudlet database.
Project setup #
First, download the .tar.gz archive corresponding to the desired base project and extract its contents into a folder.
If you previously downloaded the SPI of your Cloudlet, copy it to the lib/cloudlet folder inside the project root and rename it to spi.jar. If you want to place the SPI in a different folder, and/or give it a different name, edit the SPI_LOCATION and SPI_FILENAME properties in the gradle.properties file.
If you import the base project into an IDE that has Gradle support, such as Eclipse, you will notice that the root project is identified with the name specified by the rootProject.name property in the settings.gradle file. Leaf projects will be named in the format <rootProjectName>-<projectName>.
To include external dependencies and libraries for the root project or a leaf, open its build.gradle and edit the dependencies section:
- compile dependencies, i.e. dependencies needed to complete the plugin but not required to be included in the plugin, such as the Cloudlet SPI, should be in the form
compileOnly "<group>:<name>:<version>"; - dependencies that must be included in the plugin bundle must be in the form
implementation "<group>:<name>:<version>"; - test dependencies, needed to run automated tests, should be in the form
testCompileOnly "<group>:<name>:<version".
If the dependency is not hosted in a repository, but is an external library available only locally, the corresponding jar needs to be placed in the project’s lib/ folder.
After completing these configuration steps, generate the Gradle wrapper: by doing so, Gradle will use the version compatible with your project regardless of the one actually installed on your machine, avoiding portability issues. If you’re on Linux, open the shell and run ./gradlew wrapper under the project root; if you’re on Windows, run gradlew wrapper.
Finally, if the IDE you intend to use for your project is Eclipse, run ./gradlew eclipse in the project root to have Gradle generate the necessary files, then import them into Eclipse. To have Gradle resolve the dependencies specified in the build scripts, right-click on the project and select Gradle > Refresh Gradle Project.
Build process #
Once you have provided an implementation for each interface of the SPI that represents a handler, open the root of the project in a shell and run the command ./gradlew build. By doing so, Gradle will compile the code, run all the automated tests defined in it, generate OSGi blueprints, include the libraries marked as implementation, and finally produce an OSGi bundle in the output directory.
Gradle-generated bundles are named according to the format <projectName>-<spiVersion>, where <projectName> is the project name as stated in the Gradle files, and <spiVersion> is the value of the SPI_VERSION property in the gradle.properties file. If you want to change the format of the bundle name, change the value of jar.archiveName in the allprojects section of build.gradle.
The jar produced by the build operation will have this structure:
archiveName/
├── packages/
│   └──.../
├── OSGI-INF/
│   └── blueprint/
├── META-INF/
│   └── manifest.mf
└── lib/
- The
OSGI-INFfolder contains the blueprints generated by the Annotation Processor; - The
META-INFfolder contains the jar manifest, including the list ofimplementationdependencies that have been added to it; - the
libfolder contains the jars for theimplementationdependencies.
Basic projects #
In the following sections, we will look in more detail at the three basic projects offered by Livebase: mono-bundle, multi-bundle and multi-bundle-jooq.
Mono-bundle #
The basic mono-bundle project is recommended if only one plugin needs to be installed on the Cloudlet; it has the following structure:
root/
├── lib/
│   └── cloudlet/
├── src/
│   │   ├──main..
│   │   └──test..
│   └── build.gradle
├── build.gradle
├── settings.gradle
├── gradle.properties
└── pluginConfig.gradle
Multi-bundle #
If you need to implement several plugins to run independently on your Cloudlet, it is recommended to use the basic multi-bundle project. The project has the following structure:
root/
├── lib/
│   └── cloudlet/
├── plugin1/
│   ├── src/
│   │   ├──main..
│   │   └──test..
│   └── build.gradle
├── plugin2/
│   ├── src/
│   │   ├──main..
│   │   └──test..
│   └── build.gradle
├── build.gradle
├── settings.gradle
├── gradle.properties
└── pluginConfig.gradle
The base project only includes the two sub-projects plugin1 and plugin2, but you can add more by following this procedure:
- create a new, properly structured Java project within the root project. If you are using Eclipse, right-click on the root project and select
New > Other...; from the next menu selectGradle > Gradle projectand follow the wizard; - open the
settings.gradleof the root project and add the name of the new project to theincludelist; - If you are using Eclipse, refresh the project to update its structure.
Within the IDE, each sub-project will be identified by a name in the format <rootProjectName>-<projectName>.
Plugin and utility projects #
A multi-project accepts two types of sub-projects: plugin and utility.
A plugin project translates to an OSGi bundle and can be either a Cloudlet plugin itself or a simple class bundle that can be referenced by others. To give the nature of a plugin to a sub-project, add the following dependencies to build.gradle:
def processorLib = 'com.fhoster.livebase:cloudlet-spi-annotation-processor:+'
dependencies {
  compileOnly spiLib
  compileOnly "org.slf4j:slf4j-api:${SLF4J_VERSION}"
  compileOnly "org.slf4j:slf4j-log4j12:${SLF4J_VERSION}"

  compileOnly processorLib
  annotationProcessor processorLib
}
The utility projects contain shared code and support libraries. They can be added as a dependency of a plugin project to be included in its bundle at build time; for this you need to add the following line to the dependencies section of the relevant build.gradle:
implementation project(":${rootProject.name}-<YourUtilityProjectName>")
References between bundles #
A bundle can reference packages from other bundles: to do this, you need to add their names to the commonImports and imports arrays, which are located in the ext section of the root project’s pluginConfig.gradle file and in the build.gradle files of each subproject, respectively.
Packages in commonImports will be included in all sub-projects, while those in imports will only be included in the relevant subproject.
Multi-bundle-jooq #
If you need to make plugins that access the Cloudlet database, you can use the basic multi-bundle-jooq project. This is its structure:
root/
├── lib/
│   └── cloudlet/
├── jooq-utils
│   ├── src/
│   │   ├──main..
│   │   └──test..
│   └── build.gradle
├── jooq
│   ├── src/
│   │   ├──main..
│   │   └──test..
│   └── build.gradle
├── plugin1
│   ├── src/
│   │   ├──main..
│   │   └──test..
│   └── build.gradle
├── build.gradle
├── settings.gradle
├── gradle.properties
└── pluginConfig.gradle
The project includes jOOQ as a tool to access the Cloudlet database, and is already configured to use it.
jOOQ is a Java framework that, using a code generator, is able to map a database into a set of classes that can be used to formulate queries in the same Java language, thanks to a special DSL (Domain Specific Language).
This project contains a utility sub-project called jooq, which provides the following Gradle tasks:
generateDB: creates a local replica of the Cloudlet’s database, using thestructure.sqlfile included in its SPI;generateJooqClasses(akajooq): connects to the Cloudlet database and reverse-engineers its schema to generate jOOQ objects;cleanJooqClasses(akacleanJooq): removes all previously generated jOOQ objects;dropDB: removes the local replication schema of the Cloudlet database.
Once the Docker container is up, place your Cloudlet SPI in the lib/cloudlet directory and run ./gradlew generateJooqClasses. jOOQ will generate the sources needed to access the database items and place them in the src/main/jooq directory.
The base project includes an additional utility sub-project called jooq-utils, which contains a number of features to be used in conjunction with jOOQ-generated sources.