In the previous episodes #
We realized a simple model for managing master data and generated the first version of our Livebase application. The system for now consists of a single application view (Application) that allows to manage objects belonging to Employee, the only class present in our database.
Evolutionary Maintenance #
In this lesson we continue to work on the previous model by making small incremental changes to the Employee class: we will model missing information and improve the quality of the data.
This is a good time to talk about evolutionary maintenance: we are about to make an intervention that will modify the model of a pre-existing application and database. In these situations, it is important to avoid introducing inconsistencies in the database or regressions in the running application; fortunately, Livebase offers several solutions to transparently manage model updates without compromising the integrity of the underlying database.
Database/model alignment #
As we’ve seen, the Designer checks in real time that the model we draw is valid and consistent. When a model is installed on a Cloudlet, Livebase also checks that the model structure ’ described in the Database Schema ’ is compatible with that of the database in the Cloudlet. In case of incompatibility, Livebase alerts us by describing the problem and automatically proposes, when possible, an action to solve it.
The alignment problems we will encounter will generally be of three types, classified according to their severity:
- Low severity issue: Problem that can be solved automatically by Livebase without data loss;
- Medium severity issue: problem that can be solved automatically by Livebase, but in some cases results in data loss;
- High severity issue: severe alignment issue that cannot be resolved automatically and prevents Cloudlet from starting.
At any time you can consult compatibility errors from the database panel of a Cloudlet, which you can access by clicking on its icon () from the Dashboard. Also, this will show a different warning depending on the type of the issue, yellow for low severity, orange for medium and red for high.
Handle alignment problems #
We try to modify TutorialEngine to introduce alignment problems with the Workforce database.
1. Save the engine in the library #
Before making changes to an engine it is good practice to archive the current version, especially if ’ as in our case ’ it is installed on a Cloudlet with a non-empty database. To do this, drag the TutorialEngine icon and drop it on the Engine Library. In the dialog that opens you can enter a description of the engine and change the comment for the version, which by default will be Archived from cloudlet 'Workforce'.
It is not necessary to stop the Cloudlet to archive its engine.
2. Edit the engine #
Before modifying the engine you have to stop the Cloudlet: from the Dashboard, click on Stop in its box and check that its status has changed to Stopped.
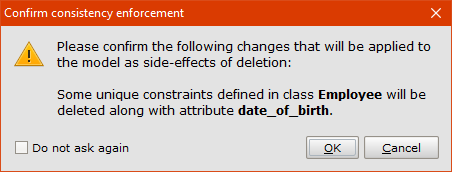
Let’s try to make destructive changes: open TutorialEngine in the Designer and delete the attribute date_of_birth from Employee by selecting the Delete option from its Attribute menu or by pressing Del.
A dialog will appear warning that the unique constraint we defined for Employee has been removed along with the attribute, as it includes date_of_birth. Click OK: along with the attribute now the icon of the uniqueness constraint has disappeared () .
Save the engine and close the Designer to return to the Dashboard. The Workforce status has changed to Cannot start (engine/database mismatch) and an orange warning has appeared on the database icon, indicating that we have introduced at least one medium severity issue. Open the Database panel, and look at the contents of the Engine compatibility issues tab:
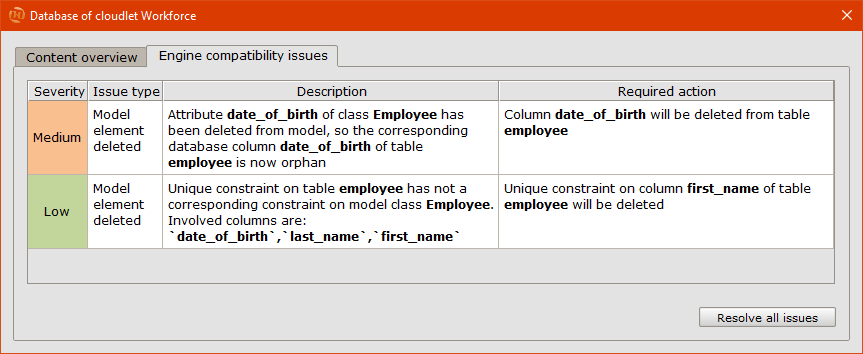
There are two issues related to removing items from the model; for both Livebase describes the problem and the proposed action to automatically align the database. The first issue is medium severity, as removing the date_of_birth column from the employee table would result in deletion of the stored values for the attribute in question from the objects we have inserted into the database.
The second issue on the other hand is low severity and has no effect on the objects in the database.
3. Restore the engine #
We have deliberately made a mistake; now let’s see how to solve it without losing data by using a stable version of the engine. For the moment don’t click on Resolve all issues. Instead, close the Database panel, right click on it, select Delete and click OK to confirm the deletion of the database. Once this is done, delete the “broken” copy of TutorialEngine on Workforce; then drag the copy stored in the library and drop it on the Cloudlet. In this way, the engine is restored and the issues disappear.
Edit the data model #
Let’s continue working on the single Employee class and model more attributes to track more information about our employees. Open the Designer by clicking on TutorialEngine and make sure you are in the Database Schema .
1. Add new attributes #
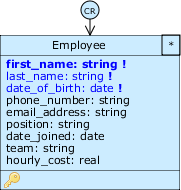
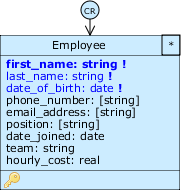
Add attributes to Employee by clicking on New attribute from the Class menu and defining them as follows:
| Attribute | Function |
|---|---|
email_address: string | The employee’s email address |
position: string | Its role in the company |
team: string | The name of the team he belongs to |
date_joined: date | The date he was hired |
hourly_cost: real | Its hourly cost |
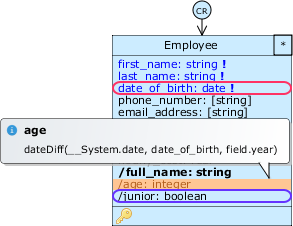
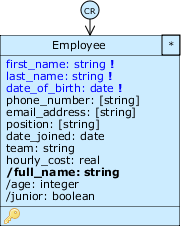
The resulting class should look like in the figure. Be careful to choose the right data types: date_joined is of type date, while hourly_cost is of type real, since we also want to include decimal places. You can sort the list by simply dragging and dropping the individual attributes to the position you want.
2. Restrict the attributes domain #
Currently, you can enter any value for all attributes; for example, nothing prohibits you from entering an invalid email address. However, we can define restrictions on the domain of allowable values for attributes.
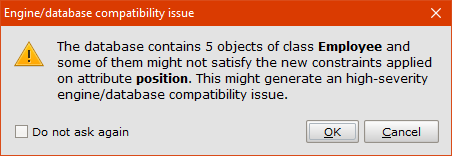
After closing the Domain Editor, the Designer warns us that this domain restriction could generate alignment problems for pre-existing objects; this danger is averted, since position has just been created and is not required. Click OK to confirm the changes.
Notice how the position attribute has changed in the class, which is now displayed with square brackets around the type: [string]. We now impose constraints on the set of allowable values for the phone_number and email_address attributes as well:
- We assume that the phone number is a string ’ because we allow symbols such as
+@, @-@, @(@ and @)’ in addition to numeric characters, and its maximum length is 20 characters. Open the Domain Editor for phone_number, specify20in theMax lengthfield, and then clickOK.
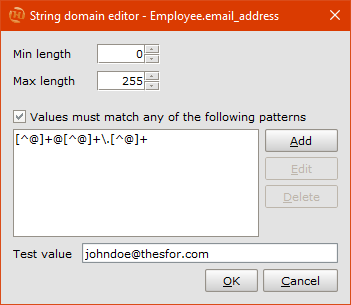 For email_address, we want it to respect the right format and be something like utente@example.com. We certainly can’t define a set of constants, since almost infinite combinations are allowed. Instead, we can specify a pattern encoded in a regular expression. Open the Domain Editor for email_address, check
 Value must match any of the following patterns, and clickAdd. From the string pattern editor, selectRegular Expressionfor thePattern Typefield, and in the space below copy and paste this regular expression:[^@]+@[^@]+\.[^@]+.
To verify that the domain works properly, enter test values in the Test value field, such as johndoe@thesfor.com, aaa@bbb, ccc.org. The first value is accepted, while the other two are correctly rejected as ineligible. Click OK and return to the Designer. The resulting class from these changes should look like this.
3. Define a complex object title #
When we save a model, the Designer sets the first attribute of a class as its object title by default, in case no other attribute has been specified. Right now the object title of Employee is first_name, and it is in fact what appears in the breadcrumb when we examine an object in the application; however, we want both the first and last name to appear.
Since only one attribute can be set as the object title at a time, we have a problem that cannot be solved by making use of the “simple” attributes seen so far; however, we can take advantage of this situation to introduce derivative attributes.
The value of a derived attribute doesn’t exist in the database, but is calculated at the application level from the value of the other attributes; the calculated value is displayed in the application along with the other attributes - which we’ll call native attributes from now on to distinguish them. We can then create an object title in the form of a derived attribute to concatenate the values of first_name and last_name.
The Designer provides a special function to create an object title: holding Ctrl, select first_name and last_name and ’ from the Attribute menu of either ’ select Create object title to open the Math expression editor.
In this case, the panel already shows an expression concat(first_name, " ", last_name) and reports at the bottom Expression validated as STRING. This means that the attribute will be a string containing the concatenation of the employee’s first and last name, including a space for the two values.
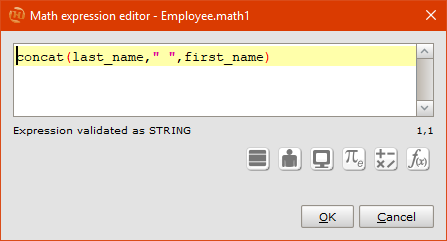
For now, let’s not worry about the other aspects of the editor; click OK to confirm and close it.
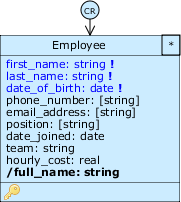
A new attribute /title has appeared in the class: the character /, placed in front of its name, indicates that the attribute in question is derived. Moreover it has already been set as object title, so it appears in bold. Since it contains the full name of the employee, rename this attribute to /full_name. In the application, for example, the breadcrumb for employee John Doe will be John Doe and no longer John.
4. Add new derived attributes #
The object title we just defined is an example of a computed attribute, defined using a simple expression based on string concatenation. Computed attributes are one of two types of derived attributes we can define, and are also called attributes of type math. The other type are attributes of type query, which we will discuss later.
In general, the expression defining a math attribute can be quite complex: the Math expression editor allows us to define expressions, which can be computed by referring not only to the attributes we define on classes (including other derived attributes), but also to additional reserved or system attributes. There are in fact three categories of reserved attributes available for each class, identified by the prefix __:
- Platform attributes: attributes automatically managed by Livebase; they contain metadata about the class objects, such as the unique identifier (
__id) and creation date (__createdon). By default, they are not shown in the Database schema; to enable these attributes on a class you need to open the Class menu and select the attribute from theNew platform attributeentry; - System properties: attributes that belong to the system as a whole (
__System), such as current date and time (__System.datetime); - User properties: attributes pertaining to the current Cloudlet user, who has an open session and is working on the data (
__CurrentUser); includes information about his profile (__CurrentUser.username,__CurrentUser.firstName,__CurrentUser.email) and his permissions (__CurrentUser.isAdmin,__CurrentUser.teamand others).
We define derived attributes for Employee: for example, we want to distinguish newcomers from the rest of the employees by age and time spent at the company. We don’t have any information about the age of the employees, but we can deduce it from their date of birth and define a derived attribute age.
From the Class menu of Employee select New derived attribute ’Math to reopen the Math expression editor, whose text area appears empty this time. We need to type a formula that calculates the difference in years between the current date and the date of birth; to do this, we have two alternatives: type it manually or select the attributes from the editor menus. Let’s take a quick look at them:
opens the list of attributes of the class for which the expression is being defined, in this case Employee. Includes any other derived attributes and enabled Platform attributes;
opens the list of User properties;
opens the list of System properties;
opens a list containing mathematical and logical operators;
opens a list of constants;
opens the function picker.
The function picker collects the functions that Livebase provides for defining expressions. Selecting a function from the list shows its description, which includes the parameters required as input with the corresponding data types. By clicking on Show Examples you can see examples of usage of each function.
In our case we need to manipulate dates: select Date from the Show field and select dateDiff(d1,d2,calendarField). Click Insert to close the Function picker and have the function appear in the text area of the editor.
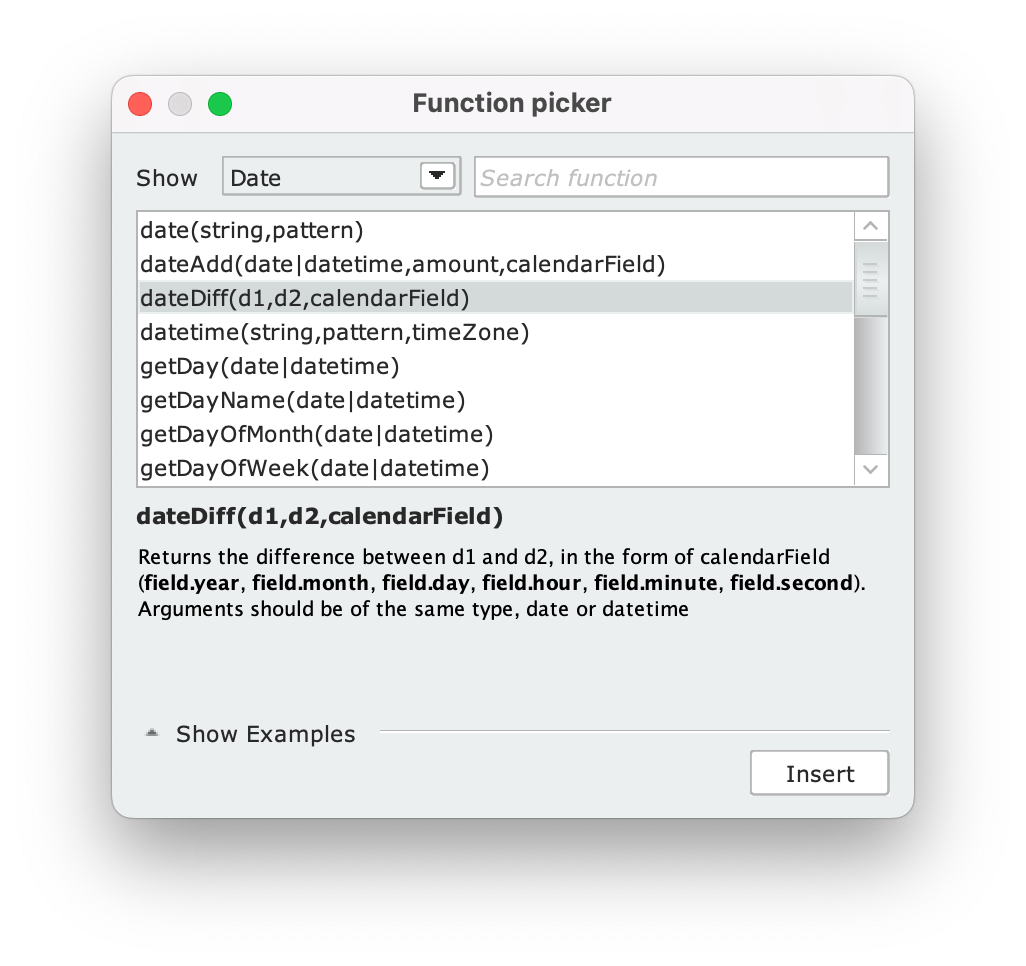
Now we need to replace the function’s placeholder parameters with the attributes we need: replace d1 with the current date (__System.date), double-clicking d1 and choosing date from the list of System properties. Similarly, replace d2 with date_of_birth by selecting it from the list of attributes. Finally, write field.year instead of calendarField.
At the end of the insertion all errors should be gone, replaced by the message Expression has been validated as INTEGER. Click OK to close the editor and rename the new attribute /math1 to /age ’ of type integer.
Now you can define ’ in a similar way ’ the attribute /junior, of type boolean, true if the employee is less than 25 years old and if he is part of the company for less than one year; the expression to use is: age < 25 && dateDiff(__System.date, date_joined, field.month) < 12.
Let’s go back to the Designer and look at the changes made:
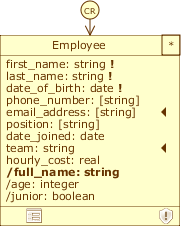
- by hovering over a math attribute, a tooltip appears with the expression that defines it;
- selecting a math attribute, all attributes of the class that are used to define it are circled in red;
- selecting any attribute, all math attributes defined from it are circled in blue.
For example, when clicking on /age, date_of_birth is circled in red because it appears in the expression of /age, while /junior is circled in blue because /age appears in the expression of /junior.
5. Verify the changes #
Let’s now verify the impact of this maintenance intervention on our Cloudlet. First, Save the model, close the Designer and observe the Workforce status: there are low severity issues that relate to the presence of new columns in the database following the addition of the new attributes. From the Database panel you can see that the issues only concern native attributes and not derived ones, consistent with what we said before.
Automatically resolve alignment issues – remember that for low severity it’s an optional step! – then start the Cloudlet and connect to the GraphiQL client. Look the new generated schema: the old services and data structures are still there, but new fields have been added to the Employee structure, one for each attribute, so that we can access them in our requests:
query EmployeePage {
  Employee___getPage {
    totalCount
    items {
      _id
      first_name
      last_name
      date_of_birth
      phone_number
      # new attributes:
      email_address
      position
      team
      date_joined
      hourly_cost
      # derived attributes:
      age
      junior
    }
  }
}
As you can see, the fields for the derived attributes Age and Junior are also present; values have already been calculated in both of them, because we inserted a date of birth for each employee. No one is junior, not only because no one is less than 25 years old, but also because the second condition of the expression is always false, since Date joined is absent for each record.
Let’s add a new employee junior, using the Employee___create mutation. Observe how the input data of type EmployeeCreate has changed: there are new fields for every attribute, except the derived ones.
Fill in the fields as in the following mutation. If you want, you can verify the correct functioning of the domain restrictions by trying to enter an invalid position, a phone number longer than 20 digits or an invalid email address: when you try to execute the request, the response will be an error with an explanatory message.
mutation EmployeeCreate {
  Employee___create(data: {
    first_name: "Ted"
    last_name: "Hawkins"
    date_of_birth: "12/12/2001"
    phone_number: "+39 333 1122333"
    email_address: "ted.hawkins@thesfor.com"
    position: "Software Developer"
    date_joined: "01/12/2022"
    team: "Thesfor"
    hourly_cost: "70.00"
  }) {
    _id
    age
    junior
  }
}
Execute the request: as you can see from the response, Ted Hawkins is 21 years old and has been employed for less than a year – assuming you are reading this tutorial in 2023 :). If not, try creating another employee with different values of Date of birth and Date joined to make the expression junior true.
Edit the application view #
So far we have always worked on the Database Schema . Instead, let’s see what we can do to add functionality and customize the appearance of our application view. From the Dashboard, stop Workforce and return to the Designer. This time, select Application from the Schemas tab to open its Application Schema .
The interface hasn’t changed much: the Employee class is still there, but it’s colored yellow; this means we’re looking at the class at the Application Schema level. Specifically, we’re in the application view named Application.
In the Overview we introduced Application Schema by stating that it allows us to partition the database. This partitioning is done by changing the manageability of portions of the database; basically, we can decide which database elements are managed (managed) in each application view by enabling or disabling classes, attributes in the relevant Application Schema.
In a view, a non-enabled attribute does not appear in the data structures of its class defined in the GraphQL schema, while a non-enabled class does not appear at all.
![]() For example, we can enable or disable an attribute of Employee by clicking on them when the pointer shows the icon in the figure: the disabled ones appear in gray. By clicking on the default class role, instead, you can disable the whole class.
For example, we can enable or disable an attribute of Employee by clicking on them when the pointer shows the icon in the figure: the disabled ones appear in gray. By clicking on the default class role, instead, you can disable the whole class.
For now, our model contains only one class and one application view so don’t disable anything before proceeding; we’ll come back to this topic at the end of the course.
At this level the footer and the items of the Class menu and other menus also change. As you hover over the class, clickable icons appear that allow you to access different panels, each related to an application aspect for that class; you can access these same panels from the Class menu. The aspects that can be modified are numerous, and to fully understand them we need a larger model. For now, let’s focus on the Class warning.
Set Class warnings #
In the first part of the lesson we imposed constraints on the domain of attributes at the database level; these constraints apply only to native attributes, not to derived attributes or platform attributes. For example, since /age is a math attribute, we have no way to control from the database that employees under the age of twenty are not included.
At the Application Schema level, we can still leverage Class warnings to impose constraints on an arbitrary number of attributes of any type. A Class warning is a validation rule based on a boolean expression: if the condition is verified, you can decide to prevent the user’s action or show a simple warning. In the first case we talk about blocked class warning.
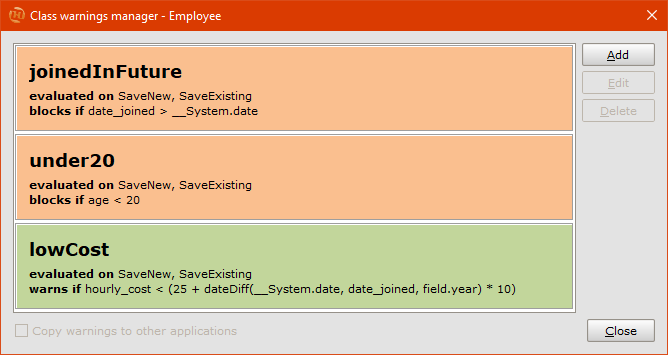
Let’s define some Class warnings for Employee. From the Class menu, click on Set warnings... to open the Class warnings manager. Click on Add to open the Class warning editor.
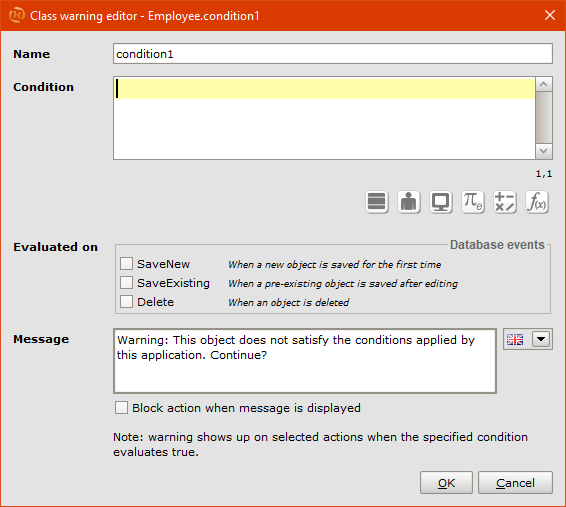
A Class warning consists of a unique name, a condition and a message that is displayed when the condition is met. The editor allows you to define the boolean condition through the Expression Editor. In addition, it is possible to choose in which situations to evaluate the condition, checking one or more events as in the figure, and finally to decide whether or not to block the user’s action.
Define the three warnings listed, adding them one by one by clicking on Add from the Class warnings manager:
- an employee cannot be under 20 years old: type
under20as condition name,age < 20as expression and in the message field writeEmployee's age is under 20!. CheckEvaluated on’SaveNewandSaveExisting: in this way the condition is evaluated when the user confirms the insertion or modification of a record. Finally, checkBlock action when message is displayedto make the condition blocking; - an employee cannot have been hired in the future: type
joinedInFutureas the name,date_joined>__System.dateas the expression, and write the messageInvalid assumption date. Check the same actions as above and make this condition blocking as well; - an employee’s salary must not be too low: suppose that the minimum salary must be appropriate with respect to seniority, expressed as the number of years spent at the company. Type
lowCostas name and use the expressionhourly_cost < (25 + dateDiff(__System.date, date_joined, field.year) * 10);write the messageHourly cost is too low with respect to the employee's experience., check the same actions but this time do not check Block action, so that the change is still allowed.
The Class warnings manager now looks like this:
Click Close to return to the Designer and save the model.
Database Schema
Application Schema
The Database Schema has not been minimally affected by the changes made in the Application Schema. As proof of the separation of these two levels we can see that no alignment issues have been introduced. You can verify the correct functioning of the default values and class warnings set trying to execute the creation of an object with invalid data (for example, an employee with less than 20 years or hired “in a week”).
Conclusions #
In this lesson, we modeled attributes computed from expressions (or derivatives of type math); we also increased the quality of representable data by imposing domain constraints at the database level and Class warnings at the application view level. Finally, we introduced the concepts of Database compatibility report and alignment issue related to the update of a model in presence of a pre-existing database structure.
Click on the button to download the model we made in this lesson:
In the next lesson… #
We momentarily interrupt our study of modeling to begin a brief digression on data management in the Cloudlet database: Import data from an Excel sheet.