In the Introduction and in Execution-environment we stated that:
- A plugin is the Java implementation of one or more interfaces defined in the SPI, generated from Service Handlers declared in an engine model.
For the sake of brevity, we will henceforth refer to Service Handlers as Handlers. - A plugin is a bundle that can be installed and run on a Cloudlet whose application is generated from the same engine model.
- Plugins and Cloudlets interact at runtime by publishing and searching services within the OSGi container.
In this article we will explain the steps that make up the development cycle of a plugin:
- Handlers modelling
- Configuration of the development project
- Code development
- Build and deploy
In the following diagram we have represented the environments and tools involved:
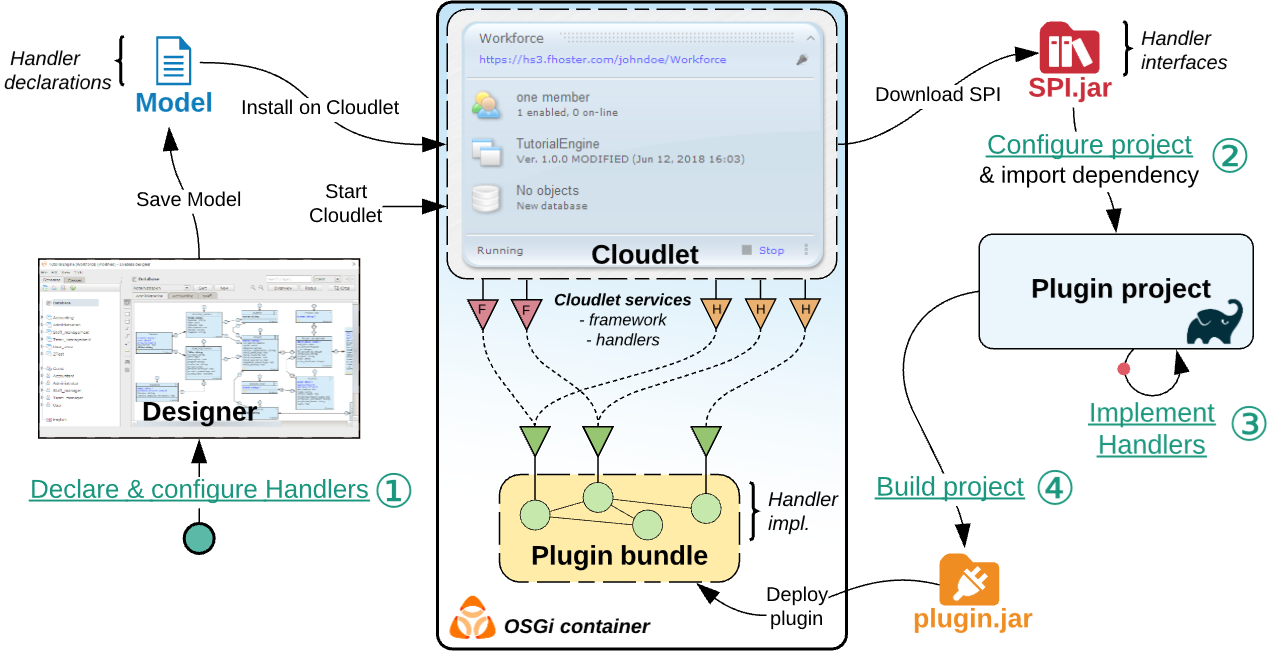
The development starts in the Designer, where we prepare a engine model for use with the desired Handlers; we continue in our IDE, where we configure the development project on which we will then implement the Handler interfaces (contained in the Cloudlet SPI jar) together with all the support code for our plugin. By building the project, we will get the output of the OSGi bundle jar that we will install and run on the Cloudlet.
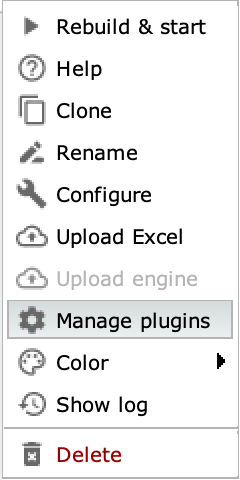
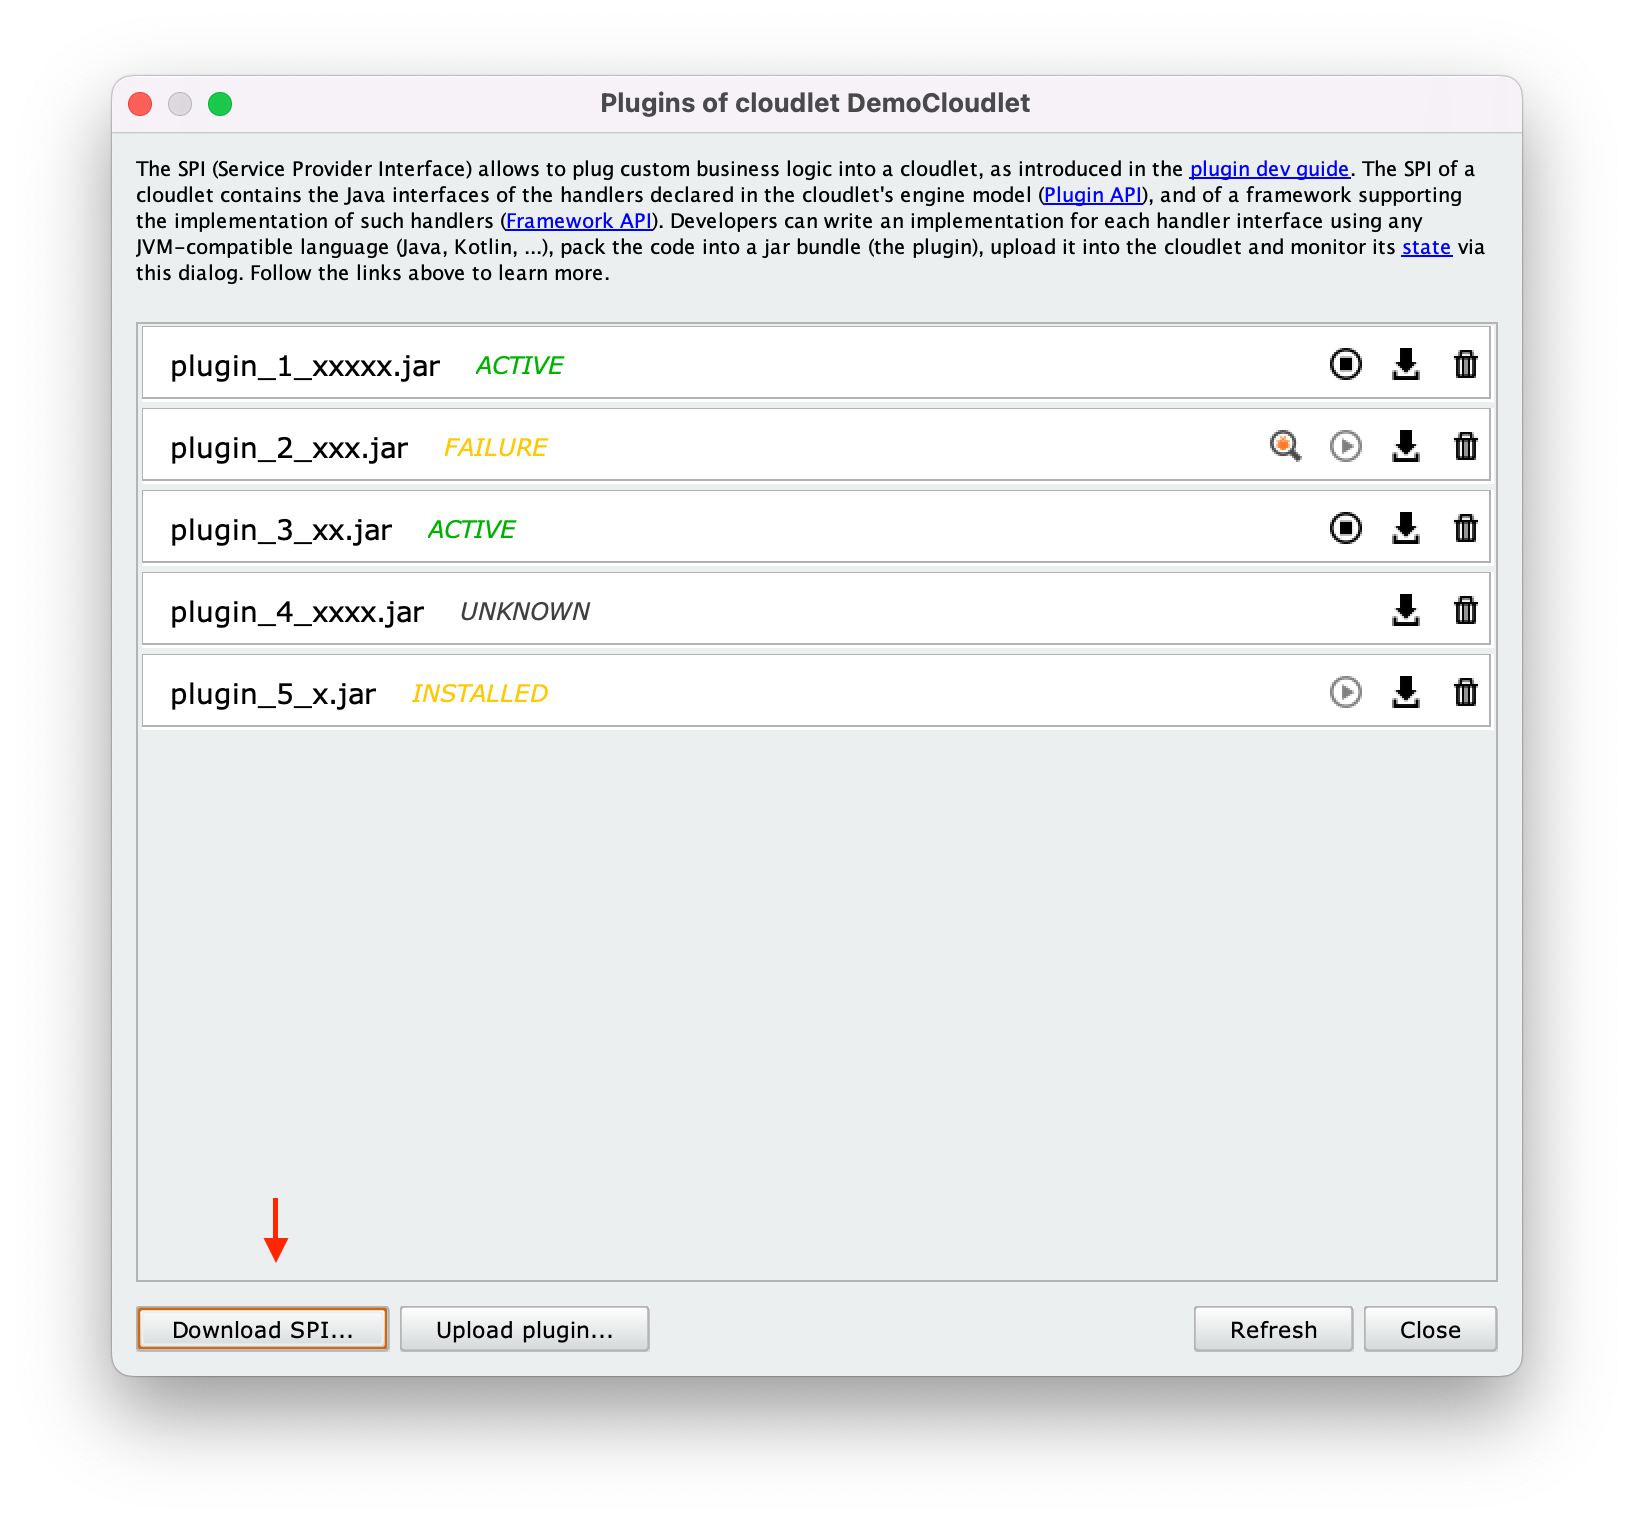
At the center you can see the OSGi container where the Cloudlet runs and that will host our Plugin after the deploy. The interconnection between the interfaces is automatically managed by OSGi after the start of the bundle. The functions to manage the deployment, start, stop and delete of the Cloudlet Plugins are available from the Dashboard in a special panel that we can access by opening the menu at the bottom right () and clicking on Manage plugins.
Handler modelling #
The first step is to choose which Handler to use. As we have mentioned, there are several types, each of which is distinguished by the context in which it operates (defined as “the point in the application where the Handler allows code to be injected”). Each Handler requires a different configuration in the engine model, which will be reflected in the SPI subsequently generated.
We can distinguish two groups of Handlers: those inserted within one of the data storage phases (edit, validate, commit transaction to database) and those that are called in response to custom events (click of a button, onChange of a form field, etc.); these events can also be modeled by customizing the Application Schema. We refer to the two groups of Handlers as Persistency Handlers and Interaction Handlers respectively.
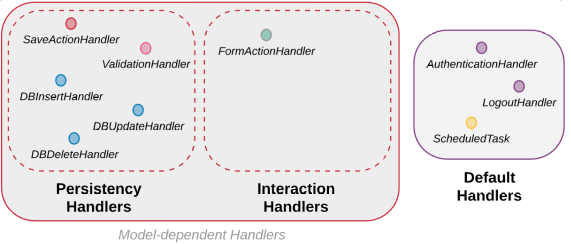
In addition to the two groups mentioned above (the model Handlers), there is a third group called Default Handlers; these are the Handlers offered by default by the Cloudlet, whose SPIs are therefore always generated regardless of the engine model. These include the Handlers inserted during the login and logout phases of Cloudlet members and the Scheduled Tasks.
To learn about all the Handler types and their configuration in the engine model we refer to the following article: Handler types and modelling.
Downloading SPIs #
Once you start the Cloudlet with the engine model configured with the Handlers, Livebase will generate the corresponding SPI interfaces; these will be contained in the SPI jar, which can be downloaded from the Manage plugins menu by clicking on Download Cloudlet SPI.
SPI jar and engine model update #
The SPI jar “binds” an engine model to its plugins. Therefore, every time you change some element of an engine model with Handlers and regenerate the application, it is very likely that a new version of the SPI jar containing the updated interfaces will be regenerated as well; the resulting mismatch may lead to compilation and/or runtime errors for plugins defined on the old version of the SPI jar.
For this reason, whenever you regenerate an application with plugins, you will need to:
- Download the new version of the SPI jar;
- Check for inconsistencies with the source code and resolve any compilation errors;
- Rebuild and install the plugins again.
Project configuration #
The complete bundle of a plugin must contain the following elements:
- (at least one) Package containing the Handler implementation compiled into .class files;
- (if any) Runtime support libraries for Handler implementation.
- A properly configured manifest.mf file to export the above packages and libraries to the OSGi container.
- A blueprint.xml configured to initialise services in the OSGi container.
The good news is that we can avoid having to manually manage much of the “bureaucracy” behind bundle configuration: a good practice is to build Gradle tasks that automatically do the OSGi configuration of our plugin. Going further, we can use Gradle to automate the build and packaging of our plugin, as well as automatically manage its dependencies.
Typically, a plugin development project is therefore a Gradle project that requires writing a build script. You don’t have to do any of this To make your life easier, we have made some basic projects available.
Code development #
Once you have chosen and properly configured a base project, you can immediately create classes and implement SPIs. Looking at the imported SPI jar, we can see that it contains all the Handler interfaces we defined in the model; these are contained in the com.fhoster.livebase.cloudlet package.
The names of the generated Handler Interfaces follow this pattern:
Spi{ClassName}{HandlerType}{HandlerName}
For example, a FormActionHandler called doStuff declared on the Person class will correspond to the SpiPersonFormActionHandlerDoStuff interface.
| Class involved | Type | Handler name | Interface to implement |
|---|---|---|---|
| Person | Insert | log | SpiPersonDatabaseInsertHandlerLog |
| Person | Update | myUpdate | SpiPersonDatabaseInsertHandlerMyUpdate |
| Person | Delete | myDelete | SpiPersonDatabaseDeleteHandlerMyDelete |
| Person | FormAction | doStuff | SpiPersonFormActionHandlerDoStuff |
With the content assist enabled in our IDE, we can type implements Spi and press CTRL+space to get a suggestion of all the available SPIs. The list also includes the default handler interfaces.
Once you’ve chosen an SPI, you must implement the methods it defines. For example, a (Form/List)ActionHandler defines a doAction() method, DatabaseHandlers define beforeCommit() and afterCommit() methods, a ScheduledTask defines a run() method.
Each method may have as parameter a context object, which allows access to elements of the application involved in the execution of the Handler, such as:
- open connections to the Cloudlet database. You can access the event-related connection by invoking the
getConnection()method, and use it to submit custom SQL queries; - Bean/Entity: representation of an object of an engine model class. Typically, handlers allow access to two versions of the entity:
- the version prior to the current change, by invoking the
getOldEntity()method, which will be accessible in read-only mode; - the version being edited by invoking the
getNewEntity()method, which will be accessible while both reading and writing if the handler allows it.
- the version prior to the current change, by invoking the
- Member: representation of the Cloudlet user involved in the event, accessible with
get__CloudletCurrentUser(); - the current session: allows CRUD operations classes among those accessible by the member that triggered the event. Depending on the Handler, the session can be accessed in its immutable version (by calling
getCloudletImmutableEntitySession()) or mutable version (getCloudletEntitySession()).
Each method requires defining a result that will determine which action will be executed by the Cloudlet when the Handler invocation is completed; this result must be built from the context, invoking the result() method on it and executing in a chain a further series of invocations depending on the requested action. For example, the doAction() method of a FormActionHandler can return context.result().withMessage().info("hello") and display the “hello” message in the form of the class it was invoked on. Eventually we can also decide not to perform any action at the end of execution, by returning context.result().none().
Code supporting SPI #
All the interfaces and classes supporting the methods defined in the SPI (including the various contexts) are also included in the SPI jar, under the com.fhoster.livebase.cloudlet package. Let’s consider for example a FormActionHandler defined on a Person class: since its context allows access to the object on which the Handler is invoked ‘with the get() method’, in the package we’ll have the Person bean/entity as well as all the possible bean/entities of the classes associated with it.
In addition to the context, during the execution of the Handler we have at our disposal several Cloudlet services. Currently the following are available:
- CloudletIdGenerator: allows unique IDs to be generated for a table record, which is essential in all scenarios where we want to add new objects to the database using plugins, as it ensures that they have a unique ID;
- CloudletDataSource: allows you to access the Cloudlet’s dataSource and directly to run a query in its database;
- CloudletMailSystem: allows you to send emails via Plugin;
- CloudletMemberManager: allows you to manage Cloudlet members via Plugin;
- CloudletSessionFactory: allows you to obtain an active session by simulating.
To use a service it is sufficient to declare it as a constructor parameter of the class implementing the Handler; the application will automatically perform the injection of the instance during the initialization of our Plugin.
The following is a complete usage example of Handler Implementation:
import java.math.BigInteger;
import org.apache.log4j.Logger;
import com.fhoster.livebase.CloudletScheduledTask;
import com.fhoster.livebase.cloudlet.CloudletIdGenerator;
import com.fhoster.livebase.cloudlet.SpiCloudletScheduledTask;

@CloudletScheduledTask(defaultCronExpression = "* * * * *")
public class MyScheduledTask implements SpiCloudletScheduledTask {
  private CloudletIdGenerator idGenerator;
  private static Logger logger = Logger.getLogger(MyScheduledTask.class);
  public MyScheduledTask(CloudletIdGenerator idGenerator) {
    this.idGenerator = idGenerator;
  }

  @Override
  public void run() {
    BigInteger id = idGenerator.get();
    String msg = "I generate pointless ids every minute. Current id: " + id;
    logger.info(msg);
  }
}
Notes #
The classes containing the handler implementations must be annotated appropriately, so that the Annotation Processor included in the base project can generate the blueprint of the Plugin, with all the Cloudlet services we have declared as constructor parameters.
In particular, these classes must be decorated with the @CloudletEventHandler annotation, except for those containing ScheduledTask implementations, which must be annotated with @CloudletScheduledTask, and those defining CloudletRestletPlugin, which require the @CloudletRestletServerResource annotation.
For more information, see the documentation of the Annotation Processor.
External libraries #
In the example above, we also used the Log4J library for logging the plugin within the application. In addition to the code available in the SPI jar, we can in fact use external Java libraries in our plugins by configuring the manifest via Gradle.
In particular, the logging library is included in the OSGi container, and therefore can be used in the same way as the SPI jar by declaring it as compileOnly and without having to include it in the output bundle. All other external libraries must be declared as implementation.
Read more #
To get a full description of the SPI, you can consult the Javadoc documentation specific to your Cloudlet (which includes the bean/entity model), which can be reached by adding /docs/index.html to the Cloudlet URL.
Project build and deploy #
Once the plugin code is implemented, we just have to to run the gradle build command. Gradle will compile and test the code, run the Annotation Processor to generate blueprints, collect dependencies, and generate an OSGi bundle.
The bundle will be located in output/ in the project root; the default name is projectName-spiVersion; we can change this by editing jar.archiveName in build.gradle and the gradle.properties file.
The resulting jar will have the following structure:
archiveName/
├── packages/
│   └──.../
├── OSGI-INF/
│   └── blueprint/
├── META-INF/
│   └── manifest.mf
└── lib/
OSGI-INFcontains the blueprints generated by the Annotation Processor.META-INFcontains the manifest.mf file which declares the project’s dependencies.libcontains the dependencies included in the project.
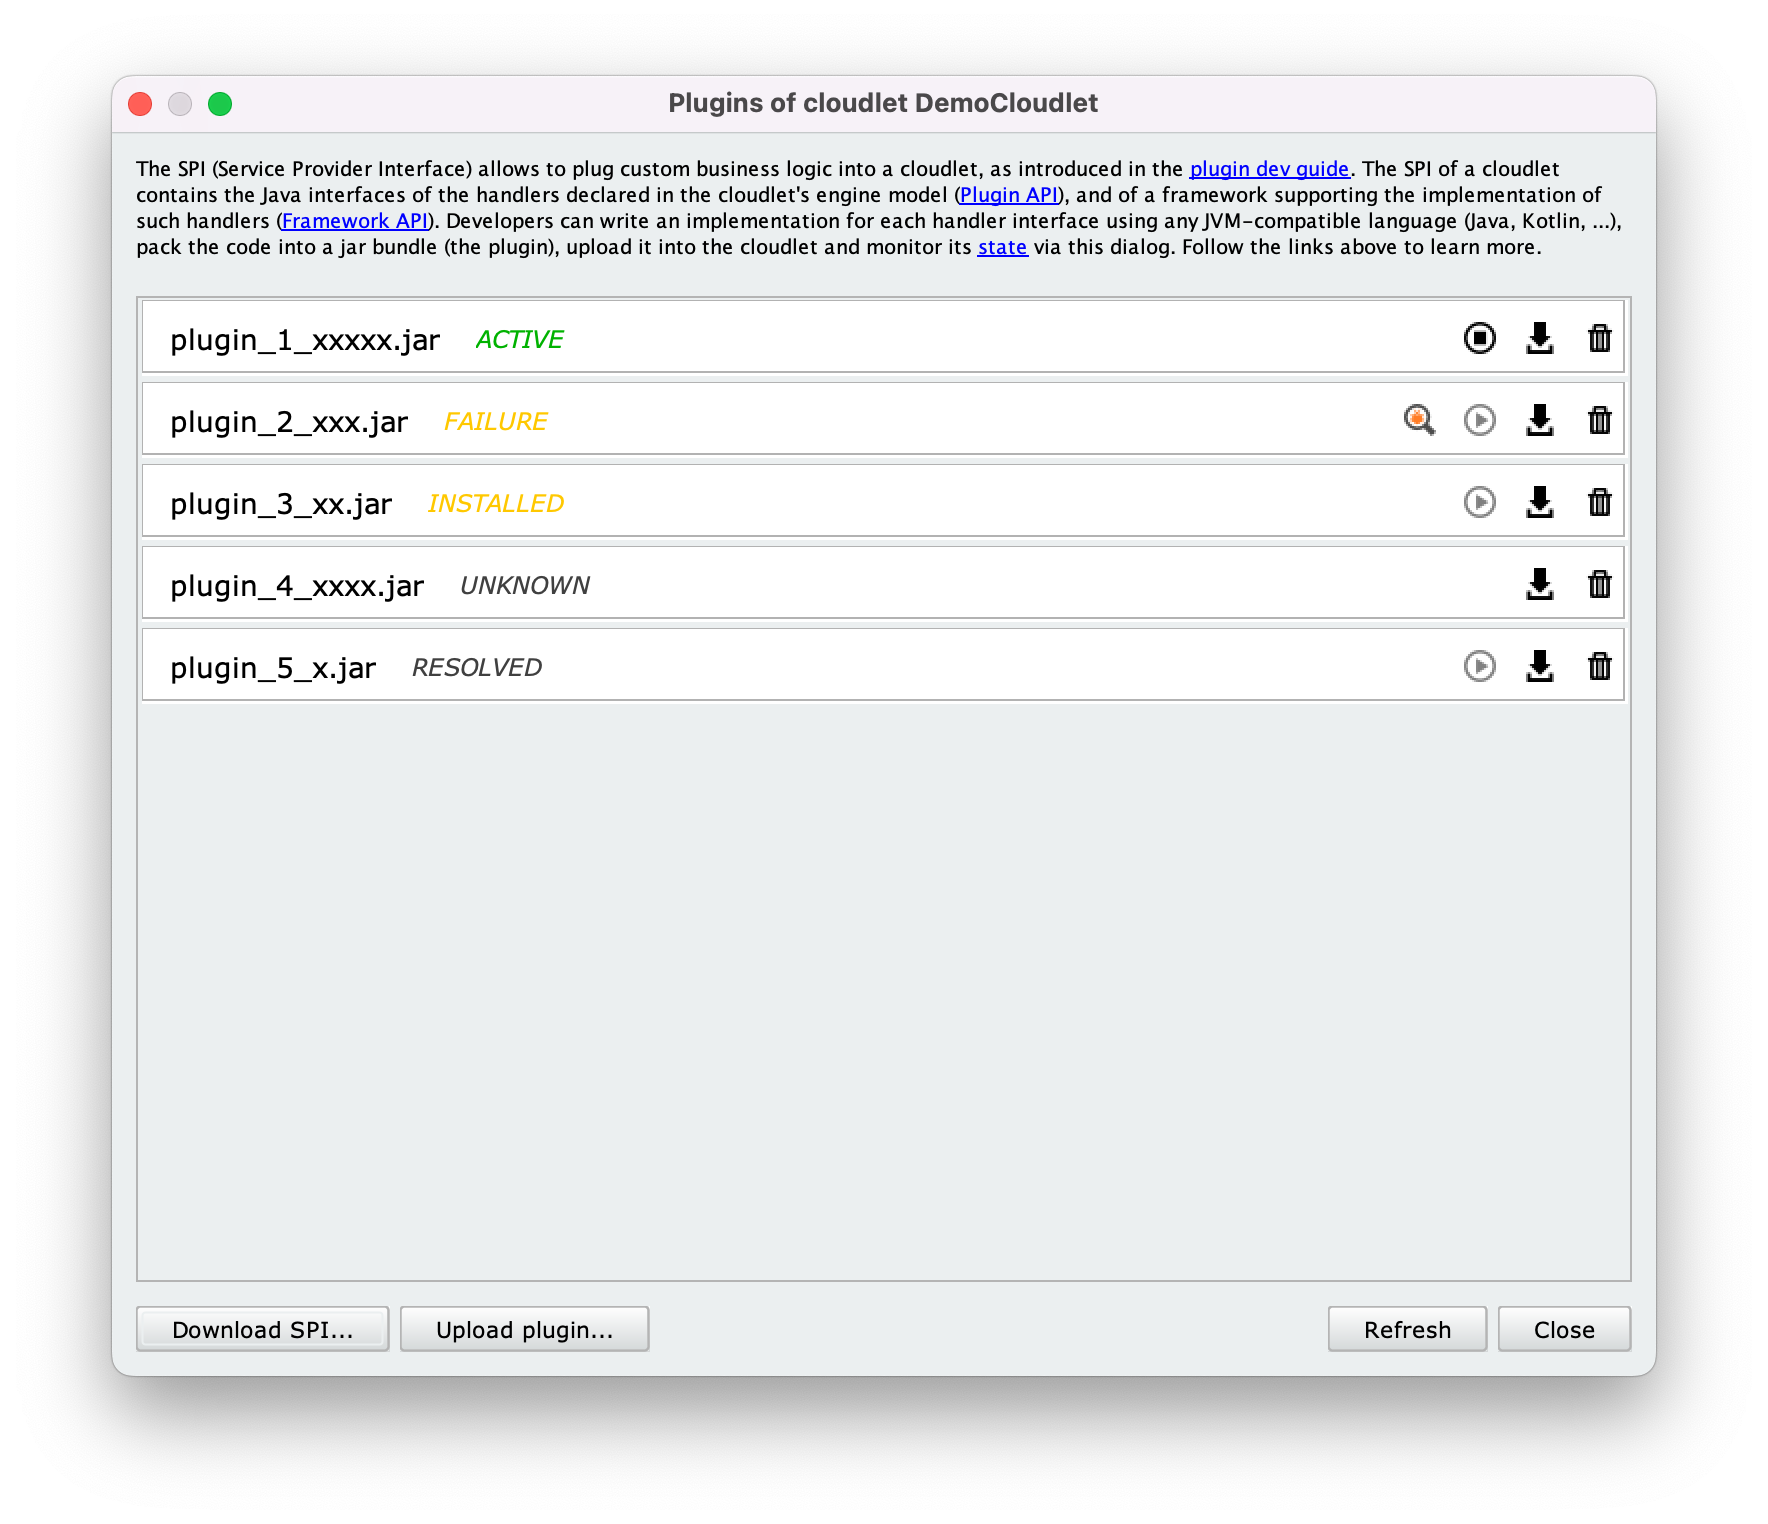
At this point we can open the Manage plugins panel of our Cloudlet, click on Upload... and select our Plugin; then click on Refresh: if the upload is successful, the plugin will enter the Resolved state. By clicking on the , the Plugin will be started and our classes will be instantiated on the OSGi service registry. By clicking on Refresh again, the Plugin will enter the Active state: from this moment on, our Plugin is running on the Cloudlet.
We can consult the Cloudlet logs to check, for instance, the execution of the ScheduledTasks.