In the previous lesson #
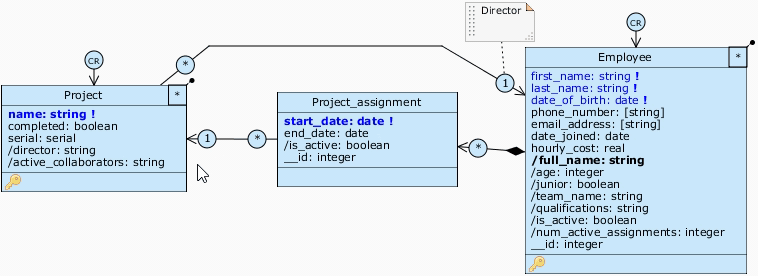
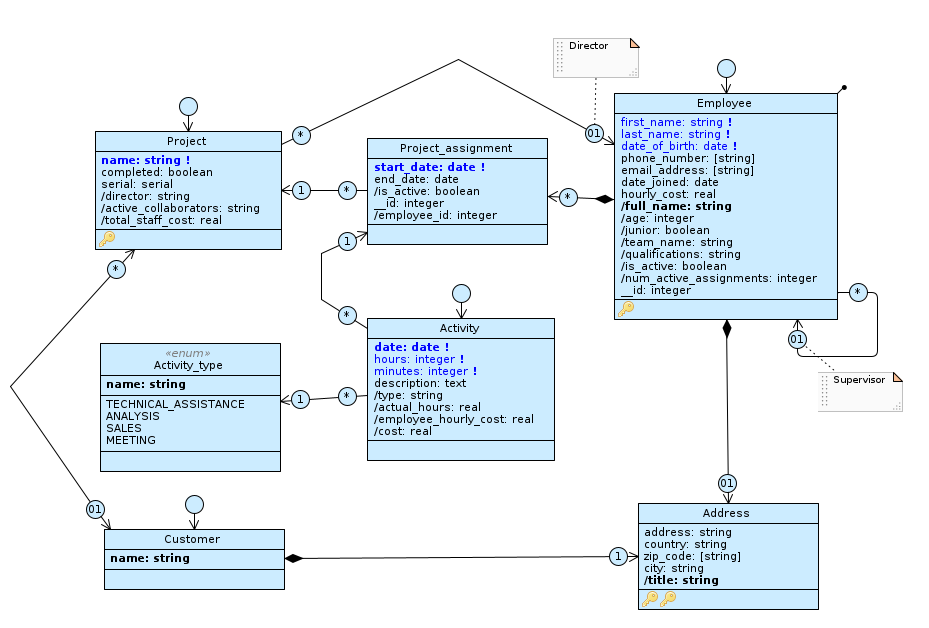
If you have correctly followed all the steps of the tutorial up to this point, the model should look like in the picture:
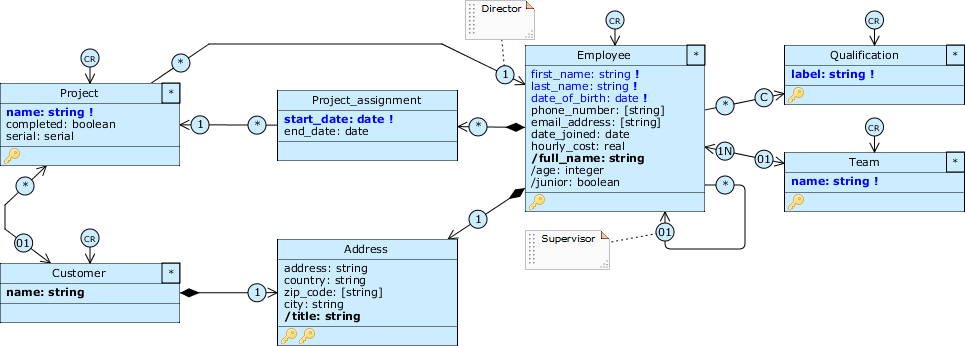
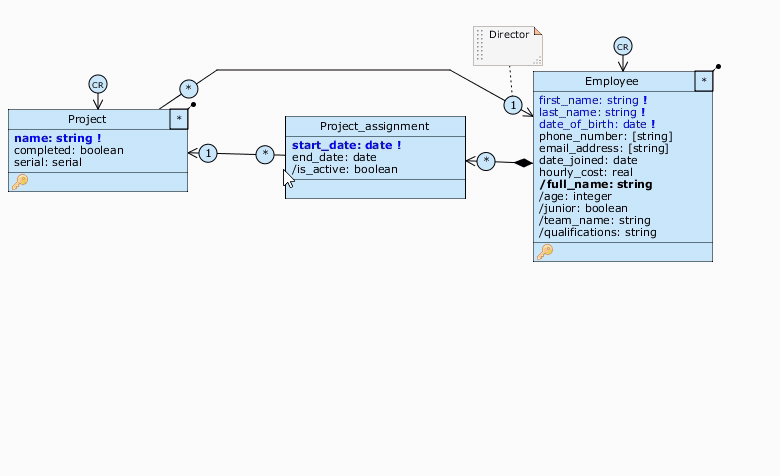
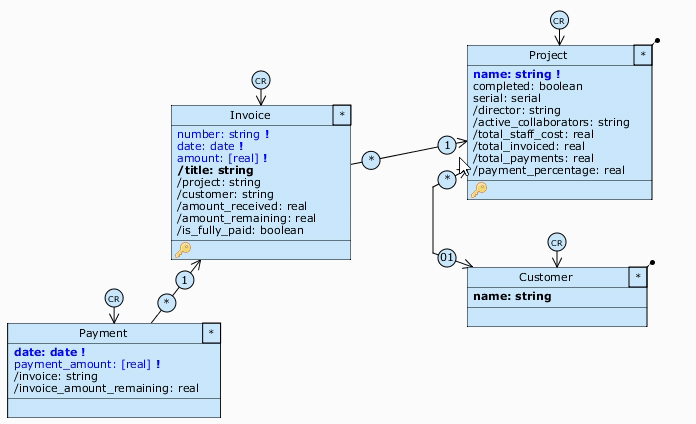
From the requirements point of view we have a system that allows to manage information about employees (personal data, organization in teams) and projects (name, status and client). Employees and projects are linked by some relationships (employees have assignments that link them to different projects, a project has at least one technical manager).
From the point of view of the modeling we have a quite complex model: we have introduced new classes and we have connected them through associations and compositions, characterized by different rules of navigability and multiplicity; the classes make moreover use of derived attributes of type math and personalizations of the Application Schema, between which values of default and class warning.
We have therefore achieved a good understanding of the modeling tools and techniques by proceeding in small doses on the requirements. However, the current model is still too focused on the Employee class and is missing information to complete the scenario.
Let’s complete the data model #
In this lesson we introduce two powerful Livebase tools: query attributes and application-level filters, Our goal is to equip the Project class with all the information needed for management control. We will have to take into account costs (including those of the staff) and revenues coming from customers’ payments, information currently not present in the model.
We will also see a new type of class: the class Enum, very useful to represent a set of objects with fixed properties and known a priori.
Stop Workforce. As usual, we recommend that you archive the current version of TutorialEngine before opening the Designer.
The query attributes #
When we removed the position and team attributes, modeling them as classes, we got the side effect of losing the field related to them from Employee’s object; this happened because the object resource only allows you to show attributes defined directly on the class.
It is of our interest to be able to display in the object also some attributes of the classes associated with Employee. To accomplish this we can make use of derived attributes of type query.
We have already seen what a derived attribute is; in particular we have worked with math attributes, defined from mathematical expressions. Expressions can only take as input values from attributes present in the class on which the derived attribute is declared. On the contrary, a query attribute depends on a query that extracts the value of an attribute present in a target class, connected through a relationship path. It is therefore a derived attribute that can depend on attributes in classes other than the one in which it is defined.
A query attribute is then defined by the path that binds it to the target attribute (analogous to a FROM). Moreover, as we will see shortly, the expression of the query can eventually include a filtering condition (analogous to a WHERE clause) and an aggregation operator (analogous to a GROUP BY or COUNT).
1. Add a simple query attribute #
Let’s create a query attribute that carries in Employee the name of the team the employee is part of: open the Designer, and from the Class menu of Employee select New derived attribute → Query to open the Query expression editor.
Under Path is a list of all attributes that can be reached from Employee by browsing its roles . From here we can select the attribute target of the query by expanding its path. Obviously, from this position it wouldn’t make sense to select an attribute of Employee, so they appear disabled. Each attribute type is represented with a different icon:
- native attributes: ;
- attributes math: ;
- query attributes: .
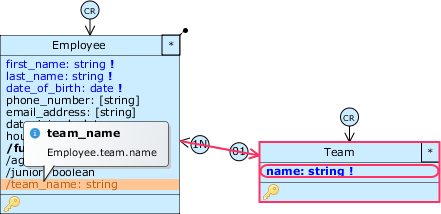
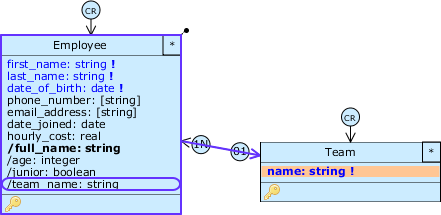
Expand the team role and select the name attribute. The path to the query (team.name) is shown at the bottom. Ignore the other options for now, so click OK to close the editor, and rename the /team1 attribute to /team_name.
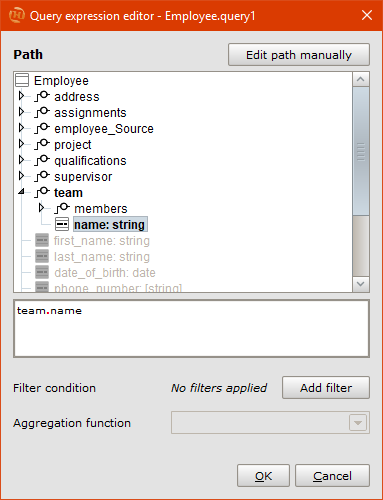
Similar to math attributes, passing the mouse over a query attribute shows a tooltip with the expression that defines it. If you select the query attribute, the corresponding target attribute is highlighted in red. Vice versa, selecting any attribute, all query attributes defined from it are also circled in blue.
This mechanism is important because it allows us to know the path taken by the query to reach the attribute. This information is not taken for granted because there may be multiple paths connecting the class on which the query is defined and the class pointed to by the query. The reachability of the classes does not depend on the navigability of the roles; in fact, it is sufficient that a relationship exists between two classes for it to be navigable in both directions.
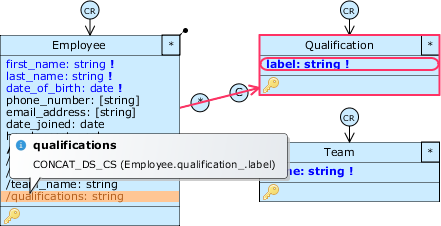
2. Add a multi-value query #
/team_name is a query attribute that spans Employee.team, a role with cardinality Zero or one (01) (an employee is part of at most one team); therefore its value will match the value of Team.name. Let’s see what happens if we try to bring in Employee also the attribute Qualification.label.
Drag label from Qualification to Employee: the Query expression editor opens again with the label attribute already selected. We’re going through a role with many cardinality, so the query extracts a set of values (all the employee’s qualifications) and not just one; so we need to determine how to aggregate these values so we can represent them in a single attribute. Look at the drop-down menu next to Aggregation function: several generic operators are available, plus some specific ones based on the data type of the source attribute. Let’s see them briefly:
| Function | Meaning |
|---|---|
| Count all | The attribute contains the count of records found. |
| Count distinct | As above, but does not include records with duplicate values. |
| Concat (comma separated) | The attribute is a string containing all the values of the found records, separated by commas. |
| Concat distinct (comma separated) | As above, but does not include records with duplicate values. |
| Max / Min | Returns the maximum/minimum value among the found records. |
If the source is a numeric attribute, additional operators are available:
| Function | Meaning |
|---|---|
| Sum | Returns the sum of the values of the records found. |
| Average | Returns the average value between those of the found records. |
| Standard deviation | Returns the standard deviation between the values of the found records. |
For boolean attributes we also have:
| Function | Meaning |
|---|---|
| Logical AND | Returns TRUE if all records are true, FALSE otherwise |
| Logical OR | Returns TRUE if at least one record is true, FALSE otherwise |
For Qualification we are interested in showing all of the employee’s qualifications; so choose Concat distinct (comma separated) and click OK to close the editor.
A query attribute with a very long name has appeared! This is because the Designer chooses the default name of a query in this way:
- if the role has cardinality to one, the default name is role_name_attribute;
- if the role has many cardinality, the default name includes the aggregation function used at the top;
- in either case, if the Source attribute is the only attribute of that class, roleName is omitted.
We rename /concat_distinct_comma_separated_qualifications, always remembering that attributes and roles share the same namespace for a class. Therefore, in this case we should restore the default name for the role qualifications: open its Role menu and select Reset default name: its name will be back to _qualification_. After that, rename the query to /qualifications.
The tooltip allows us to quickly distinguish the queries to one from those to many. For the latter, it also shows the aggregation function used (in our case CONCAT_DS_CS, that is Concat distinct ’ comma separated).
In this way we restored in the object Employee the view of the columns related to qualifications and teams, while keeping this information in separate classes.
3. Add queries with filtering options #
Now that we know how to use queries we can sophisticate the relationship between Employee and Project_assignment. An assignment can be considered “active” in two situations:
- when it has no end date, that is, when the value of end_date is null;
- when end_date is not null, but the current date is within the period between the start and end date of the assignment.
We represent this logic with a boolean expression: create the math /is_active inside Project_assignment by typing the expression isNull(end_date) || (__System.date >= start_date && __System.date <= end_date).
Having done that, we define the following query on Employee: “an employee is active if he has at least one active assignment”. First, drag /is_active from Project_assignment to Employee.
As you can see, since there are two possible paths connecting Employee and Project_assignment, the Query expression path selector has appeared; by passing over either path, all classes and relationships involved are highlighted in red. This is very useful, especially with multiple, complex paths. We want to traverse the composition, so choose the first path Employee.assignments.is_active.
We choose an aggregation function: since /is_active is boolean and an employee has multiple assignments, we can choose Logical OR; rename this attribute on Employee to /is_active as well (we can do this because /is_active of Project_assignment does not occupy the namespace of Employee).
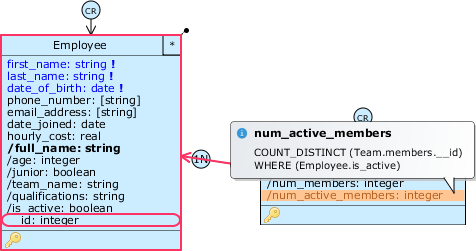
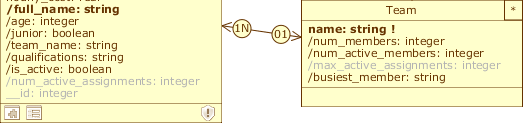
We now define queries on Team to provide some useful information about its members.
First, we can count the number of members of a team by going back to the members role; but which attribute of Employee do we choose for the query? Since we need a unique attribute, we can take advantage of the Platform attribute __id; enable it on Employee, and then drag it to Team. Choose Count distinct as the aggregation function (in these cases, Count is also fine) and rename the attribute to /num_members.
We then add another attribute to count the number of active members, i.e. those who have at least one active assignment. To do this, create another query by dragging __id from Employee to Team, but this time add a filtering condition from the Query expression editor: click Add filter and type the expression Employee.is_active. Use a Count distinct here as well, and rename the attribute to /num_active_members.
The rule we just added allowed us to make the query more specific: the employee count includes only those objects that satisfy the condition ’ that is, those that have the boolean /is_active equal to TRUE ’ while all others are filtered out.
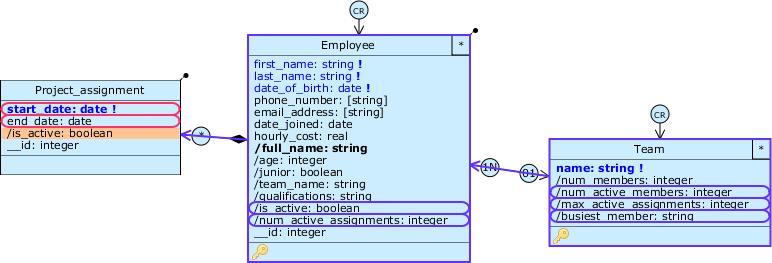
Now let’s try something more advanced: we want to show, for each team, the name of the most active employee, i.e. the one with the highest number of active assignments. Let’s proceed by three steps:
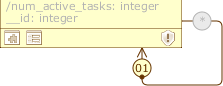
- we count the number of active assignments for each employee: enable the Platform attribute __id on Project_assignment, drag the latter to Employee (choosing the path
Employee.assignments.__id), impose the filter conditionProject_assignment.is_activeand aggregate withCount distinct; finally rename the attribute to/num_active_assignments. By doing so, we have a count similar to what we defined for /num_active_members on Team; - we store in Team the maximum value of the number of active assignments: drag /num_active_assignments from Employee to Team, choose the aggregation function
Maxand rename the attribute to/max_active_assignments. This will copy into Team the number of active assignments of the member who has the most; - at this point, drag the /full_name attribute of Employee to Team, and impose a condition with the expression
Team.max_active_assignments = Employee.num_active_assignments; aggregate withConcat distinct (comma separated)and rename the attribute to/busiest_member. By comparing with /max_active_assignments, we retrieve the other information of the team member who has that exact number of active assignments, whose first and last name we store; in case there are multiple employees sharing the maximum value, then /busiest_member will contain all their names, separated by a comma.
Clicking on /is_active of Project_assignment will highlight all queries that depend on this attribute, including those based on derivatives of derivatives.
Enable queries in the application view #
Before proceeding further, we need to make a small note. By default, Platform attributes such as __id are disabled, i.e. they don’t appear in the application view (we had mentioned the topic here); the consequence is that all queries defined from these attributes will also be initially disabled.
This may be fine for “intermediate” queries, such as /num_active_assignments or /max_active_assignments, since we have no interest in showing them in any tables; however, there are queries that we would like to show, such as /num_members, /num_active_members, and /busiest_member.
 To make these queries appear in the tables, switch to the Application Schema and re-enable only these attributes.
Selection filters #
Let’s go back to class associations and consider an aspect we didn’t cover in the previous lesson: as far as we know, it’s enough that there is an association between two classes so that the objects of one class can be associated with those of the other. Associability depends on the structure of the relationship, in terms of cardinality and role navigability; therefore, in relationships where it is possible, any two objects can be associated with each other.
Let’s now consider three scenarios that the model currently allows us to represent, but that would make little sense in reality:
- an employee can designate himself as supervisor (all he has to do is select his name);
- a project can have as director any employee, even one who has no assignment on it;
- an employee can have several assignments for the same project that overlap in time;
It is clear that, at the moment, the tools we master do not allow us to impose constraints to avoid these situations. In fact, in these scenarios, we want the associativity between employees, projects and assignments to depend on the value they assume, and not only on the cardinality and navigability of the relationships between their classes. We can achieve this goal thanks to Selection Filters.
The Designer allows us to define, similarly to the filter condition of the query, one or more conditions on the roles of an association; these conditions are intended to restrict the set of objects of the target class that can be associated through that role.
1. Add a simple filter #
Since record filtering represents a horizontal partitioning of data, we can only define Selection Filters at the application level; therefore, let’s switch to the Application Schema
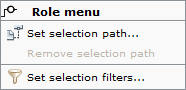
Let’s start by adding the first rule: open the Role menu of Employee.supervisor and select Set selection filters... to open the Role filters manager.
Click Add and type the expression Employee.__id != Employee.supervisor.__id in the editor. Before confirming, you can give the rule a symbolic name: for example, call it excludeSelf and click OK to close the editor.
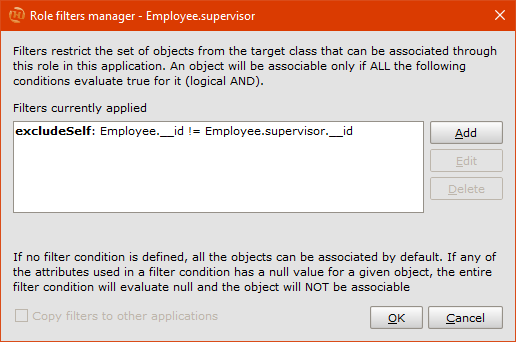
In this way we have defined a filter on the associables field for the supervisor role in the Employee object. From this list now does not appear in fact the relative record of the given employee; when the __id coincide, in fact, the condition is evaluated FALSE and that object will not be associable.
Close the Role filters manager and look at the diagram: on supervisor a black dot has appeared, indicating the presence of a selection filter for that role.
As you can see, the editor allows you to define multiple conditions for a single role. In these cases the filter will always evaluate the logical AND among all expressions.
2. Combine filters and query attributes #
Now that we’ve created a simple filter, we can reason about the other two problems:
Project → Employee #
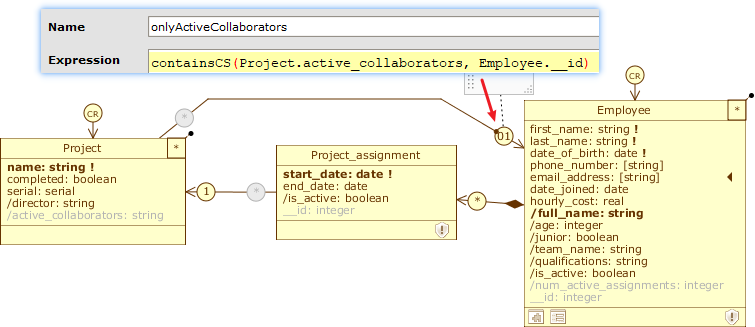
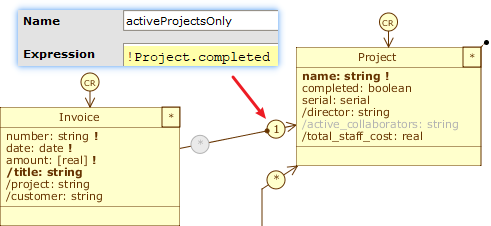
At the moment a project can indicate any employee for the director role; instead we want it to be possible to choose it only among the employees that have an active assignment for that project.
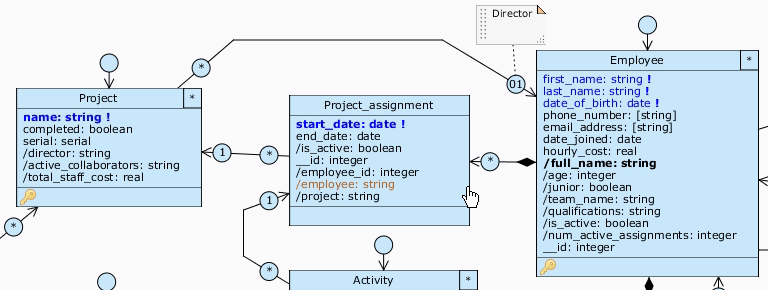
Let’s switch to the Database Schema . To show the name of the project manager directly from the Project table, we create a query to /full_name of Employee on this class: again, rename the role to director_ to make the identifier available; then drag /full_name through it (Project.director_.full_name); this path produces a single-value query, which we call /director.
A project needs to know which employees are working on it: create a query on Project by dragging Employee’s __id to this class, this time choosing the path that passes through assignments (Project.assignments.employee.__id); add the condition Project_assignment.is_active, aggregate with a Concat distinct (comma separated) and rename the attribute to /active_collaborators. In this way we store, for each project, a string containing all the __id’s of the employees who have an active assignment for that project. If one of these assignments ends, the __id of the related employee disappears from the list of active collaborators.
From the Application Schema , add a filter on the role Project.director_ calling it onlyActiveCollaborators, and typing the expression containsCS(Project.active_collaborators, Employee.__id). The containsCS function compares two strings and checks that the first one (a comma-separated list of values) contains the second one.
In this way, when from an object of type project we request the associables for director, the result shows a subset containing only the employees whose __id appears in the list of active collaborators for that project. All other objects have been filtered out because they do not satisfy the selection filter.
It is important to remember that projects initially have no active collaborators; therefore, when we create a new project, the list of the associables of director is always empty, and we are therefore initially forced to create a project without director (completing the association later). However, on the director role we have imposed a cardinality constraint Exactly one (1) which, if not satisfied, does not allow us to confirm the creation of any project! To unlock the situation we must necessarily release the constraint: from the Database Schema change the cardinality of _director_ in Zero or one (01).
The resulting filter appears as in the picture:
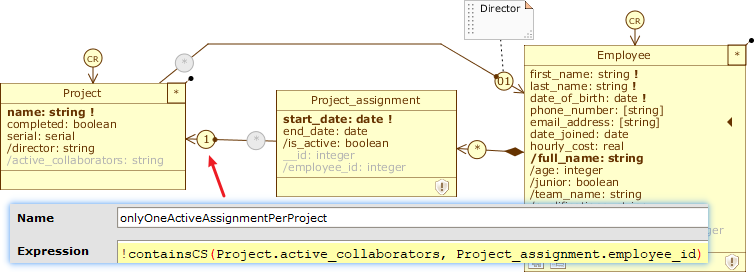
Project_assignment → Project #
Currently, a new employee assignment can be associated with any project, even if there is already an assignment associated with that project in the same time frame (it is an active assignment). So we want to prevent an employee from having multiple assignments at the same time for the same project, while still allowing them to have multiple assignments over time.
We can leverage the /active_collaborators query we just modeled to define a filter on the Project_assignment.project role. First, from the Database Schema drag the __id of Employee to Project_assignment (going by assignments) and rename the query to /employee_id. By doing so, we get visibility of the __id of the whole object directly inside its part objects. Then, from the Application Schema , add a filter on the project role called onlyOneActiveAssignmentPerProject, using the expression !containsCS(Project.active_collaborators, Project_assignment.employee_id).
Our goal here is to allow an employee to associate a new assignment with projects he hasn’t worked on yet, or has worked on previously, and instead hide projects for which he is already an active collaborator. We know that a filter always shows the records that satisfy its condition; in this case, however, we are interested in showing those that do not satisfy it, so we can prefix the condition with ! (not) in order to negate the result calculated by containsCS and reverse the logical meaning of the filter.
In this way, when from an object of a new assignment we request the list of the associatibles of the project role, the view compares the __id of the “father” employee of the assignment we are associating with the list of the active collaborators of each project, and shows all the projects where this __id does not appear.
Complete the data model #
Now that we know how to use queries and filters, we can move forward in modeling the remaining requirements for our application.
Before adding more elements, you may want to get the diagram in order. Here are some actions you can take:
- move a class by dragging it to its header;
- select multiple classes: by holding down Ctrl and clicking on their headers, or by dragging a selection rectangle over them. You can move the group by clicking on the header of any of the elements;
- select all classes in the diagram by pressing Ctrl+A;
- automatically_ align a group of selected classes vertically or horizontally by opening the Class menu of one of them and clicking
Align classes.; - add a fold on a report by clicking anywhere along it, and then dragging the roles and folds to give it the desired shape;
- remove a bend by right-clicking on it and selecting
Remove bend, or you can remove them all by selectingRemove all bendsfrom its Relation menu.
1. Model asset management #
We need to implement the management of staff costs, i.e. the employees who collaborate on a project. So far we know that each employee has an hourly cost (represented by hourly_cost) and is associated to a project through an assignment, which identifies a time window between two dates.
A first strategy would be to create an aggregate query on Project from Employee based in some way on the duration of the assignment. However, from the requirements, we know that we need to associate employees with the activities they perform relative to the projects for which they have an assignment. Therefore, we need to break down an assignment (a multi-day period) into smaller entities that track the activities performed within a single workday:
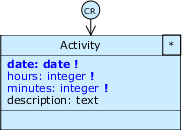
- Switch to the Database Schema and create the
Activityclass as in the picture: add a date, two integers to indicate hours and minutes and a text to note the description of the activity. date is the object title and is required, along with hours and minutes.
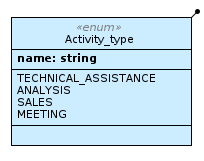
- Suppose there are several types of activities, such as technical assistance, analysis, sales, or meeting, and that these are all known a priori. We can model this concept using a Enum_ class, which admits as its instances a finite number of objects with known and immutable properties, identified through literal objects. Click on thebutton to create a new Enum class and rename it to
Activity_type, then right-click on it and selectNew literalto add a first literal to be renamed toTECHNICAL_ASSISTANCE. Repeat this to addANALYSIS,SALESandMEETING, until you have a class like the one shown opposite. You’ll notice that Enum classes are always created with a default attribute calledname, valued with one of the literals defined for each of its instances.
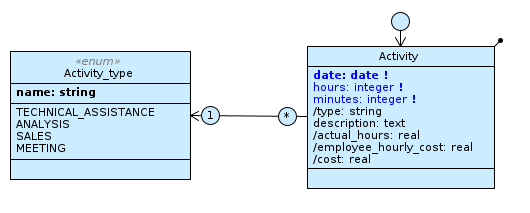
- Next, add a one-way association from Activity to Activity_type, rename the roles to
activitiesandtype_, and set the cardinality of the latter toExactly one (1). Finally, drag name to Activity and rename the query to/type.
- We associate Activity with Project_assignment: an activity refers to a pre-existing assignment, while an assignment consists of several activities performed over several days; therefore, add a unidirectional association from Activity to Project_assignment, rename the roles to
activitiesandassignment, and set the cardinality of the latter toExactly one (1).
Now that Employee is linked to Activity, we need to calculate the cost of each activity based on the hourly cost and total time spent by the employee on it:
- First, we aggregate hours and minutes: create a math on Activity by typing the expression
hours + (minutes/60)and call it/actual_hours. 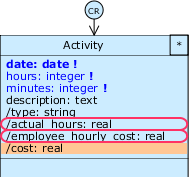 At this point, drag hourly_cost of Employee to Activity, choose the path
 Activity.assignment._employee.hourly_costand rename the attribute to/employee_hourly_cost: we’ll have a single-value query, because each activity reports to a single project_assignment, which in turn reports to a single employee.- Now you can use the expression
actual_hours * employee_hourly_costto define, on Activity, a math called/costthat calculates the cost of the individual activity.
Since each assignment is related to one project, so are its activities. So we can calculate the total human resource cost for a project by adding up the costs of all the activities associated with it. Drag /cost from Activity to Project, choose the path Project.assignments.activities.costs, aggregate with Sum and rename the attribute to /total_staff_cost. As you can see, this many query is a two-level sum, involving all assignments related to a project and all activities related to each of those assignments, from which it extracts the individual costs.
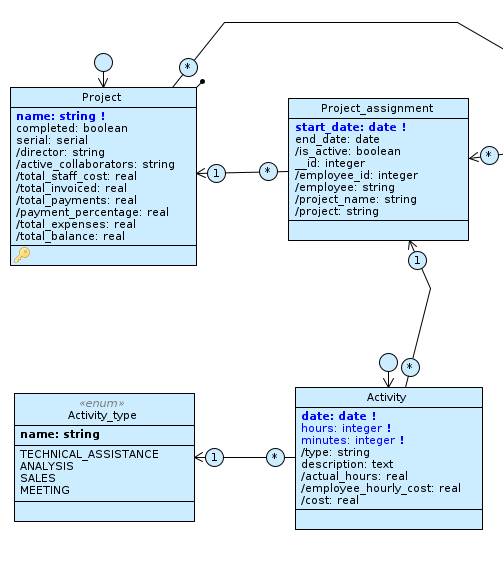
We have satisfied the first “goal” for Project, which is to have an aggregate indicator for staff cost. You can see the result in the picture:
Before proceeding further, let’s add some queries to enrich the Project_assignment class:
- drag Employee.full_name to Project_assignment via _employee_ and rename the query to
/employee; - drag
Project.nameto Project_assignment via _project_ and rename the query to/project.
In this way, when we associate tasks, we have a clear representation of the assignments, since the name of the employee and the project to which the assignments refer are shown; this last detail is also useful when we examine the assignments from an employee’s form.
Model the management of incoming accounting #
Let’s consider project accounting, starting with revenue. We expect to issue an invoice to the client of a project (Customer); in turn, the client settles the account, possibly splitting it into several payments.
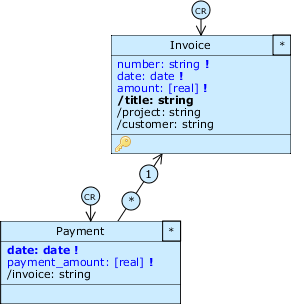
Let’s model a class that represents our invoices.
- Moving to the Accounting diagram, create the class
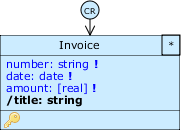
Invoicewith the attributes in the picture: each invoice has a number, a date, and an amount to be paid (expressed with a real number). Restrict the domain of amount to positive reals only by choosing a range between0andunlimited, set all three attributes to required, and create a compound object title that concatenates number and date using the expressionconcat(number," [",date,"]"). Finally, impose a uniqueness constraint on the number-date pair.
- We associate invoices with projects: add a one-way association from Invoice to Project, rename the first role to
invoicesand set the cardinality of the second toExactly one (1).
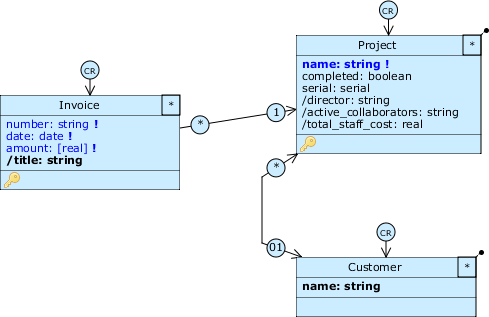
- Let’s create two queries to show, inside the invoice, the name of the project and the name of the eventual customer: drag both names from Project and Customer respectively, and rename them to
/projectand/customer.
- Let’s impose a simple rule on the role _Invoice.project_ so that an invoice can only be associated with a project if it is not yet completed. Switch to the Application Schema and create the
activeProjectsOnlyfilter with the expression!Project.completed.
As we mentioned, we want to keep track of invoice payments, which can occur multiple times for a single “account”.
- Create the
Paymentclass as shown in the picture: you can copy and paste the date and amount attributes from Invoice by selecting them (holding Ctrl), choosing theCopyitem from the Attribute menu of one of them and clicking onPastefrom the Class menu of Payment. Check date as the object title, and rename amount to payment_amount.
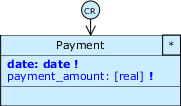
- Add a one-way association from Payment to Invoice, rename the former role to
paymentsand set the cardinality of the latter toExactly one (1). After that, drag /title of Invoice to Payment and rename it to/invoice.
We can record multiple payments for an invoice until the amount to be paid is paid off; therefore, when recording a payment for an invoice, we must take into account the amount already paid and the amount remaining, and prevent the user from entering an amount that exceeds the amount remaining. We proceed as follows:
- we sum the amount of payments received: drag payment_amount to Invoice, aggregate with
Sumand rename the query to/amount_received; - count the amount remaining: create a math attribute on Invoice with the expression
amount - amount_receivedand rename it to/amount_remaining; - drag /amount_remaining from Invoice to Payment and call it
/invoice_amount_remaining.
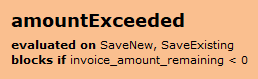
Move to the Application Schema and define a Class warning on Payment called amountExceeded with the expression invoice_amount_remaining < 0, which is calculated during a SaveNew and a SaveExisting; type the message “The declared amount exceeds the remaining amount to pay.” and make the warning blocking.
We prevent associating new payments with invoices that have been extinguished, i.e., whose remaining amount is zero:
- on the Database Schema , create a math attribute on Invoice with the expression
amount_remaining = 0and rename it to/is_fully_paid; - from the Application Schema , create a filter on the Payment.invoice role named
notPaidOnlywith the negated condition!Invoice.is_fully_paid.
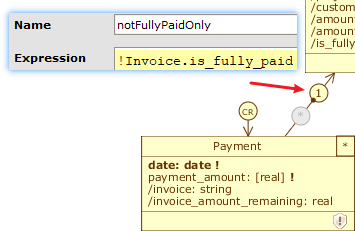
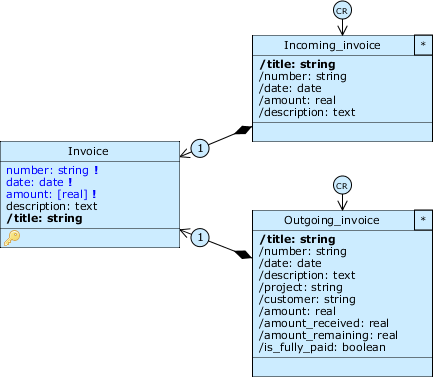
The two resulting classes now appear as in the picture.

Finally we can calculate the revenue for each project, for which we want to know both the total invoices issued and the actual payment status, in the form of a percentage:
- drag amount from Invoice to Project, aggregate with
Sumand call it/total_invoiced; - drag payment_amount from Payment to Project (via Invoice of course), aggregate again with
Sumand call it/total_payments. After that, create a math attribute on Project by typing the expression(total_payments * 100) / total_invoiced, and call it/payment_percentage.
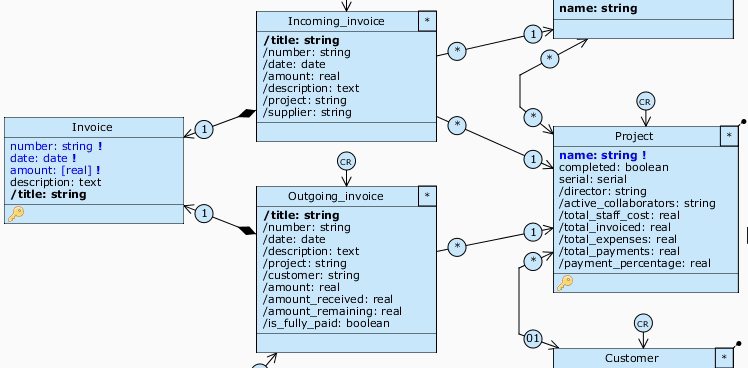
We have satisfied the second goal for Project, and now we have a record of the incoming revenue as well. You can see the result in the picture:
3. Model outbound accounting management #
The last factor to consider concerns all the external expenses that we can associate directly with a project, such as those relating to the purchase of materials and resources, the rental of tools, or the hiring of interns and consultants.
Let’s imagine that we want to record a certain number of invoices payable ’ relating to a generic “supplier” ’ and associate them directly with the project for which they were issued. In this way, for each project, we will be able to have at our disposal a figure for the total out-of-pocket expenses.
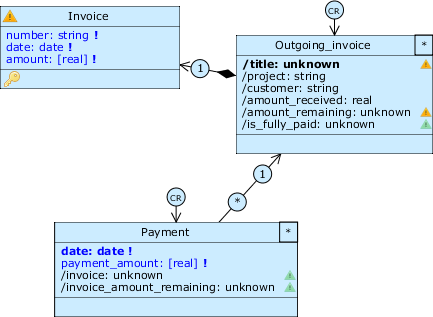
Observe Invoice: the class actually represents an outgoing invoice (or active): it is in fact related to a customer and has associated payments; we can’t reuse it in the new context and must instead introduce a new class. But let’s consider one thing: a generic invoice is still characterized by at least a number, a date and an amount. These attributes are already present on Invoice, so it may be a good idea to reuse these elements.
We then exploit to-one compositions and define a common structure to which we then associate two classes representing the two types of invoices:
- rename the current class Invoice: double click on its header and type
Outgoing_invoice; then create a new classInvoice, which will be our common structure; add a composition from Outgoing_invoice to Invoice, rename the part role todetailsand set its cardinality toExactly one (1); - move the attributes number, date and amount to the new class so that they appear in the nested form “details”, both for Outgoing_invoice and for the new class we are going to add shortly: holding Ctrl, select the three attributes, drag them to Invoice and click
Move here.
As you can see from the warning, this move is not free, since the attributes involved are sources of some math and queries. Don’t worry, we can solve these problems easily!
Click OK to confirm the move; we then proceed as follows:
- First we need a new object title for the two classes: delete /title from Outgoing_invoice and create a new compound object title on Invoice, concatenating number and date as before, with the expression
concat(number," [",date,"]"). Then drag /title from Invoice to Outgoing_invoice, selectLink here, rename the query to/titleand check it as object title. - Let’s add information to Invoice, also storing a description of the invoice: add a new attribute
description: text. 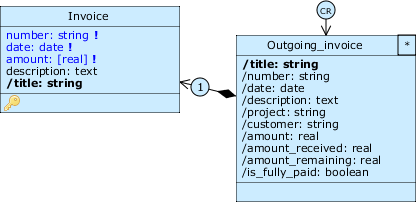 The math /amount_remaining requires that on Outgoing_invoice there is a of an attribute named amount: drag amount from Invoice to Outgoing_invoice, again select
 Link hereand rename the query to/amount. Similarly, let’s make the invoice details visible again by adding queries for/numberand/dateand the new/descriptionattribute.- At this point you should not see any warnings () on the three classes.
Now we can create a new class Incoming_invoice, also linking it to Invoice with a one-to-one composition as we did above. Again, rename the role of the part class to details and drag the attributes of Invoice into Incoming_invoice, checking the /title query as the object title.
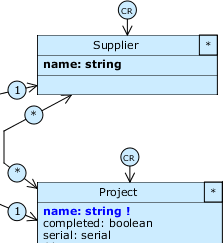
Let’s add a class to represent a generic supplier to associate this type of invoice with. Create a Supplier class with a single name attribute (which is also the object title) that indicates the business reason.
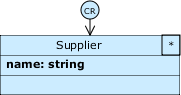
Directly link Incoming_invoice to Supplier with a one-way association, rename the former role to invoices and set the cardinality of the latter to Exactly one (1). Then, drag name to Incoming_invoice and rename it to /supplier.

We connect Incoming_invoice with Project with a many-to-one association, in the same way as Outgoing_invoice. To that end, rename the role of Outgoing_invoice to outgoing_invoices, and name incoming_invoices that of Incoming_invoice. Again, drag name from Project to Incoming_invoice and rename it to /project.

We define an activeProjectsOnly filter on the Incoming_invoice.project role, similar to the one already on Outgoing_invoice.project.
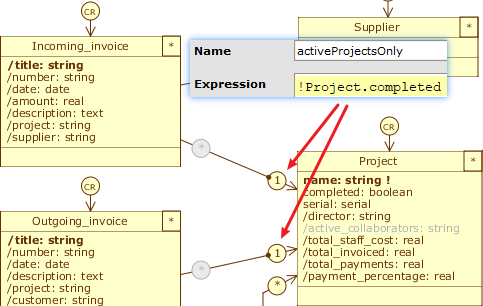
Finally, we connect Supplier to Project with a many-to-many bidirectional association, calling the respective roles suppliers and projects.
Assuming that we can associate several suppliers to several projects, we must ensure that we associate an incoming invoice only to the suppliers registered for that project. For this purpose we introduce a new tool: the Selection path editor. From the Application Scheme, open the Role menu of Incoming_invoice.supplier and select Set selection path...; a menu similar to the Query expression path selector seen above will appear. From here, select the first item Incoming_invoice.project.suppliers.Supplier to close the menu and have a dot appear on the role here as well.
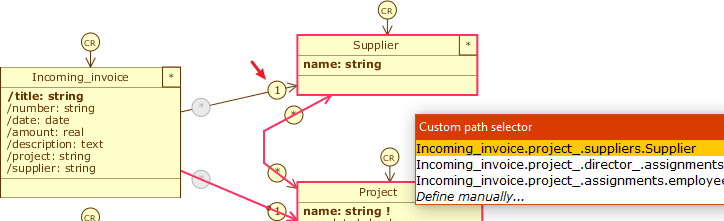
What we just did was restrict the set of suppliers that can be associated with an incoming invoice to only those suppliers associated with the project that invoice is associated with. In practice, when we insert a new incoming_invoice, initially the list of associables for supplier is empty, and it only populates after we have associated a project in the project role, allowing us to choose which supplier to refer to.
A Selection path is thus a quick way to declare a filter on a role based on a relationship path; in this case we were able to use it because we didn’t have to base the filter on any particular conditions, unlike what we did for the combined filters defined earlier.
Now we can calculate the expenses of each project: drag amount from Invoice to Project, being careful to choose the path Project.incoming_invoices.details.amount so that only the amount of passive invoices is considered. Aggregate with Sum and rename the query to /total_expenses. In this regard, we modify the attribute pointed by /total_invoiced so that it also refers to Invoice.amount: select Edit expression... from its Attribute menu and change the path to outgoing_invoice.details.amount.
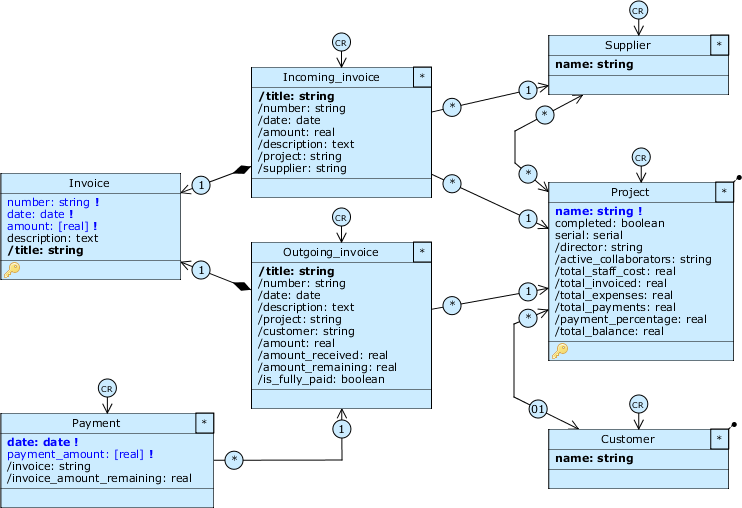
The paths to the two queries appear as in the picture:
4. Calculate the total budget #
We have satisfied the third and last “goal” for Project, and we can finally calculate the total_balance: create a math attribute on Project with the expression total_invoiced - total_expenses - total_staff_cost and call it /total_balance.
Now our Accounting diagram is complete and looks like in the picture:
The Accounting diagram.
To get an overview on a central class like Project we can create a diagram with all the classes of the model: to do this quickly, right-click on one of the two diagrams and select Clone; after that, show all the hidden classes by dragging them from the Classes tab or from the hidden relationships. Rename the new diagram to Administration.
Our data model is complete, and is represented in the following three diagrams:
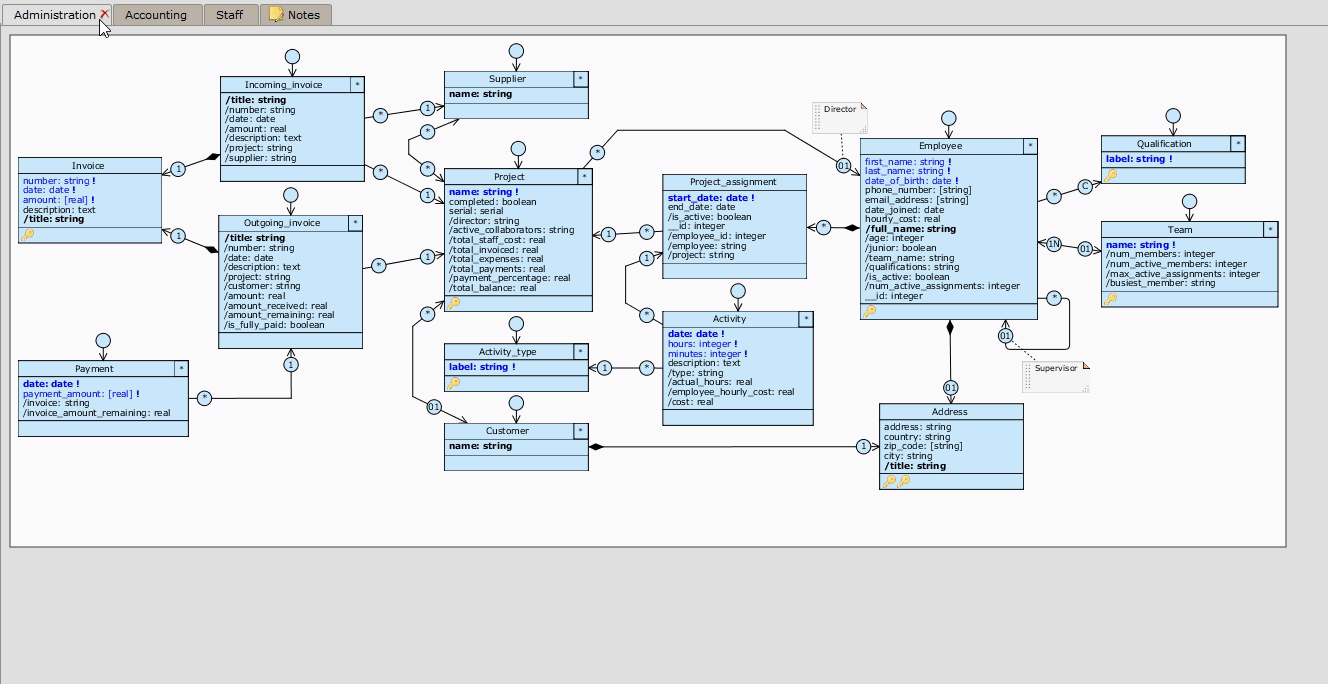
The Administration, Accounting and Personnel diagrams.
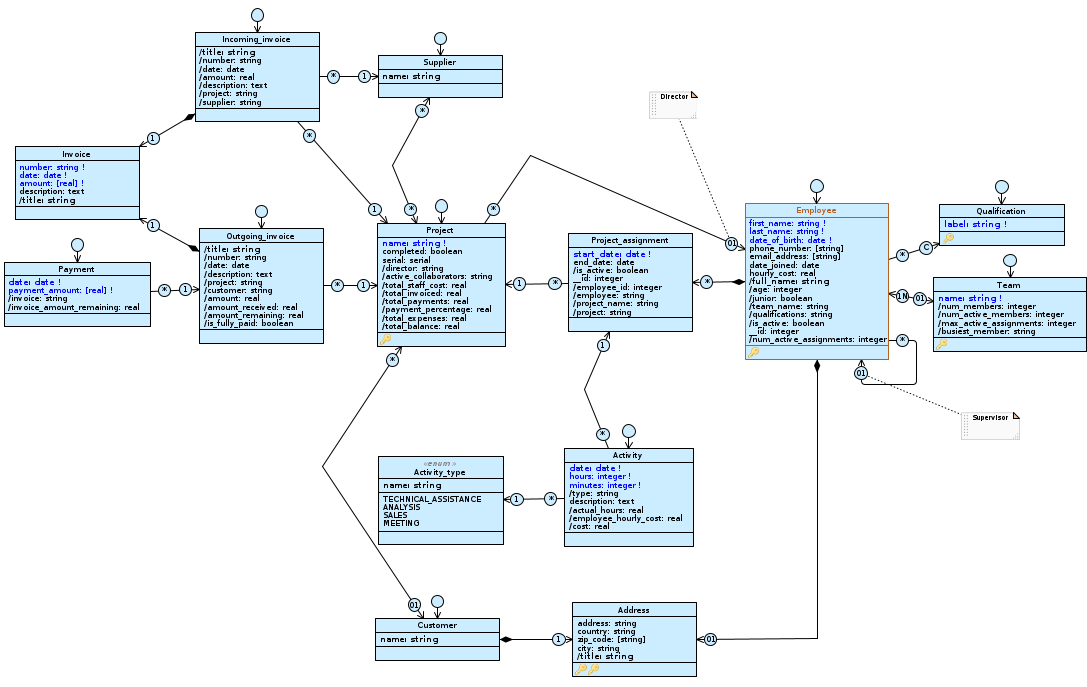
The Administration diagram
The Accounting diagram

The Staff diagram
Update and check the application #
As usual, let’s check that everything is working properly in the application. Save the model and close the Designer, then start the Cloudlet Workforce letting Livebase resolve all the issue database alignment (all of them of type low severity).
Access the GraphiQL client for te Application view and browse the schema: additional services for new classes have appeared on the Application view, except for the Enum Activity_type class whose instances are defined in the modeling phase and cannot be viewed or edited directly. We can however associate one of these instances when creating a new Activity, as we will see later.
All the query attributes that we have defined and enabled for this application view also appear on the generated schema. You can verify this, for example, for the Projects, Teams, and Active Invoices structures.
We verify that the selection filters and queries we have defined, as well as the Enum class, work correctly:
- use the
Project___previewCreateservice and request thedirector____associablesfield to verify that there are no employees that can be associated as director; - create an active assignment for an employee assigning it to a project; verify that the created employee has the derived attribute Is active valued at true;
- use the
Activity___previewCreateservice to verify the possible associable values for the activity_type attribute, and that the returned response correspond to the literals we have defined in the Designer; - set a project as completed, then create an invoice of any type; check that that project cannot be associated;
- creates an active invoice, then creates several payments to associate with it; checks that amount remaining correctly indicates the amount remaining to be paid.
Conclusions #
With this lesson, we have exhausted the modeling topics related to Database Schema. In addition, we have translated most of the requirements described in the scenario into code, preparing the ground for the final step of the course: data access partitioning.
Click on the button to download the model we made in this lesson:
TutorialEngine_queries_filters.xml
In the next lesson… #
We will define multiple Application Schema and Profile Schema to partition the model based on the different user profiles described in the requirements: Defining Application Views and User Profiles.