In the previous lesson #
With the latest changes, we represented in the model all the information listed in the roadmap of the Example Scenario.
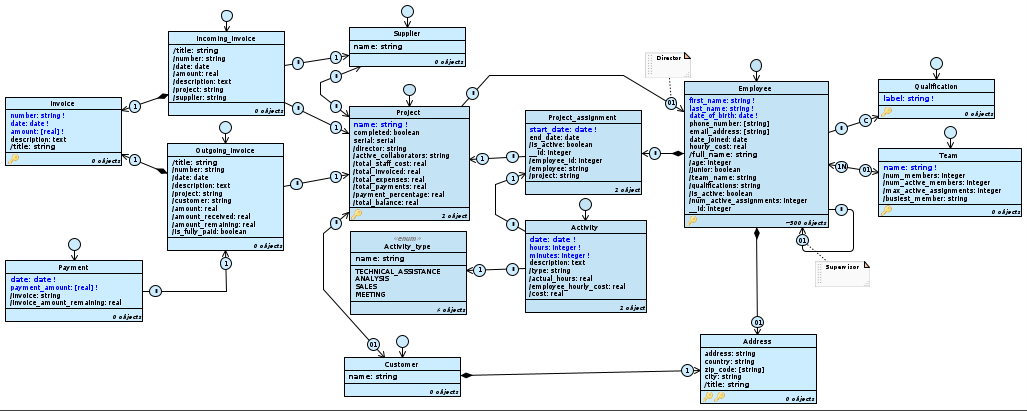
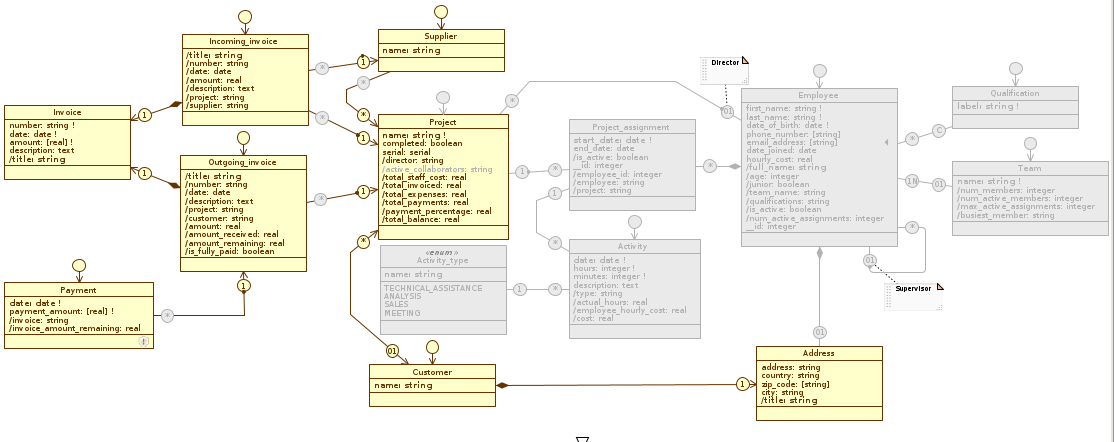
The TutorialEngine model.
Currently, there is only one application view in the model Application. Anyone who accesses it can then see the complete lists of: employees (including their assignments), projects, invoices and payments; he can also edit this data without any restrictions.
Partition data access #
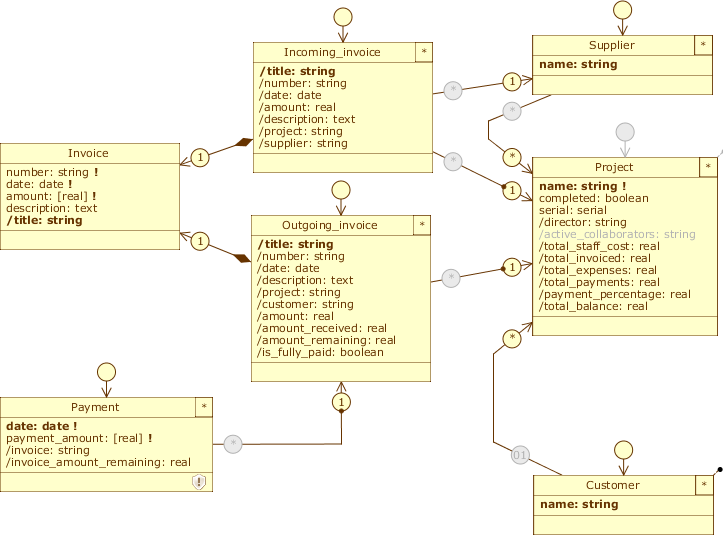
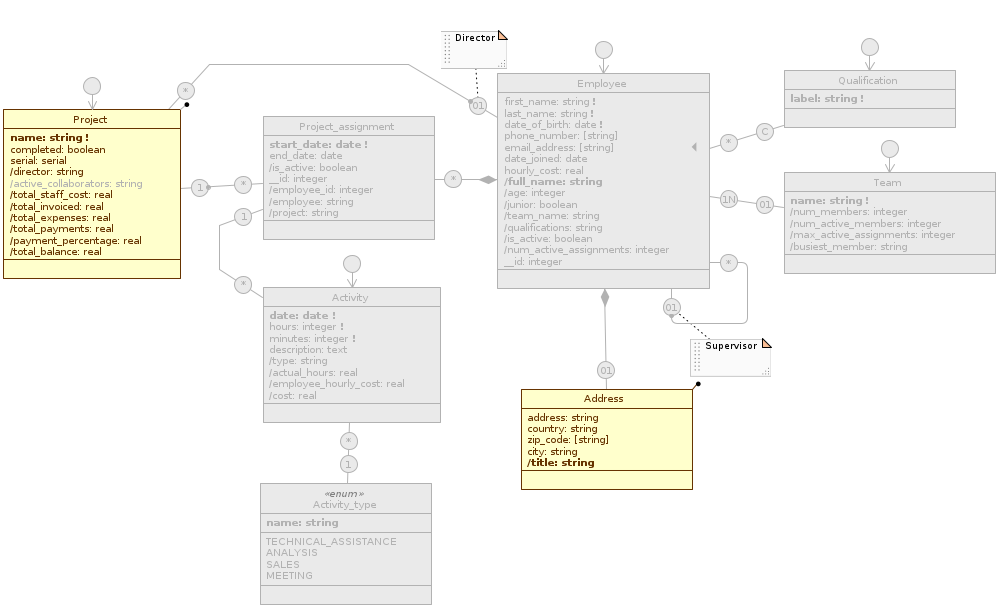
Full database management is a right that we would like to assign only to system administrators, while we would like all other users to have access only to the portion of the database that is their responsibility. From the user profiles described in the Scenario, we know that the accounting department is interested in the classes in the partial Accounting diagram, while the human resources department is interested in those in the Staff diagram.
Our goal now is to partition the system’s data by defining multiple applications, granting access to those applications to specific groups of members; we accomplish this separation by combining three different partitioning techniques: vertical, horizontal, and by user profile.
As usual, we recommend that you archive the current version of the model before proceeding. After that, stop the Cloudlet Workforce, open TutorialEngine in the Designer and switch to the Application Schema .
1. Vertical partitioning using multiple application views #
We’ve already introduced the concept of partitioning: enabling or disabling database elements in an application view represents vertical-partitioning. This operation is useful because it allows us to define multiple applications, each allowing access to a specific portion of the database.
As we know, we can disable an item by clicking on it when the Toggle management policy is selected in the Palette. According to the structure of the model, disabling an element involves all the elements that depend on it; for example, when we disable a class (i.e., its default class role), all its attributes and the roles for which it is parent are disabled along with it, along with any part classes, unless the latter participate in other relationships.
Add new application views #
In the previous lesson, we created the two diagrams Accounting and Staff to get a compact view of two distinct areas of the model; we can use this idea to identify two new application views.
First, rename Application to Administration by double-clicking on it from the Schemas tab. Since it has all classes enabled, we can consider it as the view that will be used by the system administrators.
It is possible to add a new application view by clicking on the New application; however, doing so would create a view from scratch, losing the class warnings and role filters defined in Administration. We want to keep these customizations in the new views as well, so let’s proceed in another way:
- Right-click on Administration to open its Application menu; from there select
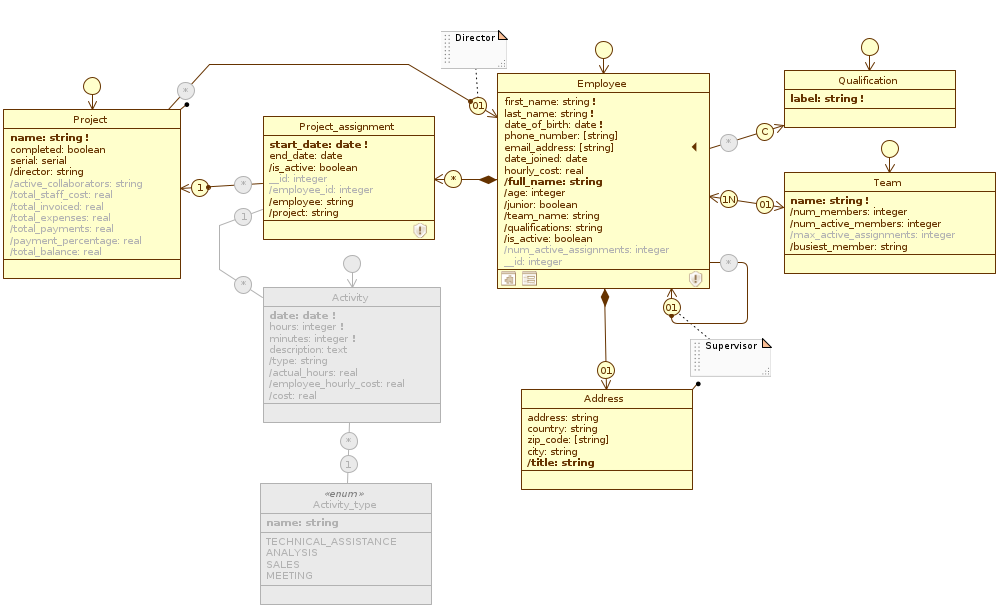
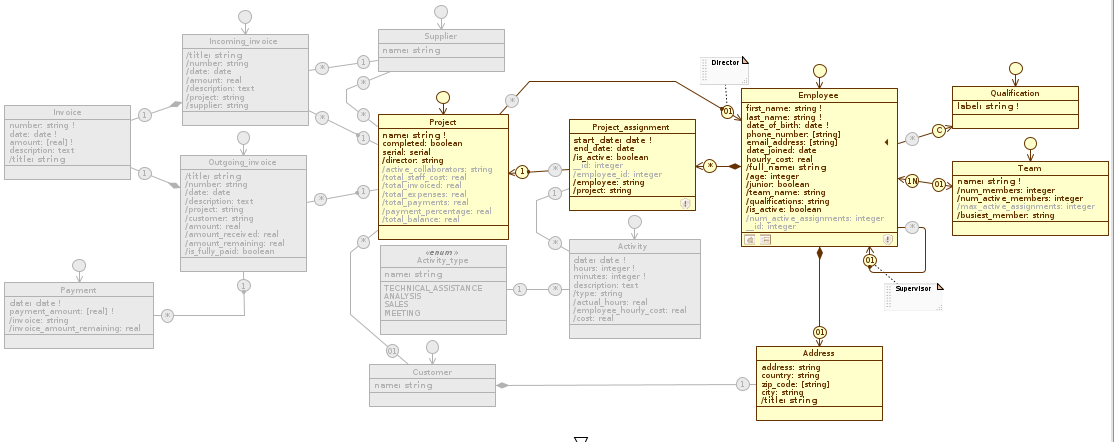
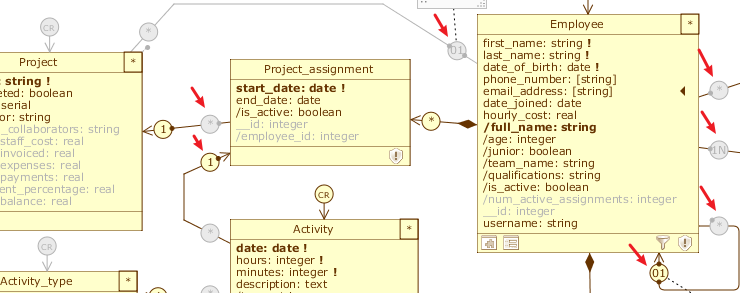
Clone: an exact copy of the view is created, which preserves all its customizations. Rename the latter toAccounting; - We want incoming associations to projects to be managed from this application view, without them being able to be created, modified, or deleted; select Accounting, switch to the Staff diagram, and disable all class roles present: Employee, Qualification, Team, Activity, and Project. Notice how Address and Project have not become grey: the first one in fact participates as target in other associations, while the second one is part for Customer. You’ll also notice that Activity_type doesn’t have a class role because Enum type classes are not independent.
- Clone Administration again and rename the copy to
Staff_management; select it, switch to the Accounting diagram and disable all class roles except Project (Incoming_Invoice, Outgoing_Invoice, Payment, Supplier and Customer); for Project, disable all query attributes on the budget calculation and the Project.customer and Project.supplier roles. Finally, switch to the Staff diagram and disable the class role of Activity.
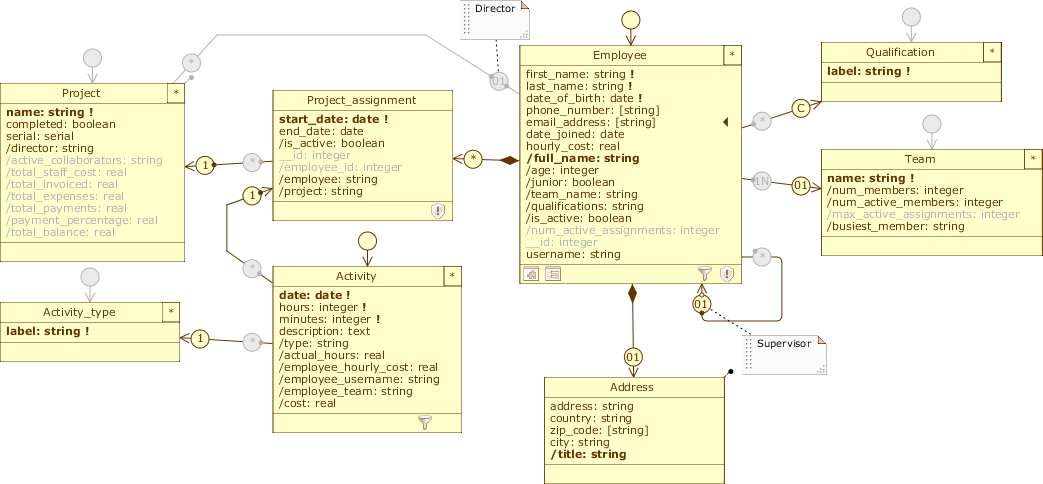
Below we show the changes to the three data model diagrams in the two views just defined:
Accounting #
Accounting

Staff_management
Staff #
Accounting
Staff_management
Administration #
Accounting
Staff_management
Disabled elements in an application view are disabled in all diagrams. You can verify this statement by looking at how the Administration diagram changes by scrolling through the three views (Administration, Accounting, and Staff_management).
Define permissions by user profile #
Now that we’ve partitioned the database into multiple “slices”, we need to determine who will be able to access each application view; at the moment, in fact, each Cloudlet member has access to all the Application Schema we’ve defined. We then need to further partition access, and to do so we introduce Profile Schema . Quoting the Livebase overview:
The Profile Schema describe the grant (rights) that users with that profile have in the system. A profile may or may not be enabled to access a set of application views, and for each view/Application schema you can specify read and edit rights on objects made accessible by the view.
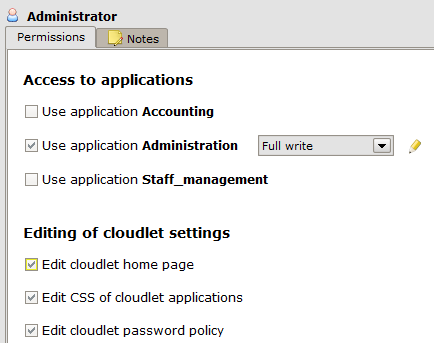
Currently in the Schemas tab there is only the default Profile Schema Member (in addition to the profile Guest, which we won’t cover here). Click on Member to open the Settings tab. From this panel we can configure the following aspects:
- Access to applications: there is a checkbox for each application view in the model. When an application view is checked, you can choose the type of access between full (
Full write), read only (Read only) or custom (Custom); - Editing of cloudlet settings: allows you to assign to the profile the right to modify the Cloudlet settings;
- Management of cloudlet members: allows you to assign to the profile the right to create, edit or delete cloudlet members.
When we add a new application view, all existing profiles get access to it. This happens because each application view must have at least one profile that can access it; therefore, the Member profile currently can use all of our applications.
Rename Member to Administrator and allow access to the Administration view only, of type Full write; also check all rights to modify Cloudlet settings.
Let’s create two new profiles: click on the New profile and rename it to Accountant; open its Settings tab and check Use application Accounting. Repeat the process by creating a Staff_manager profile that has access to the Staff_management view . For both profiles, for now, leave the Full write access type.
Observe the Staff_management application view: on it we have kept the Project class enabled, while we have disabled Activity; this is because we expect a manager to be able to manage at least what in a project is related to the staff (i.e. the assignment of the technical manager) while instead we do not expect him to record the activities of the employees, but to do it from a personal area.
The Permission Schema #
Let’s reason about the first problem: we want to grant partial access to the Project class for this profile, and prevent HR managers from creating, deleting or modifying other project attributes besides the Project.director role. To do this, we need to customize the access right: open the Settings view of Staff_manager and click on the ![]() icon next to the Use application Staff_management checkbox to open a new view on our model.
icon next to the Use application Staff_management checkbox to open a new view on our model.
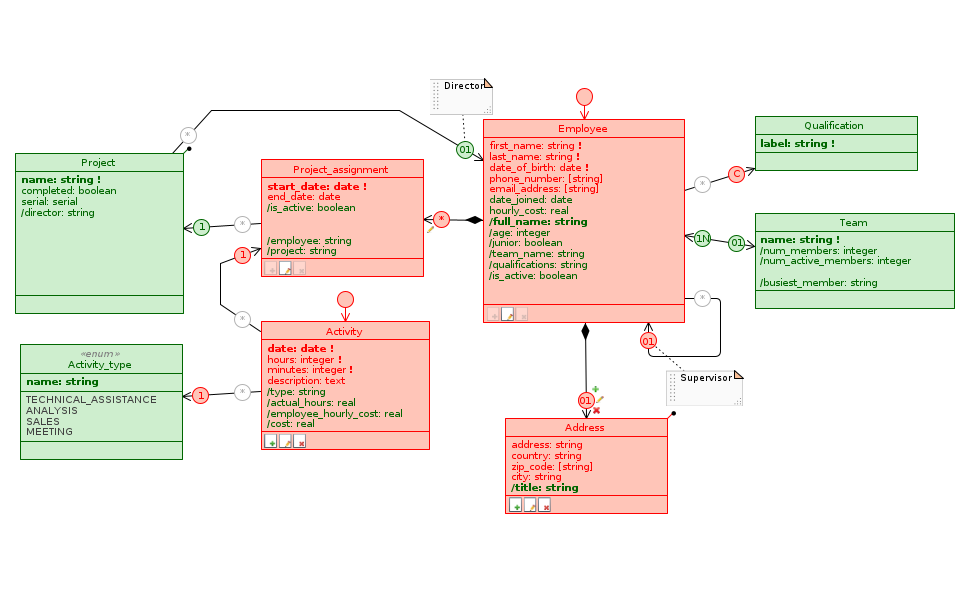
This takes the name Permission Schema , and shows the permissions a profile has relative to an application view for which it has access rights. In this context, the diagram changes appearance and allows you to view and modify the access type for each class, attribute or relation of the model for the selected Profile Schema on time.
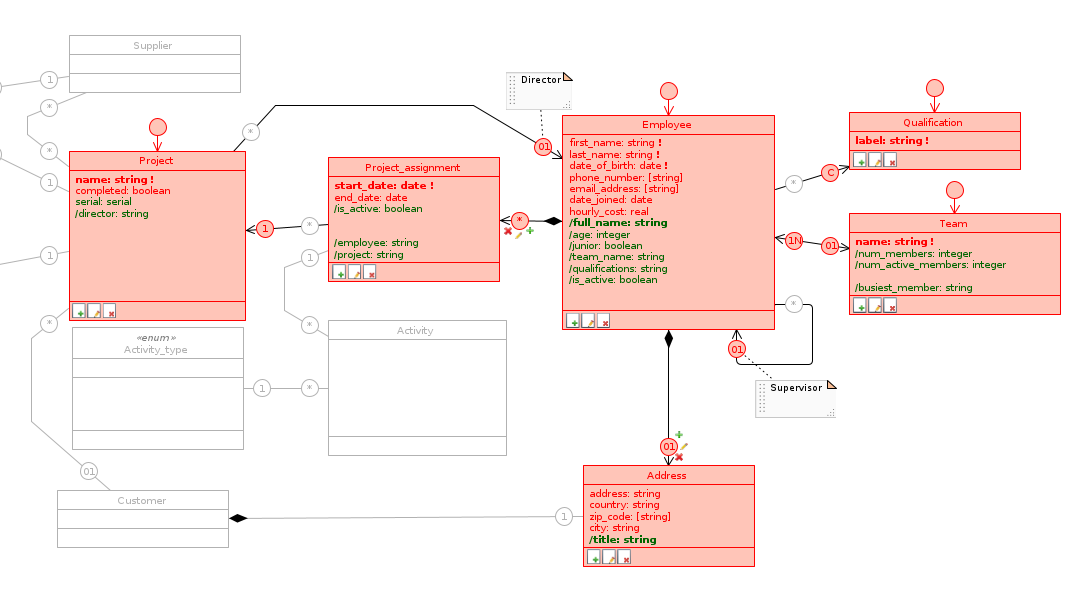
Observe the diagram: just as an Application Schema depends on the Database Schema on which it is defined, a Permission Schema depends on the Application Schema for which it specifies the permissions (grants) of that Profile Schema . Therefore, elements disabled in the corresponding application view are also disabled in the Permission Schema; in particular, only the gray outline is shown for disabled classes and roles, while disabled attributes do not appear at all and leave blank spaces in classes.
Each enabled item has three possible states here:
- Editable: the profile has full access to that element; it can compile it if it is an attribute and associate objects if it is a role;
- Read-only: the profile can see that element, but cannot modify it;
- Disabled: not to be confused with the disabled elements inherited from the application schema; also at this level we can disable diagram elements, but always within one Profile Schema.
Cursor profile toggle By clicking on an element in the diagram we can instead choose its state from the three configurations listed above. As you may have noticed, derived, platform and serial attributes are an exception: since it is not possible to alter their value directly, we can allow them to be read but not written.
Classes and compositions have an even finer level of detail, represented by three icons in the footer or on the part role:
- represents the right to create new objects;
- represents the right to edit objects;
- represents the right to delete objects.
By clicking on an icon we can disable or enable the corresponding right; when all three are disabled, the class and all its attributes automatically switch to read-only.
Let’s modify the permissions for the Project class:
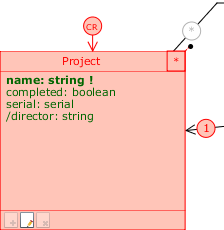
Make sure you are in the view Permissions of Staff_manager in Staff_management, then uncheck the two icons on Project, leaving only the edit right, and set all its attributes to read-only. This way, staff managers can edit the project director (the director role is enabled) and read the rest of the information.
2. Horizontal partitioning using class filters and user properties #
The Staff_management view is not designed to allow access to individual employees or team managers; we need to create two other, more restricted views that show only the data of interest to the user type: employees must have access to their employee object, complete with assignments and tasks; team managers must have access to the team and its members.
We then need to implement further horizontal partitioning of the records but based on some correspondence with the information associated with the Cloudlet members. Let’s see how to do this:
Add the User_area view #
First let’s create a new application view, this time cloning Staff_management: rename the copy to User_area , enable the class role of Activity and disable those of Qualification, Team and Project. Also, take care to remove the Manage Objects Project_assignment menu item, which is not relevant in this context. This leaves only the menu items related to Employee and Activity.
Create a new User profile, open its Settings tab and check Use application User_area; after that, open the corresponding Permission Schema and remove the create and delete rights for the Employee and Project_assignment classes. Set the Employee.team and Project_assignment.project roles to read-only: we don’t want users to be able to create or delete other employees or assignments, nor do we want them to be able to reassign themselves to another team or move their assignments to other projects. Finally, set the date_joined and hourly_cost attributes to read-only, so that users cannot increase their hourly cost.
The newly defined application view and profile now appear as in the picture (for convenience, we only show the Staff diagram):
User_area:
Permessi di User in User_area:
At this point we need to find a way to show, to each user/employee with profile user, only the employee object that represents him in the system. We then introduce Class Filters, which are application-level filters on classes. Similarly to a Selection filter, a Class filter is a boolean condition that is evaluated on all objects of the class, and is used to filter from the class list the records that do not meet the condition.
To define the condition we have to make use of the User properties, i.e. the attributes related to the current Cloudlet user, who has an open session and is working on the data (__CurrentUser); in particular we exploit the __CurrentUser.username attribute to realize a correspondence between the Cloudlet member and the employee of the model.
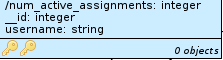
Before defining the filter, let’s model a new attribute for Employee: switch to the Database Schema and add the username: string attribute to the class, imposing a new uniqueness constraint on it. When we insert new employees, we will use the information in this field to create Cloudlet users for each of them.
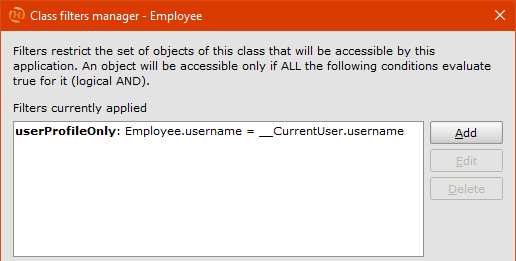
Back on the User_area view , open Employee’s Class menu and click on Set filters... to open its Class filters manager. This panel is similar to the Role filters manager, but has an extra section that lets you decide whether or not to prevent saving objects that don’t meet the filter; we can ignore this, since in our case we’ve prevented new employees from being created by people accessing User_area.
Click Add and add a new filter called userProfileOnly, typing the expression Employee.username = __CurrentUser.username. Click OK to confirm, close the Class filters manager and return to the diagram.
Once a class filter is added, the corresponding icon appears in the class footer, as it does for other aspects such as Class warnings. Moreover, the same filter is applied in cascade to all the incoming roles for that class, including the incoming roles of its part classes if any; in our case, in fact, a new filter has appeared on the roles Employee.supervisor, Team.members, Qualification.employees, Project.director, Project.assignments and Activity.assignments.
In case you want to disable the propagation of a class filter on a role, just open its Role menu and uncheck the Apply class filters item. For example, in our case it is correct not to apply the class filter for the reflective role Employee.supervisor, since we have already defined a filter on this role that excludes itself from the associables list and we want to show the rest of the employees instead.
We have filtered the employees, but we are still able to access all unfiltered activity objects by clicking on the Activities menu item; therefore we need to define a class filter on Activity as well. Since we need to refer to the username, we need to show this information directly on the class: switch to the Database Schema and drag Employee.username to Activity, passing the path Activity.assignment.employee_.username, renaming the query to /employee_username. Go back to User_area and add another filter called userProfileOnly by typing this time the expression Activity.employee_username = __CurrentUser.username.
For each menu item of User_area we have defined custom filtering rules, which on the diagram correspond to the enabled class roles.
Add the Team_management view #
The User_area view is complete. Let’s now deal with team management:
- We need to create a view identical to User_area, differing only in the Class filter we apply to Employee; therefore, clone from User_area and rename the copy to
Team_management. - Create a new
Team_managerprofile and assign it access to Team_management. After that, edit the corresponding Permission Schema as above for the permissions of User in User_area. - Switch to the Team_management view , reopen the Class filters manager of Employee, remove the userProfileOnly filter (which was copied here, having cloned from User_area) by selecting it and clicking
Delete, and add another filter calledsameTeamOnly, with the expressionEmployee.team_name = __CurrentUser.team. Again, remember to disable the class filter for the Employee.supervisor role. - Taking advantage of the existence of the Team concept in the model, we can in fact divide the Cloudlet members into the same teams they belong to in reality. In this way, the team manager will be able to manage not only his personal area, but also those of the employees that are part of his team.
- Also here we need to filter the activities showing only those of the team members. We need to show on Activity the team name to be able to use it in the filter, so add a query to Employee.team_name called
/employee_teamas we did for /employee_username. After that, remove the userProfileOnly filter defined on Activity and add a filter calledsameTeamOnlyagain, with the expressionActivity.employee_team = __CurrentUser.team.
3. Enable user management #
In Creating your first application, we said to ignore the presence of the warning urging us to include the _\User platform class in the model. However, if we don’t include this class, we can’t manage Cloudlet users, which makes the horizontal partitioning we’ve modeled so far useless.
Switch to the Administration diagram, right-click in a free spot in the Canvas and hover over the New platform class option. From the menu that appears, select User to make the _User class appear in the diagram:
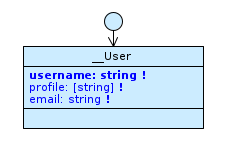
The _\User class
The class does not need to be linked to the others: its presence is enough to enable user management.
If now you check again the warnings raised on the model, clicking on the Check button in the lower right corner, you will notice a new one:

We have included the _\User class in our model, and as you can verify it is enabled by default in all application views, but none of the profiles we have defined have write permissions on the class.
Select a profile from the Schemas tab to open its Settings, then look at the Management of cloudlet members section:
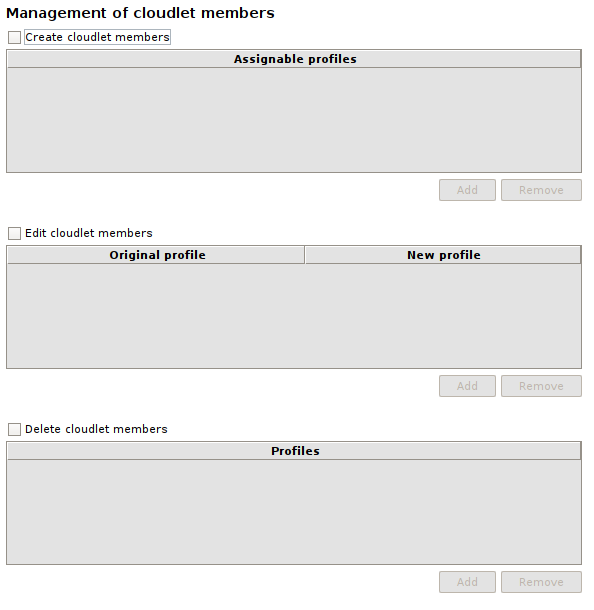
There are three checkboxes: Create cloudlet members, Edit cloudlet members and Delete cloudlet members, which enable respectively creation, modification and deletion of users whose profiles are listed in the relevant tables. To grant a particular permission, check one of the checkboxes and add the profiles for which that permission is valid by clicking the Add button. To revoke permissions on a previously added profile, select it and click the Remove button. Note that the Edit cloudlet members table has two columns: Original profile and New profile, and its records represent transitions between profiles; you can edit the attributes of any user whose profile appears in the Original profile column, but the latter is editable only if its transition is present.
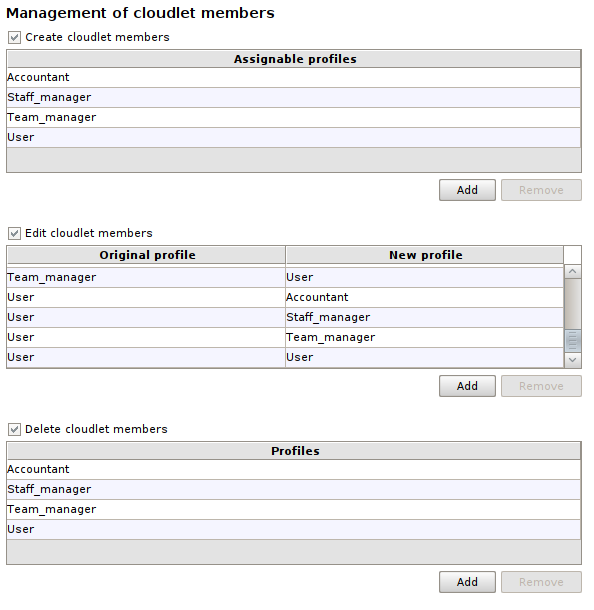
In our case, we want to grant permissions on users to profiles Administrator and Staff_manager: Administrator will have full rights of creation, modification and deletion, while Staff_manager will be able to freely manage all users who are not administrators.
These are the tables Create cloudlet members, Edit cloudlet members and Delete cloudlet members for both profiles:
Administrator #

Staff_manager #
Since only Administrator and Staff_manager will be able to manage users, it doesn’t make sense to leave the class enabled for all applications, so disable it in Accounting, Team_management and User_area views.
Now our _engine is truly complete. You can save it and close the Designer.
Update and check the application #
Back to the Dashboard, start the Cloudlet Workforce as usual, solving all the alignment issues. As you can see from the warning shown, the changes we’ve made to the profiles have resulted in no member of the Cloudlet having a profile that allows them to access the applications. In fact, initially we only had the Member profile, which has been replaced by Administrator, Accountant, Staff_manager, Team_manager and User. We can fix this by logging into Cloudlet with the default member’s credentials and clicking on the pencil icon next to the member’s name in the Members area of the home page: select a profile of your choice from those available in the Profile dropdown, click Save, then log in again; you should now see at least one application in the Applications area.
Take your time to check that each application view is working properly, changing the profile each time by repeating the steps above.
Alternatively, you can check that the horizontal partitioning works like this: log in with the default member and make sure his profile is Administrator or Staff_manager. Enter the Administration or Staff management application and create a new user with the _User___create service assigning him a username, a profile of your choice and an email address. At that address you will be sent a link to use to define the password needed to log in with the newly created user: if the horizontal partitioning has been modeled correctly, you should see the applications for which the corresponding profile has been enabled.
Conclusions #
With this lesson, we have implemented all the requirements we had listed in the roadmap shown at the beginning of the course and we are ready to put the application into operation.
Click on the button to download the model we made in this lesson:
In the next lesson… #
We will look at some advanced maintenance techniques, useful in case you need to make changes while running the application: Manually realigning the database via SQL.