It’s time to create our first model. For now, we’ll take care of managing the company’s employee registry as described in the Example Scenario.
Model the application #
1. Open the Dashboard #
![]() Start the Dashboard. If you followed the installation guide you should find a shortcut on the desktop with the icon in the picture.
Start the Dashboard. If you followed the installation guide you should find a shortcut on the desktop with the icon in the picture.
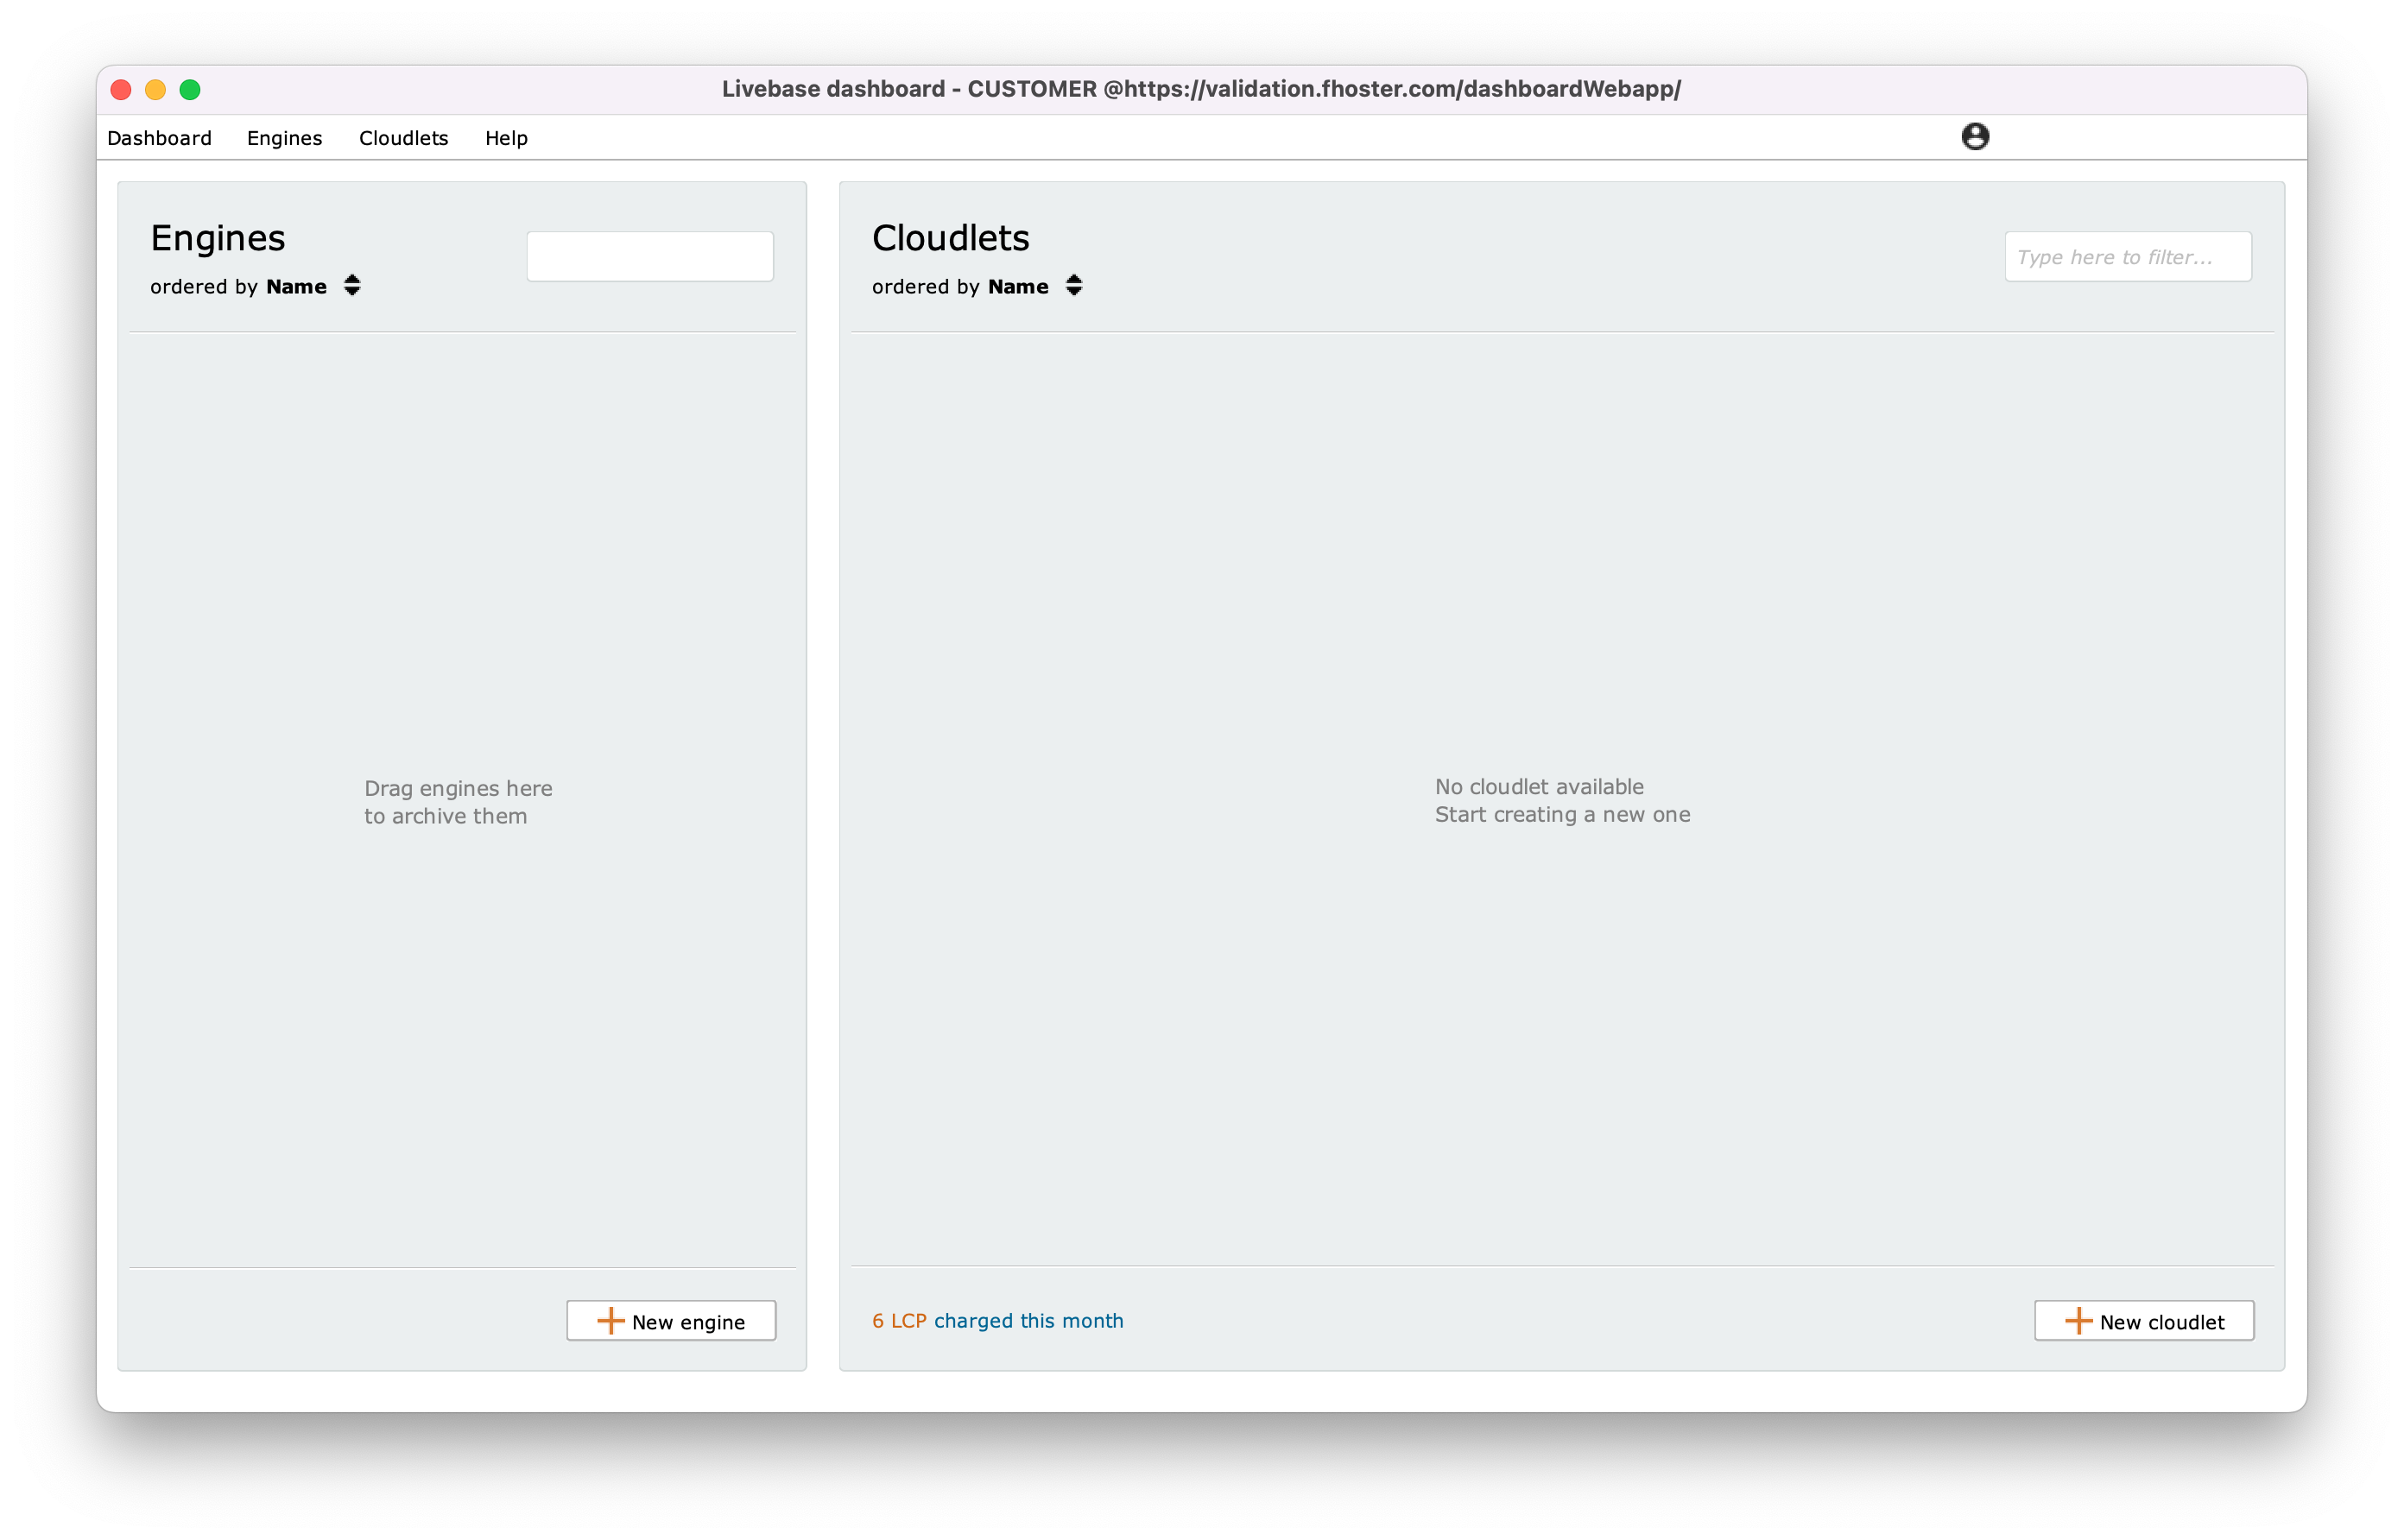
Once logged in, the Dashboard looks like in the picture, divided into the following tabs:
- Engine Library: a collection of archived engines that can be extended and reused at any time;
- Cloudlets: a list of all the Cloudlets created in your account.
We’ll go over the other features of the Dashboard later; for now, our focus is on creating and launching a working Cloudlet.
2. Create a Cloudlet #
First, click on the New cloudlet button at the bottom of the Cloudlets tab. Observe the light blue box that just appeared:
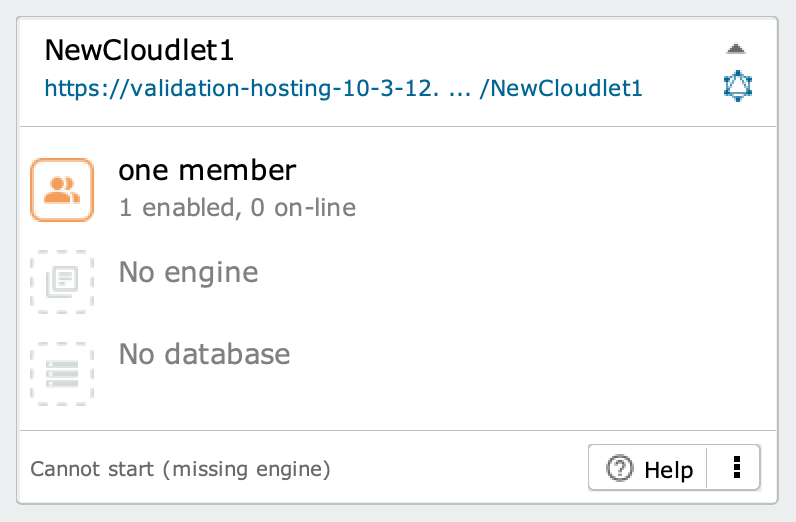
at the top there is a name , in this case Livebase has assigned the default name
NewCloudlet1'and a URL address; the latter depends on the hosting server where the Cloudlet was deployed, your username and the name of the Cloudlet. For example, if your username is johndoe, the Cloudlet will have addresshttps://hs3.fhoster.com/johndoe/NewCloudlet1. For this reason, each Cloudlet you create must have a unique name;in the middle there are three icons: list of members, engine and database;
a message at the bottom indicates the status of the Cloudlet. At the moment we can’t start it because we haven’t installed a model on it yet:
Cannot start (missing engine).
Let’s rename the Cloudlet: double-click on its name and type Workforce (or click on the menu at the bottom right and select rename ). Note how this action also causes the Cloudlet URL to be updated.
3. Create a model #
We need to create a model for Workforce: to do that, click on the New engine button from the Engine library box: a new empty model will appear, named NewModel1; to install it on the Cloudlet, drag it onto it. Rename the model by double-clicking on its name and type TutorialEngine. Notice how the Cloudlet state has changed and the Start button has appeared. However, it makes little sense to start the Cloudlet with an empty engine: if we try to do so, in fact, Livebase will prevent us from doing so and invite us to open the Designer to define it. To do so, click on its .
The Designer opens in a separate window from the Dashboard, presenting itself as in the screenshot:
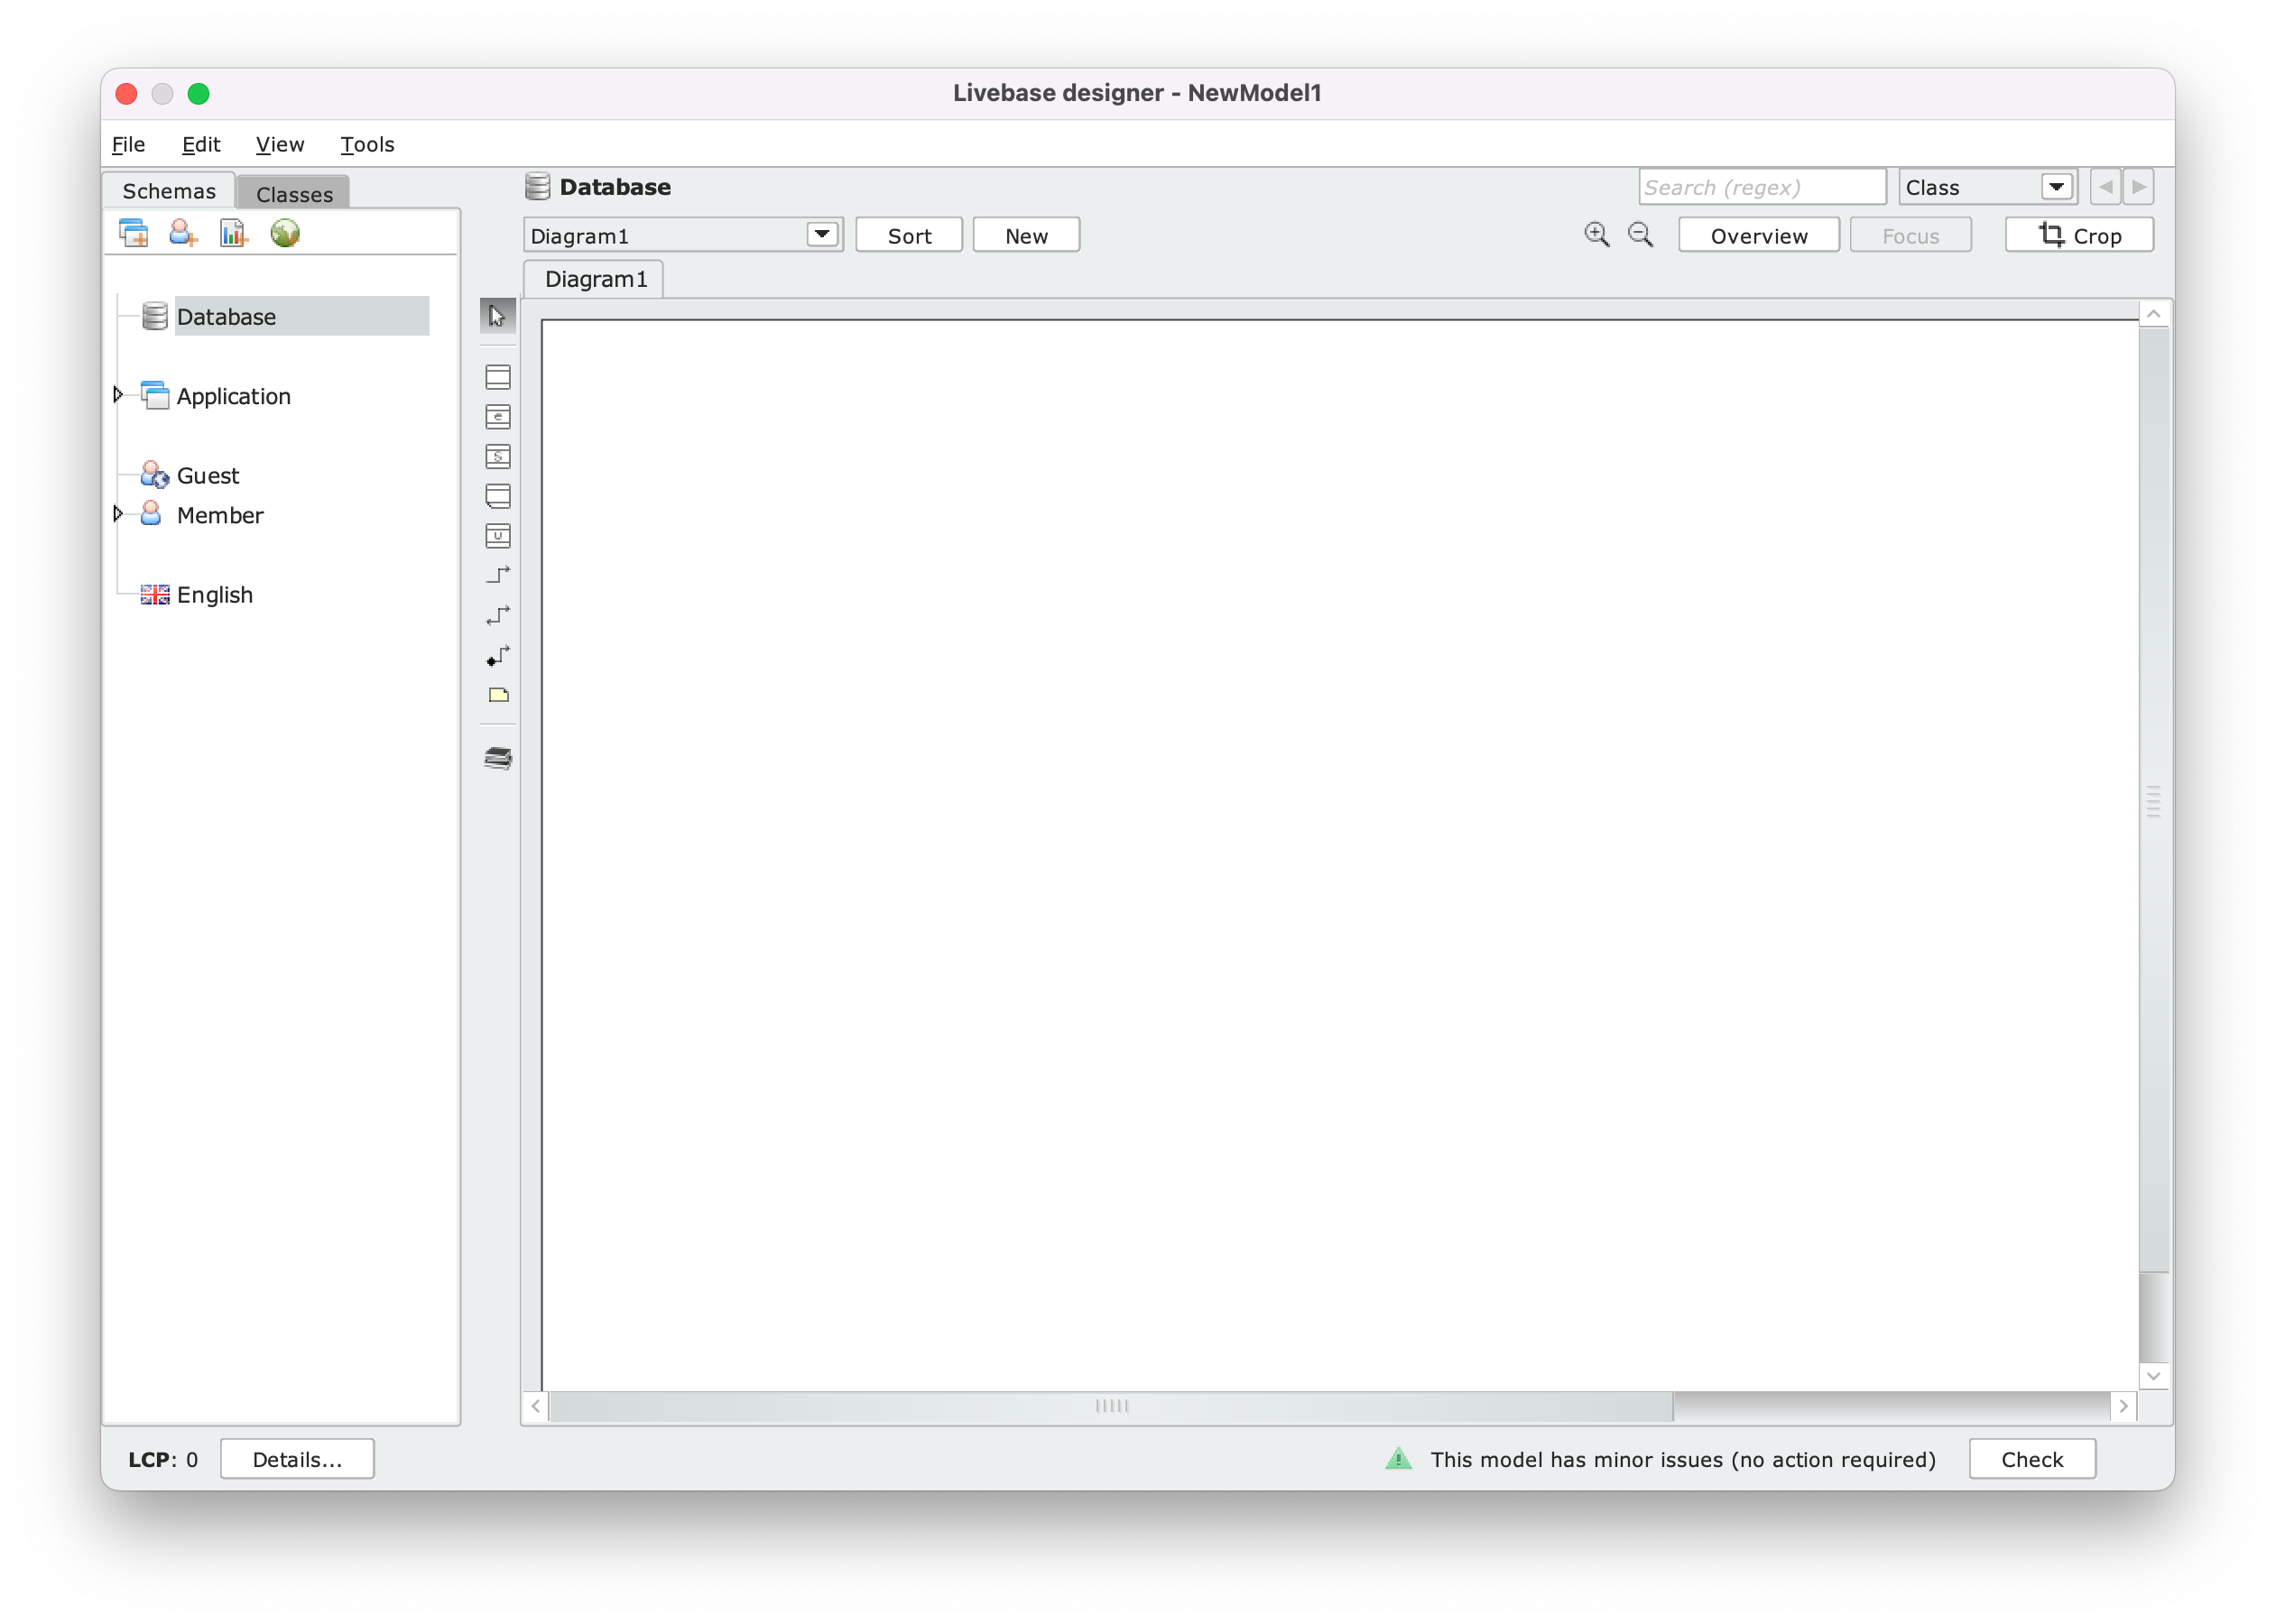
- On the left are two tabs: Schemas and Classes. The former collects the model views, while the latter lists the classes;
- On the right is the canvas, with a tab for each diagram and a special tab for notes. As we will see later, it is possible to create multiple-diagrams to split a complex model into several parts and simplify its understanding.
4. Define the class Employee #
at the moment we focus on the Database Schema , the view selected by default. At this level we will define the data model, that is, the classes and relationships that form the logical structure of the database.
![]() Let’s create a class to represent the employees of the company.
Let’s create a class to represent the employees of the company.
Click on the icon Create a new class in the toolbar (Palette) next to the diagram, and click on a blank space. A new class will appear, whose name (Class1) is already selected, so that it can be renamed immediately: rename it Employee and press Enter.

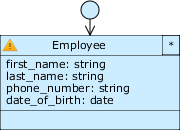
A class in the Database is a blue box consisting of three sections:
At the top, the header shows a unique name that identifies the class. Immediately above, the circle and arrow pointing to the class represent the default class role of the class.
In the center is the attribute list of the class;
At the bottom, the footer shows additional information, such as the number of objects currently in the database. This information is only available if we are viewing an engine installed on a Cloudlet.
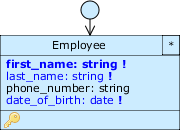
Let’s add the first attributes: for each employee we want to store first name, surname, phone number and birthdate. To do this, right-click on the Employee header to open its Class menu, click on new attribute and select the String data type; then, type first_name as the attribute name.
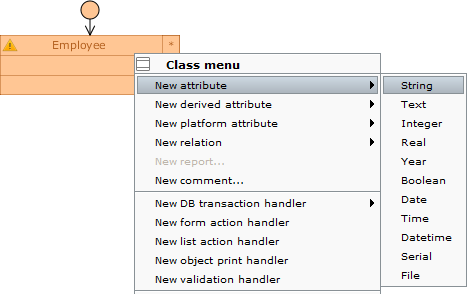
Repeat the process for last_name, phone_number, and date_of_birth, selecting String as the type again for the first two and Date for the last. The resulting class should look like in the figure.
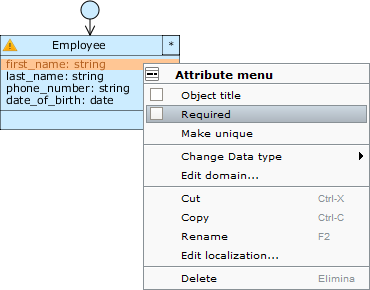
We refine the Employee class by imposing constraints on the values that can be taken by its attributes:
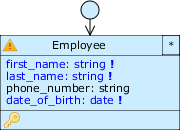
First, we want to prevent users from being able to create empty objects, i.e. without first and last names; we therefore need to impose an integrity constraint to enforce that all values of some attributes are not null. To do this, right-click on the first_name attribute to open its Attribute menu and check Required.
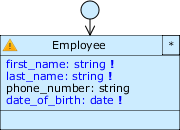
Notice how the attribute has changed: the name is now highlighted in blue and there is an exclamation mark next to it. Repeat the same process for last_name and date_of_birth, and leave phone_number as non-mandatory.
We want to prevent the insertion of duplicate objects, for example two employees with the same first name, last name and date of birth. To do this we can add a uniqueness constraint: while holding down the Ctrl key, select first_name, last_name and date_of_birth at the same time, right click on one of these three and select Make unique from the Attribute menu.
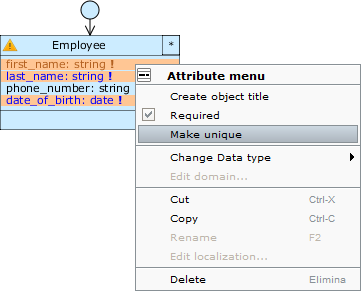
After this operation, an icon () will appear at the bottom of the class to indicate that a uniqueness constraint has been imposed on the class; by clicking on it, the attributes involved in the constraint are highlighted.
In this case, the constraint prevents two objects of Employee from having the same first name, last name, and date of birth, but does not prevent them from having the same value for one or two attributes of the three involved (e.g., same first name and last name but different date of birth, or same first name but different last names and date of birth).
At this point we have a good starting model for our application. Save it by selecting File’ Save or by pressing Ctrl+S. Observe the class changes: first_name is shown in grass, indicating that this attribute has been designated as the object title for the class_Employee_.
The object title is the name by which ‘as we’ll see shortly’ the object of a class being examined is identified in the application; this name is represented by the value of a single attribute.
If no specific attribute is given as object title for a class, the Designer will by default choose when saving changes that add a new class the attribute at the top of the list of the class, exactly as happened in this case with first_name.
The warning we mentioned earlier has also disappeared.
Close the Designer by selecting File’Close or by pressing Ctrl+Q, or by simply closing the window.
5. Launch the Cloudlet #
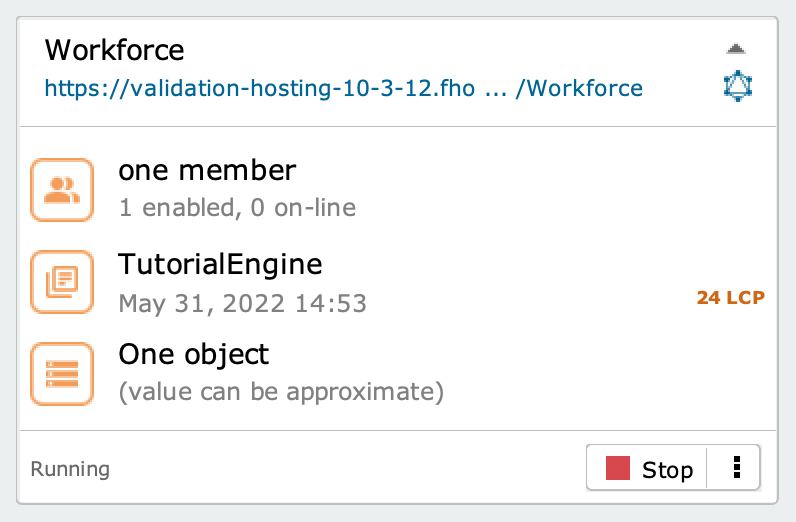
Back to the Dashboard. The status of Workforce is Stopped (missing Database): the last step to start it is to create a database with the necessary structure to support the engine; click on the empty database icon () to have Livebase generate it. After that, click on Start and wait a few seconds while Livebase translates the engine into source code, generates the corresponding application and starts it on the cloud server. At the end of the process the Cloudlet switches to Running state, while the Start button is replaced by Stop.
A Cloudlet can be started and stopped at any time by its owner, i.e. the user who created it. When it is not running, its homepage is still accessible but does not allow you to login.
6. Create a Cloudlet member #
To access the application generated by the Cloudlet, there must be at least one member active in the community.
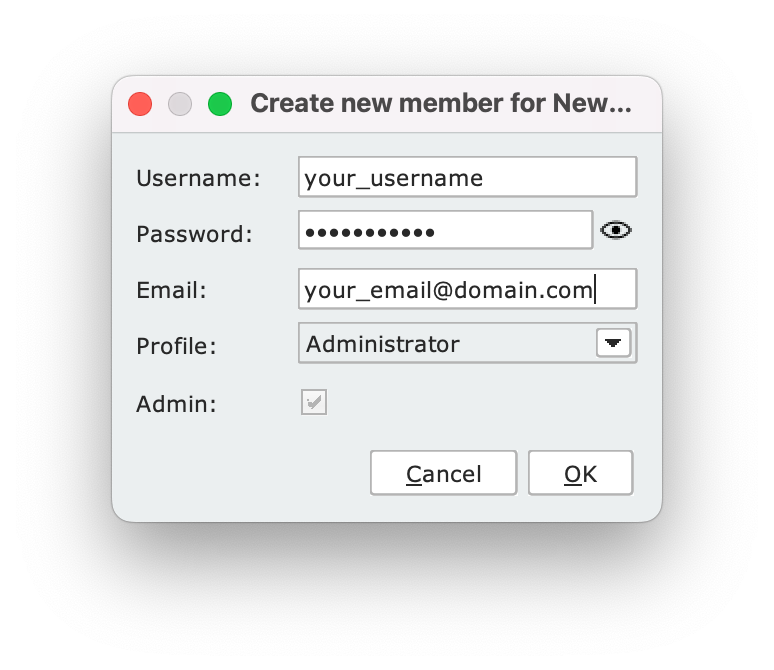
To create a Cloudlet member, open the Members of Cloudlet dialog box by clicking on the icon in the Cloudlet panel, then click on the Create Member button on the right column.
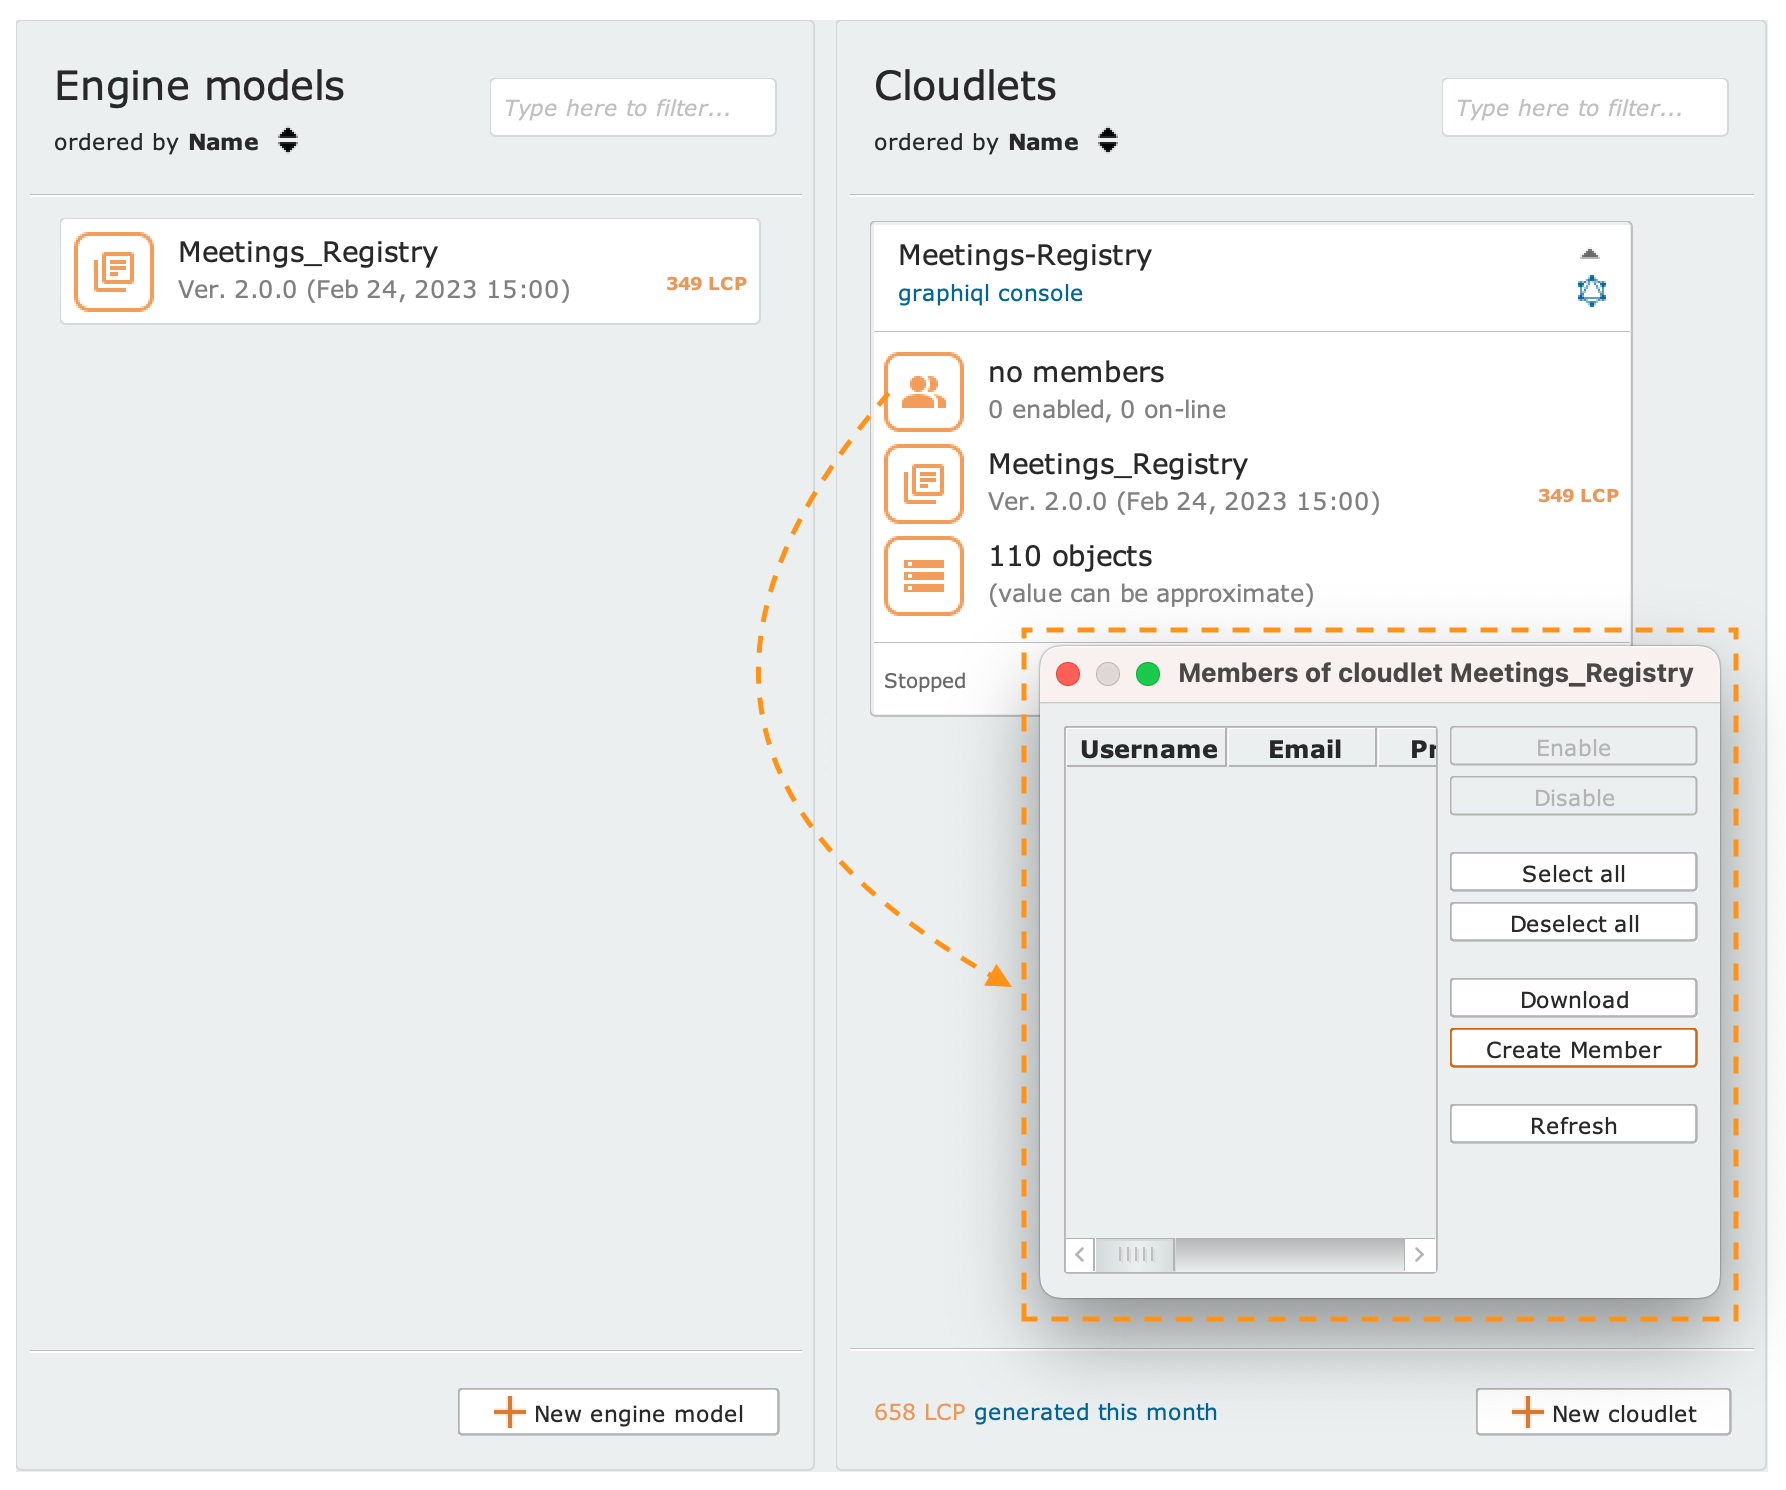
In the Create new member for [Cloudlet name] dialog box (shown in the image beside) fill out the creation form with a unique username and password. Enter also an email and associate a profile among those present (defined in the engine). Finally, choose whether or not to make the user you are creating Admin by checking the checkbox, and press the OK button to confirm.
Enter data into the generated application #
Now that Workforce is running, let’s take the opportunity to take a tour of the generated application, you can use the GraphiQL client to quickly test the generated GraphQL services.
1. Access GraphiQL #
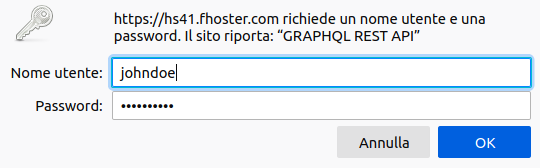
When logging in for the first time, authentication is required to use GraphiQL. Log in as default member: so type in your Livebase account credentials and click OK.
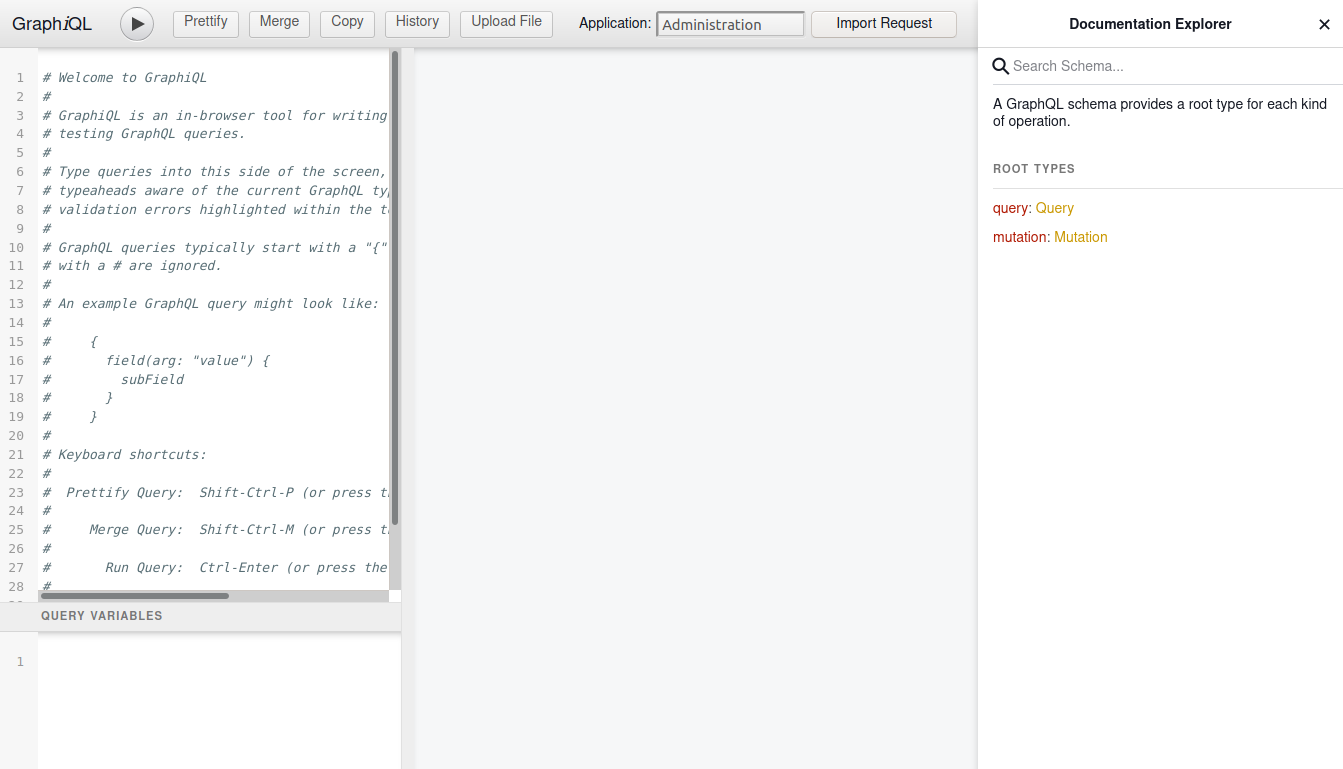
Once logged in, GraphiQL presents itself divided into three panels: on the left you can type a GraphQL query; the central panel shows JSON responses of the queries executed and on the right is the documentation panel, useful to find services and types exposed by the application.
On the top you can find a toolbar to launch queries, change the current application and other functionalities.
GraphiQL is a powerful tool, you can find a detailed explanation of its usage in the dedicated page.
2. Make a query #
Using Application from the drop-down menu in the top bar, we can execute the first query: type the following query in the left panel and then press the buttonor type Ctrl+Enter.
query EmployeePage {
  Employee___getPage {
    totalCount
    items {
      _id
      first_name
      last_name
      date_of_birth
      phone_number
    }
  }
}
The JSON response will appear in the central panel.
Let’s examine the query:
We made a query named EmployeePage and we used the service Employee___getPage to get a page (that is a list) of instances (the objects) of the classes in the model. We requested the totalCount of instances and for each item all of its attributes.
The are no objects in the database yet, so in the response totalCount is 0 and items is an empty array.
3. Enter data #
Let’s add an instance of Employee class; to do so, we need to execute a mutation request to the Employee___create service.
This is a sample query to create an Employee:
mutation EmployeeCreate {
  Employee___create(data: {
    first_name: "John"
    last_name: "Doe"
    date_of_birth: "26/10/1977"
    phone_number: "+39 333 0011222"
  }) {
    _id
  }
}
In this example we are creating an employee named John Doe, born on 26 October 1977 with phone number +39 333 0011222, specifying those values in the data parameter and requesting the _id of the created object.
In the model we have imposed that the attributes name, surname and date of birth are not null: from the documentation panel you can notice as the corresponding fields of the input EmployeeCreate are marked with !.
Try creating another record, but this time without typing in one of these fields (e.g. date of birth); once you execute the request you will see as response an error message, that specifies that a value is required for that field.
In addition, the data field you left incomplete will appear highlighted in red by the GraphiQL editor; hovering over the red underline will display a tooltip with feedback about the error.
In the model, we also imposed a uniqueness constraint on the same three attributes; let’s verify this:
try entering another duplicate record, containing the same data as John Doe; launching the mutation will again display a warning informing us that another employee has the identical values of the first name, last name, and date of birth attributes.
4. View, edit and delete data #
After entering a few records, the response for the EmployeePage query shows the created instances and the totalCount field reflects the number of objects created.
From GraphQL you can request an individual record of Employee by using Employee___get; this service requires the Employee _id as input and you can specify in the body which fields to request.
query EmployeeGet {
  Employee___get(_id: 101) {    # Note: replace the _id with the correct one!
    first_name
    last_name
    phone_number
    date_of_birth
  }
}
Let’s edit an existing record: for example, let’s change the phone number of an Employee. Use the Employee___update service, passing in the data input the _id of the Employee and the fields to update, in our case the phone number. As with every GraphQL request, we can type the wanted fields in the service body.
mutation EmployeeUpdate {
  Employee___update(data: {
    _id: 101    # Note: replace the _id with the correct one!
    phone_number: "+39 333 1122333"
  }) {
    phone_number
  }
}
Let’s delete a record, for example to delete the Employee with _id 101, we must make a mutation to the Employee___delete service:
mutation EmployeeDelete {
  Employee___delete(_id: 101) {
    deleted
  }
}
The output of this service is a boolean flag indicating whether the object has been deleted.
Conclusions #
As you can see, with a minimum of effort you have been able to create a working application with API that allows for quick and effective database management. This is just the beginning! As we will see in future articles, Livebase allows you to do much more.
Click on the button to download the engine model we made in this lesson:
TutorialEngine_getting_started.xml
In the next lesson… #
We will extend Employee by modifying some existing attributes to make them more specific; we will also introduce derived attributes and some aspects of the Application Schema: Extending your application.