In the previous lesson #
We concluded our digression on data import and exploration. Let’s bring the focus back to modeling and recap what we’ve seen so far:
- we modeled the Employee class to manage master data for a set of employees. It is currently the only class present;
- on the Database Schema, we modeled native attributes with constraints and domains, and declared expressions to represent derived attributes;
- on the Application Schema, we defined Class warning.
In case you are not clear on the topics listed above, before proceeding we recommend that you return to the Creating your first application and Extending your application lessons.
From one to several classes #
In this lesson we extend our starting model by representing new concepts (and therefore new classes) related to each other. In relational databases, it is in fact common for distinct information (represented on multiple tables) to be somehow related to each other by a form of relationship; for example, an employee is part of a team, an employee participates in a project with a tot month assignment, a project has a list of invoices, etc… We then focus on expanding the set of satellite concepts of Employee, such as projects, qualifications, teams, and addresses; in doing so, we will introduce new classes to link to Employee, modeling relationships of different types and cardinality.
Associations and Roles #
From the Dashboard, stop the Cloudlet Workforce and open the TutorialEngine engine in the Designer, making sure you have selected the view Database.
Add a new class #
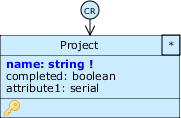
To get started, let’s represent the company’s projects; to do this, we need to add a new class, which we call Project:
- Let’s add attributes: each project has a name (
name: string), which is also the object title of the class, and a flag (completed: boolean) indicating whether the project is completed or not. Checkrequiredfor the former; for the latter, however, from the Application Schema , set thedefault valueas a false boolean constant. - Let’s make the projects unique, but this time, instead of imposing a constraint on the name, let’s take advantage of the serial data type, which allows you to add a progressive, unique and explicit identifier. So add a
serial: serialattribute and note how a uniqueness constraint () is automatically imposed on it, which cannot be removed or modified manually.
The Project class appears as in the figure. Through each class we are now representing an independent set of information.
2. Add an association between two classes #
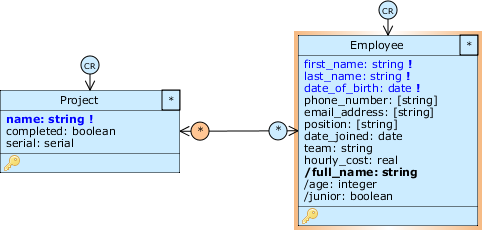
![]() Let’s connect the newly created class to Employee: click on the Palette icon
Let’s connect the newly created class to Employee: click on the Palette icon Create a new bidirectional association; click on one class and then on the other (in this case the order is not important).
We have just created an association, the most common form of relation between two classes. In the model, a relationship is represented by a line connecting a pair of classes. Each of the classes participating in the association takes on a role (role), depicted with a circle at the end of the relationship.

Think of roles as “special” attributes: when a role is selected in the diagram, the class to which that role belongs is also highlighted. This class is called the parent for that role (in some cases it is also called the source class), while the class that role represents is called the target.
In the case shown in the figure, clicking on the left role highlights the parent Employee (an employee, in addition to his attributes, is characterized by a set of projects he works on), while Project is the target class pointed to by the role.
3. Cardinality, identifiers and navigability of roles #
The symbol within a role represents its cardinality, that is, how many objects of that class can be associated with an object of the class to which that role refers. By default, associations are created as many-to-many: the asterisk * (any) on the role of class A indicates that any object A can be associated with any number of objects of class B. In our case, an employee can work on any number (even zero) of projects.
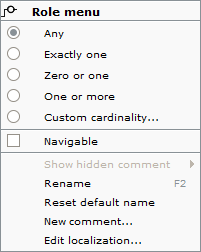
We can change the cardinality of a role from the Role menu, which can be accessed by right-clicking on it; by combining the cardinality of the two roles we can define one-to-many, one-to-one, or custom cardinality associations. For now, do not change the cardinality of this association.
Each role, analogous to classes and attributes, has its own identifier:
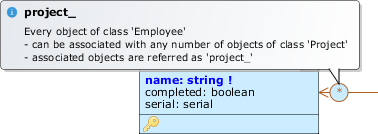
You can examine the identifier from the tooltip that appears by hovering the mouse over the role. In this case, the circle on the side of Project represents the \project\ role of Employee within the association with Project, i.e. _Employee.project_. The tooltip also describes the cardinality rules of that role discursively, as in the figure.
To encourage pluralization, we rename the roles: right-click on the _project__ role and select Rename from the Role menu; type projects and press Enter to confirm; repeat the process for the _Employee_ role and rename it to employees. The identifiers we chose reflect the cardinality of the association: one employee works on multiple projects, and one project has multiple employees.
At the ends of the association there are two arrows. These indicate the navigability of the association; in this case the association is visible from both classes and is therefore bidirectional, i.e. it is possible from an employee to go back to the projects he works on, and vice versa. From the Role menu we can check Navigable to remove visibility from either class and make the association unidirectional. For now, leave the association between Employee and Project as is.
4. Use associations to extract new classes #
Looking at the Employee class, we can easily see that there are two problems:
- Each employee can fill one plus one position among those we have allowed in the list of allowed values. What happens if we want to add new positions? What happens if we want to permit more than one position?
- The team attribute often has a repeated value, but this must be entered manually each time. How do we prevent entering incorrect team names without declaring a priori which teams are eligible by restricting the domain?
Problems arise from the fact that in reality information such as position and team are not part of the employee concept. So in this case domain restrictions are not the right way, because we would have to modify the model every time a user wants to add a new position or team from the application.
Let’s take advantage of relationships to solve both problems and add two new classes to “encapsulate” the information about these attributes:
- First, delete the position and team attributes from Employee. Note how deleting the position and team attributes will result in removing the corresponding columns from the database and the values stored in them. At the end of modeling we will need to resolve this medium-sized issue.
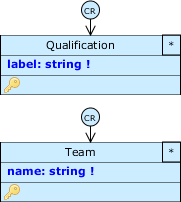
- Create the
QualificationandTeamclasses and add the attributelabel: stringfor Qualification andname: stringfor Team. - Set both attributes as object titles for their respective classes, check them off as mandatory and also impose a uniqueness constraint on each (we don’t want two objects representing the same qualification or two teams with identical names).
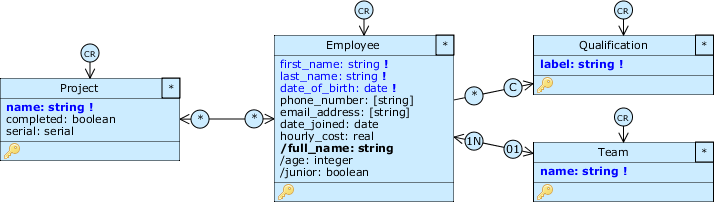
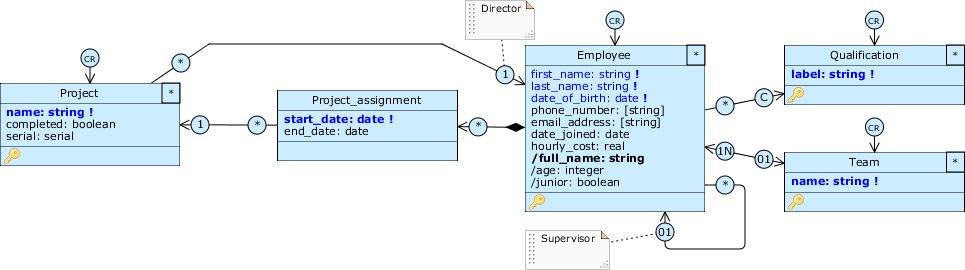
We associate Qualification with Employee so that an employee has at most three qualifications and one qualification can be shared by any number of employees. We also want it to be possible to trace back from an employee to his or her qualification, but not vice versa. Therefore, we create a unidirectional association:
 click on icon
 Create a new unidirectional association, click first on Employee and then on Qualification. This time the order is important, because it determines the direction of the association;- open the Role menu for the Qualifications role and select
Custom Cardinality: from the Cardinality Editor set0for MIN and3for MAX. The role will have the letterCto indicate the custom cardinality; - Finally, rename this role to
qualificationsand that of Employee toemployees.
We associate Team with Employee so that a team has at least one employee and an employee belongs to at most one team, this time allowing navigability in both directions (from a team you can trace its members):
- create a bidirectional association between the two classes and choose the cardinalities
One or more (1N)for the role of Employee andZero or one (01)for that of Team; - rename the roles to
membersandteamrespectively (with a cardinality of one it makes sense to use a singular identifier).
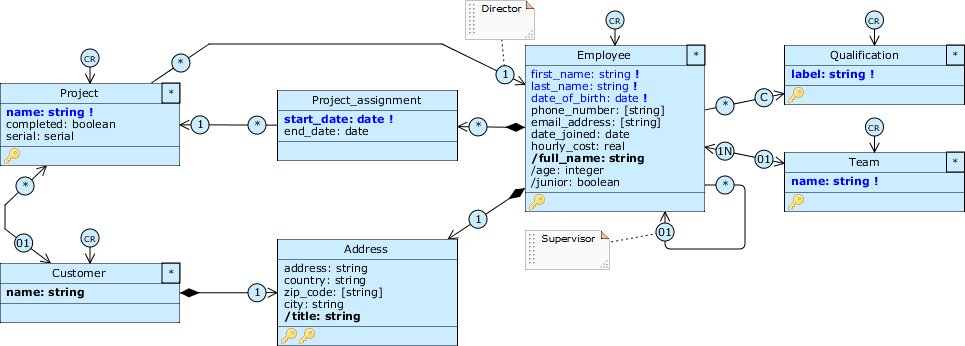
After these changes, the model appears as in the picture:
5. Add a reflexive association #
Let’s assume there is a hierarchy among employees, whereby some must supervise the work of others. To represent this hierarchy we could create “special” titles ’ technical manager, CEO, chief designer ’ that could be held by a limited number of employees; however, in this way we would establish an implicit hierarchy based on the level of importance of these positions.
In our case, also considering the presence of multiple teams, it would be more convenient for us to be able to directly say ‘who is the supervisor of whom’, putting the employees in relation to each other. Such a relationship is called reflexive, since it binds objects that belong to the same class.
To add a reflexive association, select as usual the icon but then click twice on Employee. A ring will automatically appear at the bottom right with two roles on the same class, called employee_Source and employee_Target by default; rename the latter to supervisor and change the cardinality to Zero or one (01). If you haven’t already, make the association one-way from Source to Target.
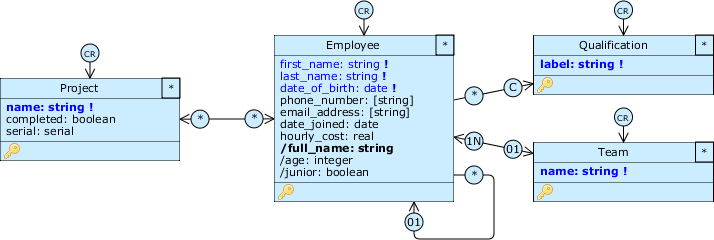
In this way, we have established that an employee can optionally designate one of their direct supervisors. Each employee can be referred to as a supervisor by more than one person; we can trace an employee back to his or her supervisor, but not vice versa.
Improve diagram readability #
Often a model is opened and modified by more than one person, and the meaning of some of its elements may be unclear to those who have not modeled them. To provide additional information, we can annotate the diagram with comments.
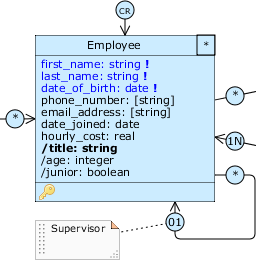
![]() Let’s add a comment to the Employee.supervisor role: select the Palette icon
Let’s add a comment to the Employee.supervisor role: select the Palette icon Create a new comment and click on the diagram; in the post-it that appears, type “Supervisor” and click elsewhere to confirm.
![]() Click on the newly created comment and then on the Employee.supervisor role to link to it. Now you can move the comment by dragging it by the handle on the left, resize it with the handle in the bottom right corner, and bend the link as desired.
Click on the newly created comment and then on the Employee.supervisor role to link to it. Now you can move the comment by dragging it by the handle on the left, resize it with the handle in the bottom right corner, and bend the link as desired.
Compositions #
So far, working with associations, we have related our classes by giving each pair equal importance. A composition, on the other hand, is a relationship in which one class belongs to or is part of the other.
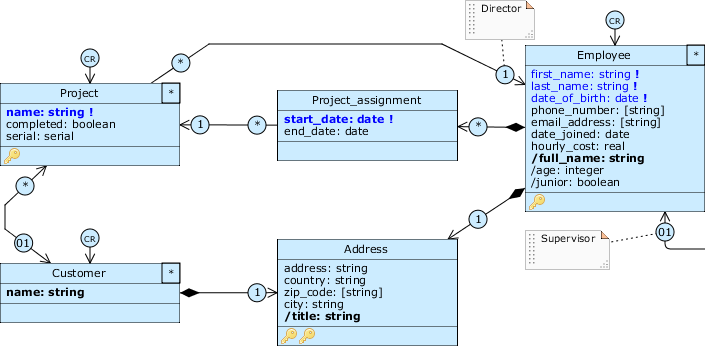
Let’s add more elements to the model and suppose we want to sophisticate the relationship that exists between an employee and the projects on which he collaborates, storing the start and end date of the assignment. We suppose that an employee may over time have multiple assignments related to the same project; to reify this information we need to introduce a new class intermediate between Employee and Project:
First, let’s get rid of the bidirectional association we initially created: right-click on it and select Delete from the Association menu.
After that, create a Project_assignment class to reify the association between Employee and Project; add two attributes start_date: date and end_date: date and make the first one mandatory (there can be assignments that don’t have an end date yet, but they must always have a start date). For now, make start_date object title.
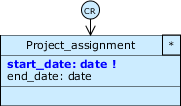
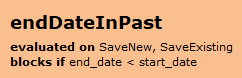
We impose a Class warning from the Application Schema on the new class to prevent users from entering an end date earlier than the start date: create a warning on Project_assignment called endDateInPast with expression end_date < start_date that is calculated during a SaveNew and a SaveExisting; type the message End date must be after the start date. and make the warning blocking.
1. Add a composition #
Now we need to relate Project_assignment to Employee and Project, presumably via a pair of associations; however, let’s reason about this question: how strong is the dependency that one class has on the other? While Project and Employee are distinct concepts (they can be handled independently), an assignment only makes sense to exist if there is an employee to perform it. In cases like this, it is more correct to use a composition.
![]() Switch to the Database Schema and click on the Palette icon
Switch to the Database Schema and click on the Palette icon Create a new composition, then click first on Employee and then on Project_assignment.
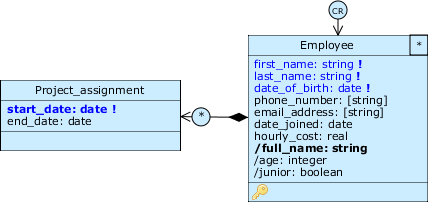
As you can see in the figure, this type of relationship has a special role and is navigable in only one direction. The rumble at Employee indicates that this relation is a composition from Employee to Project_assignment. In a composition, the target of this role is called the part class (the part), while the parent is called the whole class (the whole). Rename the part role to assignments and leave the default cardinality at many (*) (an employee can have multiple assignments).
Notice how both the default class role and the class cardinality have disappeared from Project_assignment; by adding composition, in fact, we have established a dependency that an assignment cannot exist without an employee to do it; therefore, it will not be possible to create project_assignment objects without first creating an employee object.
The next step is to relate Project_assignment and Project:
- in this case create a simple one-way association aimed from the first to the second class. Rename the role of the first one to
assignments; - set the cardinality of the role of the second one to
Exactly one (1): each assignment must always refer to a project, and a project can be referred to by several assignments.
The three classes appear as in the figure:
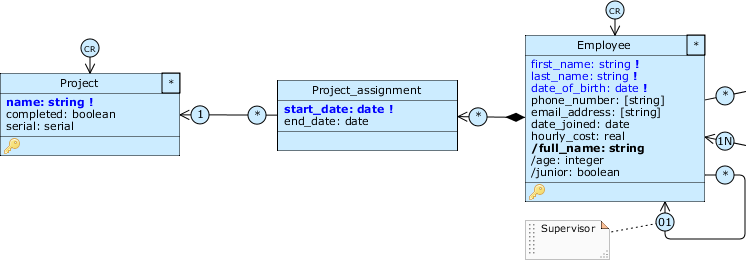
Project_assignment reifies the association from Employee to Project by adding information such as the start and end dates of the assignment. Of course, in doing so, we have removed, from the Project class, the ability to trace employees who participate in projects.
Let’s now suppose that one of these employees holds the special position of director for a specific project, and that we need to be able to trace his information with a “direct” reference that does not go through Project_assignment. To do this we need to introduce a new, more specific association between Project and Employee:
- creates another unidirectional association directed from Project to Employee;
- sets to
Exactly one (1)the cardinality of the Employee role: a project has only one manager, an employee can manage several projects; - rename the roles to
projectsanddirectorrespectively.
Once completed the modifications, the diagram appears as in figure:
2. Compositions and forms of reuse #
A common strategy in modeling is the reuse of elements. First, let’s assume that a design may have been requested by a client outside the company:
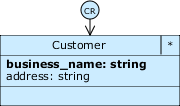
Create a Customer class with two attributes: the object title name: string to indicate the business name of the customer or organization, and address: string, which will contain a generic address.
Link Project to Customer with a bidirectional association, rename the roles to projects and customer respectively, and set the cardinality of the latter to Zero or one (01). This way we allow to record projects without a client, such as in-house projects.

Now suppose we want to store an address for our employees as well. One solution would be to add another address attribute for Employee. However, there are several problems with this approach:
- What if we want the two attributes to have a common structure?
- What if we repeat the reasoning by considering a set of attributes, instead of just one (e.g., using multiple address-related attributes to also store information such as city or country)?
- What if in the future we want to represent multiple addresses for an employee (e.g., work address and home address)?
Clearly such an approach cannot scale. A more flexible solution is to encapsulate the information in a single class, to be linked to Employee and Customer with a pair of one-to-one compositions (and solve the three problems above):
- create a new class
Address, drag the address attribute of Customer and drop it on the new class by clickingMove here; - add the attributes
zip_code: string,city: stringandcountry: stringto store zip code, city and country;
- then impose a restriction on the domain of zip_code to be a sequence of letters and numbers exactly five characters long: use the regular expression ^[A-Za-z0-9]+$,and set both Min length and Max length to
5);
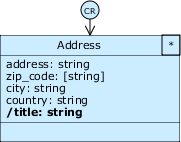
- creates an object title composed of the concatenation of the values of all four attributes (do you remember how to do this?);
- connects Customer and Employee to Address with two compositions, renaming the role for both to
addressand setting the cardinality toExactly one (1). In this way we reused common attributes by enclosing them in a part class shared by multiple whole classes.
3. Multiple compositions and uniqueness constraints #
The “exactly to one” cardinality is very stringent, and requires that an address must always correspond to each employee or principal. This does not mean that employee and customer must share the same address; in fact, we can never have an address object that is part of both an employee and a customer! When we create one of the two whole objects, an address part for that one object is automatically created as well.
However, there is nothing to prevent us from storing an address with all fields empty, or creating two addresses with all fields identical. Let’s try to prevent the second case from happening and create a uniqueness constraint on all four attributes: select them and click Make unique.
A new Unique constraint options for parts selector appears on the screen: in case of multiple compositions like this, the Designer allows us to define a specific uniqueness constraint, based on the “origin” of the part object. This way, we can avoid the side effect whereby the information of one class would conflict with that of another.
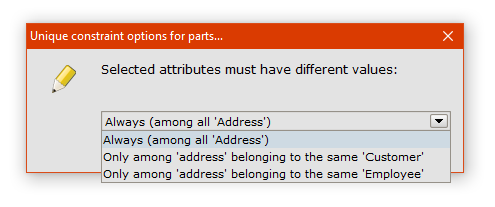
Select the option Only among 'address' belonging to the same 'Customer'; after that, repeat the same procedure selecting instead Only among 'address' belonging to the same 'Employee'; two keys appear in the footer of Address; clicking on one of them is highlighted ’ in addition to the attributes involved ’ also the whole class symbol for which that constraint is valid.
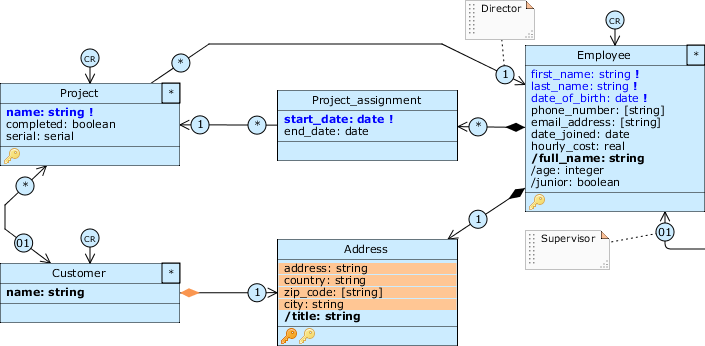
The final diagram should look like the picture:
Manage the model update #
Solve alignment problems #
In this lesson, we made a lot of changes to the initial model. In all likelihood, we introduced alignment issues with our Cloudlet database. You can realize this by saving the model: the Designer immediately alerts us to the presence of high-severity compatibility issues.
Observe the Employee class: the source of the problem is highlighted in red. Since our database previously contained employee objects, adding the composition with minimum cardinality one has invalidated all the objects currently present; none of them in fact respect the constraint that they must be associated to an address object, since the relation has been introduced after their creation!

From the Designer you can click on the Palette to read the issue, which confirms our point. Livebase is not able to fix this issue, but we can do it by moving in two ways: empty the database (a database with no records does not violate any constraint), or release the constraint (if we allow minimum cardinality zero the data currently present does not violate any constraint).
We decide for the second option: change the cardinality of the role Employee.address to Zero or one and save the model again. As you can see, this change solved the problem and the whole role of Employee is back to black as before.
Close the Designer and access the Database panel of Workforce to see the other issues: deleting position and team generated two medium severity issues resulting in loss of stored values. We intentionally introduced this change by moving the information into the new classes, so for now we are forced to accept it.
This scenario confirms what we said earlier about working with real data: before transferring a lot of data to an application under construction, it’s good practice to work with test data for a while, so you can test the operation, notice any errors or discrepancies with the initial requirements, and finally correct the model easily (without risking complex mismatches).
Click on Resolve all issues and let the platform resolve the above two issues along with all the low severity issues that will involve adding new tables, columns, and relationships to the database.
Update the archived version #
As usual, update the archived version of TutorialEngine by dragging the engine from the Cloudlet and dropping it into the Engine library; add the comment you want for this version and confirm the save.
When you archive a version, the previous versions of the engine are not overwritten; rather, they are all searchable and available from the version archive. To open it, right-click on the TutorialEngine in the library and select Versions.... You should have four archived versions: 1.0, 2.0, 3.0 e 4.0. Selecting a version from the list, we can use the buttons at the bottom of the panel to view the model in the Designer (Open), download it as an .xml file (Download), delete the version from the list (Discard) or view its details (View details).
These options are analogous to common version control technologies like Git and allow us to treat Livebase models as source code, being able to view and edit a particular version or restore it in a Cloudlet.
Update and check the application #
Close the TutorialEngine version panel, start Workforce and access the homepage as soon as Livebase has finished regenerating the application.
Notice how new services and data structures appeared in the Application view, and for the classes Project_assignment and Address only the read services are present, as they are part classes. Notice also as output data structures have a field for each association that allows to retrieve the associable objects for a specific role.
Try to create a new Employees object, notice the changes in the input structure EmployeeCreate and verify that the cardinality we’ve imposed for the relationships works properly; for example, associating more than three Qualifications will return an issue of type ROLE_CARDINALITY.
Take a few minutes to freely explore the application and see how all the aspects we’ve talked about so far have actually been translated into working code, including services, navigability, and constraints on relationship cardinality.
Conclusion #
This lesson concludes the second part of the Tutorial: we have taken a huge step forward in the discovery of Livebase, dealing with the key aspect of relationships between classes. Concepts such as roles and cardinality are of considerable importance and open the door to learning advanced modeling topics.
Click on the button to download the model we made in this lesson:
In the next lesson… #
We will enrich the relationships we have defined in the model, making them more specific and in line with the requirements;
we’ll also add additional classes and relationships to complete the database model: Modeling queries and filters.